Lenovo ThinkPad T550 (English) System Update 3.14 Deployment Guide - Page 35
Administrative (ADM) template files, Adding Administrative Templates ADM file, servername.com
 |
View all Lenovo ThinkPad T550 manuals
Add to My Manuals
Save this manual to your list of manuals |
Page 35 highlights
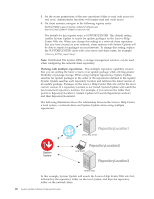
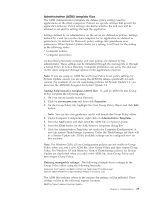
Administrative (ADM) template files The ADM (Administrative) template file defines policy settings used by applications on the client computers. Policies are specific settings that govern the application behavior. Policy settings also define whether the end user will be allowed to set specific settings through the application. Settings defined by an administrator on the server are defined as policies. Settings defined by a end user on the client computer for an application are defined as preferences. As defined by Microsoft, policy settings take precedence over preferences. When System Update checks for a setting, it will look for the setting in the following order: v Computer policies v Computer preferences As described previously, computer and user policies are defined by the administrator. These settings can be initialized through the start.reg file or through a Group Policy in Active Directory. Computer preferences are set by the end user on the client computer through options in the applications interface. Note: If you are using an ADM file and Group Policy to set policy settings for System Update, ensure you are using the ADM file release specifically for each version. For example, if you are customizing policies for System Update 3.2, you must use the ADM file designed for System Update 3.2. Adding Administrative Templates (ADM file): To add an ADM file into Group Policy, complete the following steps: 1. On your server, launch Active Directory. 2. Click on servername.com and then click Properties. 3. On the Group Policy tab, highlight the New Group Policy Object and click Edit button. Note: You can also run gpedit.msc and it will launch the Group Policy editor. 4. Under Computer Configuration, right click on Administrative Templates. 5. Press the Add button and then select the ADM file for System Update. 6. Press the Close button on the Add/Remove Templates dialog box. 7. Click the Administrative Templates tab under the Computer Configuration. A new tab named ThinkVantage is present. Under the ThinkVantage tab there will be a System Update tab. All the available settings can be configured now for this machine. Note: For Windows 2000, if User Configuration policies are not visible in Group Policy when you add a new ADM file, close Group Policy and then reopen Group Policy. For Windows XP and Windows Vista, if ThinkVantage policies for System Update are duplicated when you add a new ADM file, close Group Policy and then reopen Group Policy. Defining manageable settings: The following example shows settings in the Group Policy editor using the following hierarchy: Computer Configuration>Administrative Templates>ThinkVantage> System Update>UserSettings>General>RepositoryLocation1 The ADM files indicate where in the registry the settings will be reflected. These settings will be in the following registry locations: HKLM\Software\Lenovo\System Update Chapter 3. Configurations 29
-
 1
1 -
2
-
3
-
4
-
5
-
6
-
7
-
8
-
9
-
10
-
11
-
12
-
13
-
14
-
15
-
16
-
17
-
18
-
19
-
20
-
21
-
22
-
23
-
24
-
25
-
26
-
27
-
28
-
29
-
 30
30 -
 31
31 -
 32
32 -
 33
33 -
 34
34 -
 35
35 -
 36
36 -
 37
37 -
 38
38 -
 39
39 -
 40
40 -
41
-
42
-
43
-
44
-
45
-
46
-
47
-
48
-
49
-
50
-
51
-
52
-
53
-
54
-
55
-
56
-
57
-
58
-
59
-
60
-
61
-
62
-
63
-
64
-
65
-
66
-
67
-
68
-
69
-
70
-
71
-
72
-
73
-
74
-
75
-
76
-
77
-
78
-
79
-
80
-
81
-
82
-
83
-
84
-
85
-
86
-
87
-
88
-
89
-
90
-
91
-
92
 |
 |
