Lenovo USB WebCam User Guide - Page 8
Software, installation, Hardware, Using, Lenovo, Webcam - driver xp
 |
UPC - 683728145224
View all Lenovo USB WebCam manuals
Add to My Manuals
Save this manual to your list of manuals |
Page 8 highlights
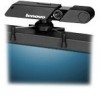
Software installation To install the Lenovo USB VOIP Webcam software for Windows 2000 Professional or Windows XP, complete the following steps: 1. Insert the CD for the Lenovo USB VOIP Webcam that comes with your option. After inserting the CD, the User's Guide Software window opens. 2. On the left side of the window, click Software. 3. Click Install Device Drivers. The Lenovo USB VOIP Webcam Installer Window opens. 4. Read the content in the Installer window carefully. Follow the steps in each window and click Next. 5. Click Finish. 6. Save and close all open documents and restart your computer to complete the installation. Note: When restart is complete, the webcam system tray icon and quick start link displays on your computer. Hardware installation The non-skid platform on the Lenovo USB VOIP Webcam can be rotated to accommodate LCD, flat-panel, or computer monitors. To correctly mount your webcam, complete the following steps: 1. Carefully pull the mounting brackets together. 2. Rest the webcam on the upper ledge of your monitor and slowly allow the mounting brackets to return to their normal position until it is secured to the monitor. 3. Plug the webcam into a USB port on your computer. 4. Slide the lens cap open. Your camera is ready for use. Using the Lenovo USB VOIP Webcam To operate your webcam, complete the following steps: 1. Open the webcam capture window. 2. Click the system tray icon or the quick start link. The capture window opens. 3. To capture video, click Capture , and then click Start Capture. 4. To capture a still image, click StiCap, and then click GetImage. 5. To open the face tracking function, click Options, and then click Video Capture Filter. A dialog window opens. 2 Lenovo USB VOIP Webcam User's Guide
-
 1
1 -
2
-
 3
3 -
 4
4 -
 5
5 -
 6
6 -
 7
7 -
 8
8 -
 9
9 -
 10
10 -
 11
11 -
 12
12 -
 13
13 -
14
-
15
-
16
-
17
-
18
-
19
-
20
-
21
-
22
-
23
-
24
-
25
-
26
-
27
-
28
-
29
-
30
-
31
-
32
-
33
-
34
-
35
-
36
-
37
-
38
 |
 |
