Lenovo V100 (English) Service and Troubleshooting Guide - Page 36
computer, Attention
 |
View all Lenovo V100 manuals
Add to My Manuals
Save this manual to your list of manuals |
Page 36 highlights
Replacing memory 2. Turn off the computer; then disconnect the ac adapter and all cables from the computer. 3. Close the computer display, and turn the computer over. 4. Remove the battery. 5. Unfasten the two screws 1 on the cover of the memory slot, and remove the cover 2 . 2 1 1 6. If the SO-DIMM is already installed in the memory slot, remove it to make room for the new one by pressing out on the latches on both edges of the socket at the same time. Be sure to save it for future use. 7. Find the notch on the contact edge side of the SO-DIMM. Attention: To avoid damaging the SO-DIMM, do not touch its contact edge. 28 Lenovo 3000 V100 Service and Troubleshooting Guide
-
 1
1 -
2
-
3
-
4
-
5
-
6
-
7
-
8
-
9
-
10
-
11
-
12
-
13
-
14
-
15
-
16
-
17
-
18
-
19
-
20
-
21
-
22
-
23
-
24
-
25
-
26
-
27
-
28
-
29
-
30
-
 31
31 -
 32
32 -
 33
33 -
 34
34 -
 35
35 -
 36
36 -
 37
37 -
 38
38 -
 39
39 -
 40
40 -
 41
41 -
42
-
43
-
44
-
45
-
46
-
47
-
48
-
49
-
50
-
51
-
52
-
53
-
54
-
55
-
56
-
57
-
58
-
59
-
60
-
61
-
62
-
63
-
64
-
65
-
66
 |
 |
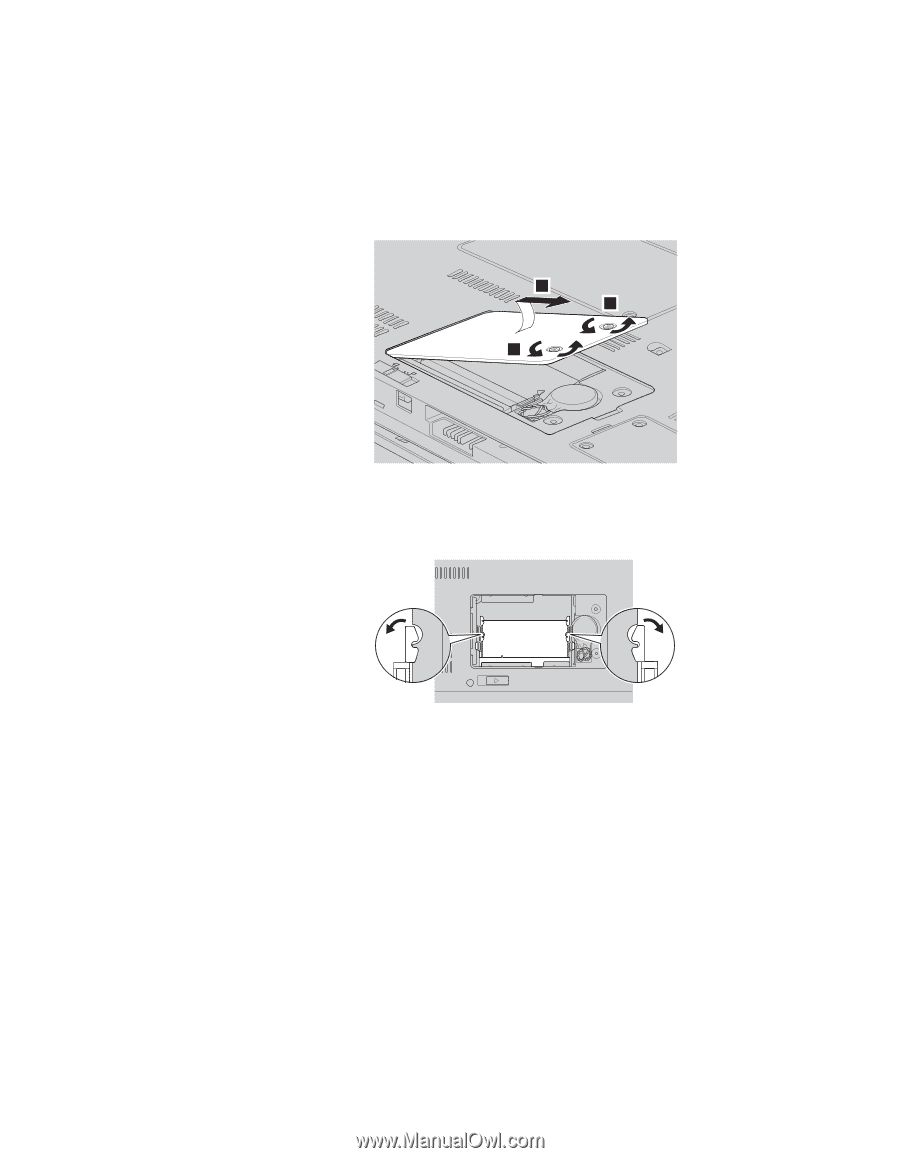
2.
Turn
off
the
computer
;
then
disconnect
the
ac
adapter
and
all
cables
from
the
computer.
3.
Close
the
computer
display,
and
turn
the
computer
over.
4.
Remove
the
battery.
5.
Unfasten
the
two
screws
±1²
on
the
cover
of
the
memory
slot,
and
remove
the
cover
±2²
.
2
1
1
6.
If
the
SO-DIMM
is
already
installed
in
the
memory
slot,
remove
it
to
make
room
for
the
new
one
by
pressing
out
on
the
latches
on
both
edges
of
the
socket
at
the
same
time.
Be
sure
to
save
it
for
future
use.
7.
Find
the
notch
on
the
contact
edge
side
of
the
SO-DIMM.
Attention:
To
avoid
damaging
the
SO-DIMM,
do
not
touch
its
contact
edge.
Replacing
memory
28
Lenovo
3000
V100
Service
and
Troubleshooting
Guide