LevelOne KVM-0461 Quick Install Guide - Page 3
English
 |
View all LevelOne KVM-0461 manuals
Add to My Manuals
Save this manual to your list of manuals |
Page 3 highlights
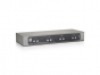
English Hardware Review Front View 1. PC Selection Pushbutton 2. Audio Selection Pushbutton 3. PC LED 4. Audio LED Rear View 5. Console Port 6. CPU Port Section 7. Power Jack 8. USB 2.0 Peripheral Port Hardware Installation 1. Plug your USB keyboard and USB mouse into their corresponding USB ports located on the KVM's rear panel. 2. Plug your DVI monitor, microphone, and speaker cables into the Console ports located on the unit's rear panel. 3. Using the included cables, plug the DVI, USB, and Audio connectors into one of the CPU ports on the KVM. 4. Plug the other end of the KVM cable to the respective ports on the computer that is part of your installation. 5. Plug the USB peripherals that you want to be part of your KVM setup into the rear USB hub ports. 6. Repeat steps 3 and 4 for any other computers you are connecting. 7. Plug the power adapter cable into the switch's power jack, then plug the power adapter into an AC power source. 8. Power on the computers. Please safely remove USB device by clicking on the Safely Remove Hardware icon at the notification area before switching to another port. Switching ports when USB device is in use (read/write) might damage USB device. Operation Manual Switching 1. Press and release a port selection pushbutton to bring the KVM focus to the computer attached to its corresponding port. The USB port focus changes with the PC port that they are on. 2. Press and release an audio selection pushbutton to bring microphone/speaker focus to the computer attached to its corresponding port.
-
 1
1 -
 2
2 -
 3
3 -
 4
4 -
 5
5 -
 6
6 -
 7
7 -
 8
8 -
 9
9 -
10
-
11
-
12
-
13
-
14
-
15
-
16
-
17
-
18
-
19
-
20
-
21
-
22
-
23
-
24
-
25
-
26
-
27
-
28
-
29
-
30
-
31
-
32
 |
 |
