Lexmark 1100 User's Guide
Lexmark 1100 - W 840 B/W Laser Printer Manual
 |
UPC - 734646553759
View all Lexmark 1100 manuals
Add to My Manuals
Save this manual to your list of manuals |
Lexmark 1100 manual content summary:
- Lexmark 1100 | User's Guide - Page 1
X1100 Series All-In-One User's Guide • Learning about the All-In-One • Understanding the software • Using the All-In-One • Maintenance • Troubleshooting www.lexmark.com - Lexmark 1100 | User's Guide - Page 2
and Eire, send to Lexmark International Ltd., Marketing and Services Department, Westhorpe House, Westhorpe, Marlow Bucks SL7 3RQ. Lexmark may use or distribute any This software and any accompanying documentation provided under this agreement are commercial computer software and documentation - Lexmark 1100 | User's Guide - Page 3
the software 3 Using the Lexmark All-In-One Center 3 Using Print Properties 6 Using the Lexmark Solution Center 8 Using the Lexmark Photo Editor 9 Using the All-In-One 10 Printing 10 Scanning 13 Copying 14 Faxing 16 Maintenance 17 Replacing the print cartridges 17 Troubleshooting 19 - Lexmark 1100 | User's Guide - Page 4
Removing and reinstalling the software 26 Other help sources 26 Thank you for purchasing a Lexmark X1100 Series All-In-One! Congratulations on your purchase. The Lexmark™ X1100 Series All-In-One combines the functionality of an inkjet printer, a scanner, a copier, and a fax machine all into a - Lexmark 1100 | User's Guide - Page 5
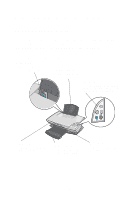
the Setup Sheet to complete the hardware and software installation. If problems occur during the setup process, see "Setup troubleshooting" on page 20. Understanding the parts of the All-In-One Paper guide Slide next to paper to ensure proper feeding. Paper support Lift to load paper into the All - Lexmark 1100 | User's Guide - Page 6
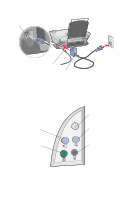
USB cable connector 2 1 USB cable Power supply Silver, metal contacts are on the left side of the power supply. Using the control panel The All-In-One has a control panel that lets you scan and copy with the press of a button. Paper Feed button Press to feed paper through the All-In-One. Color - Lexmark 1100 | User's Guide - Page 7
• Print Properties (printing) • The Lexmark X1100 Series Solution Center (troubleshooting, maintenance, and cartridge ordering information) • The Lexmark Photo Editor (editing graphics) Using the Lexmark All-In-One Center Use the Lexmark X1100 Series All-In-One Center software to scan, copy, and fax - Lexmark 1100 | User's Guide - Page 8
to view all settings. Choose from a variety of creative ideas. • Enlarge or reduce an image. • Repeat an image several times on one page. • Print an image as a multi-page poster. • E-mail an image to a friend. • Fax using your computer's modem. • Save an image on my computer. • Edit text found in - Lexmark 1100 | User's Guide - Page 9
• Troubleshoot All-In-One problems • Device status and ink levels • More printing ideas and how to's • Contact information • Advanced (skin, voice, and communication options) • View the software version and copyright information For more information about the Lexmark Solution Center, see page - Lexmark 1100 | User's Guide - Page 10
Using Print Properties Print Properties is the software that controls the All-In-One printing function. You can change the settings in Print Properties based on the type of project you want to - Lexmark 1100 | User's Guide - Page 11
paper you are using. Orientation - Select how you want the document oriented on the printed page: portrait or landscape. Layout - Select the layout you want to print. Duplexing - Select links to different parts of the Lexmark Solution Center (see page 8), as well as software version information. 7 - Lexmark 1100 | User's Guide - Page 12
-In-One problems. Maintenance • Install a new print cartridge. Note: Wait until scanning is complete before installing new cartridges. • View shopping options for new cartridges. • Print a test page. • Clean to fix horizontal streaks. • Align to fix blurry edges. • Troubleshoot other ink problems - Lexmark 1100 | User's Guide - Page 13
located in the lower right corner of the screen. Using the Lexmark Photo Editor Use the Lexmark Photo Editor software to edit graphics. To open the Lexmark Photo Editor, click Start Programs Lexmark X1100 Series Lexmark Photo Editor. The Lexmark Photo Editor displays. Use the touch-up tools to edit - Lexmark 1100 | User's Guide - Page 14
right side of the paper support with the print side facing you. Make sure you select the paper size for your document. For help, see page 12. Load up to: remove each transparency or photo as it exits and allow to dry to avoid ink smearing. • 10 envelopes Note: Do not load envelopes with: • Holes, - Lexmark 1100 | User's Guide - Page 15
2 Squeeze and slide the paper guide to the left edge of the paper. 3 Make sure the All-In the printing task you want to perform is on the I Want To menu, click it, and then follow the instructions on the computer screen; otherwise, click Close at the bottom of the menu. 7 From the Quality/Copies tab - Lexmark 1100 | User's Guide - Page 16
8 From the Paper Setup tab, select the paper type, paper size, and orientation. To see details about a setting, right-click a setting on the screen, and then select the What's This? item. Paper type setting Paper size setting Orientation setting 9 From the Print Layout tab, select the layout and - Lexmark 1100 | User's Guide - Page 17
the arrow. 3 Close the top cover. 4 Open the Lexmark All-In-One Center (see page 3). The All-In-One Main Page displays. 5 Click the Preview Now button located in the upper right corner of the All-In-One Main Page. An image of the scanned item displays in the preview section. - Lexmark 1100 | User's Guide - Page 18
scan the item on the scanner bed. Scan settings Adjust the software program, click Scan Now to complete the scan. If you are using the Creative Tasks section, follow the instructions on the computer screen. For a list of the Creative Tasks available from the All-In-One Main Page, see page - Lexmark 1100 | User's Guide - Page 19
the upper left corner of the front of the item aligns with the arrow. 3 Close the top cover. 4 Open the Lexmark All-In-One Center (see page 3). The All-In-One Main Page displays. 5 Click See More Copy Settings to review and change the copy settings. The All-In-One Copy section expands - Lexmark 1100 | User's Guide - Page 20
glass. Make sure the upper left corner of the front of the item aligns with the arrow. 3 Close the top cover. 4 Open the Lexmark All-In-One Center (see page 3). 5 From the Creative Tasks section of the All-In-One Main Page, click Fax an image. 6 Follow the instructions on the computer screen. 16 - Lexmark 1100 | User's Guide - Page 21
or with both a color cartridge and a black cartridge. For information about ordering supplies, see page 8. Before you install new or replacement print cartridges, remove the used cartridges. 1 Make sure the All-In-One is on. 2 Lift the scanner unit until the scanner support keeps it open. The print - Lexmark 1100 | User's Guide - Page 22
the lid closed. If you are installing a black print cartridge, make sure that it is secure in the right carrier, and then snap the lid closed. 7 Lift the scanner unit and push the scanner support back while lowering the scanner unit until it is completely closed. Lexmark's All-In-One warranty does - Lexmark 1100 | User's Guide - Page 23
? Is the black print cartridge secure in the right carrier, if you installed both? Is the paper loaded correctly? Make sure you do not force the paper into the printer. Did you install the printer software correctly? For help, refer to the setup documentation. Is the Lexmark X1100 Series set as the - Lexmark 1100 | User's Guide - Page 24
Problem: Power light does not come on Alignment page does not print When I insert the All-In-One software CD, nothing happens All-In-One is not communicating with the computer Installation page: 20 21 21 21 21 22 22 23 23 23 24 24 24 25 25 Setup troubleshooting Use this section to solve problems - Lexmark 1100 | User's Guide - Page 25
documentation. 3 Restart the computer. If the problem continues, remove and then reinstall the software. For help, see page 26. Installation appears incomplete The software may not be installed properly. Try the following: 1 Right-click the My computer icon. Windows XP users, click Start to access - Lexmark 1100 | User's Guide - Page 26
Lexmark items unless they are present under the Other Devices category. 5 Insert the CD, and install the software again. Do not restart the computer. For help, refer to the setup documentation. Printing troubleshooting paper as it exits. Let the ink dry before handling. 2 Adjust the Quality/Speed setting in - Lexmark 1100 | User's Guide - Page 27
In-One can cause the print cartridge nozzles to become clogged. To clean the cartridge nozzles: 1 Open the Lexmark Solution Center. For help, see page 8. 2 From the Maintenance tab, click Clean to fix horizontal streaks. All-In-One has a paper jam 1 Follow the instructions on the screen for clearing - Lexmark 1100 | User's Guide - Page 28
Scanning, copying, and faxing troubleshooting Scanning was not successful The software may not be installed properly. Follow the instructions for "All-In-One is not communicating with the computer" on page 21. Scanning or using a scanned image with a software program takes a long time or freezes the - Lexmark 1100 | User's Guide - Page 29
on. The computer must be on in order for the All-In-One to work. • Make sure you properly installed the software. For help, refer to the setup documentation. The software must be installed for the copier to work. Fax function does not work • Make sure the computer and the All-In-One are - Lexmark 1100 | User's Guide - Page 30
CD and follow the instructions on the computer screen to install the software. For help, refer to the setup documentation. Other help sources If the preceding solutions do not solve the problem with your All-In-One: • Refer to the Lexmark Solution Center software for more troubleshooting information - Lexmark 1100 | User's Guide - Page 31
Lexmark 3100 Series 4476-K01 has been tested and found to comply with the limits for a Class B digital device, pursuant to Part installation. This equipment generates, uses, and can radiate radio frequency energy and, if not installed and used in accordance with the instructions service - Lexmark 1100 | User's Guide - Page 32
28 - Lexmark 1100 | User's Guide - Page 33
All-In-One Center 3 opening 3 using 3 Lexmark Solution Center 8 Advanced tab 9 Contact Information tab 9 How To tab 8 Maintenance tab 8 opening 8 Printer Status tab 8 Troubleshooting tab 8 loading paper 10 M Maintain/Troubleshoot page 5 Maintenance tab 8 multiple copies 7 O orientation, selecting - Lexmark 1100 | User's Guide - Page 34
20 software reinstalling 26 removing 26 sound, see voice notification Status tab 8 T top cover 1 transparencies 10 troubleshooting copying problems 24 faxing problems 24 scanning problems 24 setup problems 20 troubleshooting checklist 19 Troubleshooting tab 8 V View Saved Images page 5 Open - Lexmark 1100 | User's Guide - Page 35
www.lexmark.com
-
 1
1 -
 2
2 -
 3
3 -
 4
4 -
 5
5 -
 6
6 -
 7
7 -
8
-
9
-
10
-
11
-
12
-
13
-
14
-
15
-
16
-
17
-
18
-
19
-
20
-
21
-
22
-
23
-
24
-
25
-
26
-
27
-
28
-
29
-
30
-
31
-
32
-
33
-
34
-
35
 |
 |

X1100 Series
All-In-One
User’s Guide
•
Learning about the All-In-One
•
Understanding the software
•
Using the All-In-One
• Maintenance
• Troubleshooting
www.lexmark.com