Lexmark 13R0223 User's Guide - Page 54
Using the Paper Handling submenu, Using the Change Printer Default Settings submenu, Setup
 |
UPC - 734646091732
View all Lexmark 13R0223 manuals
Add to My Manuals
Save this manual to your list of manuals |
Page 54 highlights
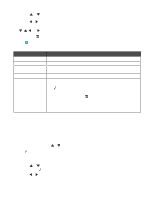
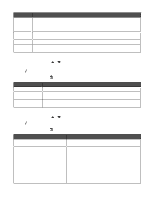
Note: The user default setting remains in effect until you access the menu again, choose another value, and save it. An asterisk (*) appears next to the user default setting. Using the Paper Handling submenu You can select the size and type of paper loaded into the trays from this submenu. It appears with different menu items depending on whether the optional Tray 2 is installed. Notes: • The Paper Handling submenu is available in other menus besides the Setup menu. • Tray 1 is the factory default setting. 1 From the Setup menu, press or repeatedly until Paper Handling is highlighted. 2 Press . 3 After changing values, press to save these values and exit this submenu. Use this To Size1 Specify the size of the paper loaded. Type1 Specify the type of paper loaded. Size - Tray 12 Specify the size of the paper loaded in Tray 1. Type - Tray 12 Specify the type of paper loaded in Tray 1. Size - Tray 22 Specify the size of the paper loaded in Tray 2. Type - Tray 22 Specify the type of paper loaded in Tray 2. Tray Linking2 Set tray linking off or to automatic (on). Copy Source2 Specify the source, Tray 1 or Tray 2, for the job. Photo Source2 Specify the source, Tray 1 or Tray 2, for the job. Print Files Source2 Specify the source, Tray 1 or Tray 2, for the job. Fax Source2 Specify the source, Tray 1, Tray 2, or Auto for the job. Note: Select Auto so the printer uses paper from the tray containing the paper that matches the size of the incoming fax. Specify the correct paper size for both trays. PictBridge Source2 Specify the source, Tray 1 or Tray 2, for the job. Bluetooth Source2 Specify the source, Tray 1 or Tray 2, for the job. 1 Menu item appears only when the optional Tray 2 is not installed. 2 Menu item appears only when the optional Tray 2 is installed. Using the Change Printer Default Settings submenu 1 From the Setup menu, press or repeatedly until Change Printer Default Settings is highlighted. 2 Press . 3 After changing values, press to save the values as default settings and exit this submenu. 54
-
 1
1 -
2
-
3
-
4
-
5
-
6
-
7
-
8
-
9
-
10
-
11
-
12
-
13
-
14
-
15
-
16
-
17
-
18
-
19
-
20
-
21
-
22
-
23
-
24
-
25
-
26
-
27
-
28
-
29
-
30
-
31
-
32
-
33
-
34
-
35
-
36
-
37
-
38
-
39
-
40
-
41
-
42
-
43
-
44
-
45
-
46
-
47
-
48
-
 49
49 -
 50
50 -
 51
51 -
 52
52 -
 53
53 -
 54
54 -
 55
55 -
 56
56 -
 57
57 -
 58
58 -
 59
59 -
60
-
61
-
62
-
63
-
64
-
65
-
66
-
67
-
68
-
69
-
70
-
71
-
72
-
73
-
74
-
75
-
76
-
77
-
78
-
79
-
80
-
81
-
82
-
83
-
84
-
85
-
86
-
87
-
88
-
89
-
90
-
91
-
92
-
93
-
94
-
95
-
96
-
97
-
98
-
99
-
100
-
101
-
102
-
103
-
104
-
105
-
106
-
107
-
108
-
109
-
110
-
111
-
112
-
113
-
114
-
115
-
116
-
117
-
118
-
119
-
120
-
121
-
122
-
123
-
124
-
125
-
126
-
127
-
128
-
129
-
130
-
131
-
132
-
133
-
134
-
135
-
136
-
137
-
138
-
139
-
140
-
141
-
142
-
143
-
144
-
145
-
146
-
147
-
148
-
149
-
150
-
151
-
152
-
153
-
154
-
155
-
156
-
157
-
158
-
159
-
160
-
161
-
162
-
163
-
164
-
165
-
166
-
167
-
168
-
169
-
170
-
171
-
172
-
173
-
174
-
175
-
176
-
177
-
178
-
179
-
180
-
181
-
182
-
183
-
184
-
185
-
186
-
187
-
188
-
189
-
190
-
191
-
192
-
193
-
194
-
195
-
196
-
197
-
198
 |
 |