Lexmark 250dn User's Guide - Page 81
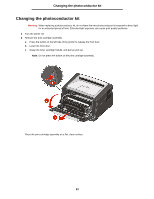
Changing the photoconductor kit - toner cartridge
 |
UPC - 734646013338
View all Lexmark 250dn manuals
Add to My Manuals
Save this manual to your list of manuals |
Page 81 highlights
Changing the toner cartridge 4 Unpack the new toner cartridge. Note: You can use the packing material from the new toner cartridge to ship the old toner cartridge back to Lexmark for recycling. See Changing the photoconductor kit on page82 for more information. 5 Firmly shake the toner cartridge in all directions to distribute the toner. 6 Install the new toner cartridge by aligning the white rollers on the toner cartridge with the white arrows on the tracks of the photoconductor and pushing the toner cartridge in as far as it will go. The toner cartridge clicks into place when correctly installed. 7 Close the front door. 8 Turn the printer back on. 81
-
 1
1 -
2
-
3
-
4
-
5
-
6
-
7
-
8
-
9
-
10
-
11
-
12
-
13
-
14
-
15
-
16
-
17
-
18
-
19
-
20
-
21
-
22
-
23
-
24
-
25
-
26
-
27
-
28
-
29
-
30
-
31
-
32
-
33
-
34
-
35
-
36
-
37
-
38
-
39
-
40
-
41
-
42
-
43
-
44
-
45
-
46
-
47
-
48
-
49
-
50
-
51
-
52
-
53
-
54
-
55
-
56
-
57
-
58
-
59
-
60
-
61
-
62
-
63
-
64
-
65
-
66
-
67
-
68
-
69
-
70
-
71
-
72
-
73
-
74
-
75
-
 76
76 -
 77
77 -
 78
78 -
 79
79 -
 80
80 -
 81
81 -
 82
82 -
 83
83 -
 84
84 -
 85
85 -
 86
86 -
87
-
88
-
89
-
90
-
91
-
92
-
93
-
94
-
95
-
96
-
97
-
98
-
99
-
100
-
101
 |
 |

81
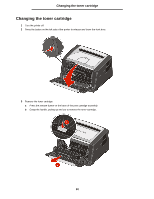
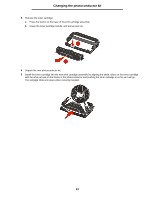
Changing the toner cartridge
4
Unpack the new toner cartridge.
Note:
You can use the packing material from the new toner cartridge to ship the old toner cartridge back to
Lexmark for recycling. See
Changing the photoconductor kit on page82
for more information.
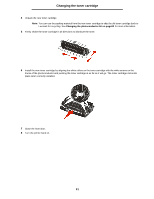
5
Firmly shake the toner cartridge in all directions to distribute the toner.
6
Install the new toner cartridge by aligning the white rollers on the toner cartridge with the white arrows on the
tracks of the photoconductor and pushing the toner cartridge in as far as it will go. The toner cartridge
clicks
into
place when correctly installed.
7
Close the front door.
8
Turn the printer back on.