Lexmark 5470 User's Guide - Page 71
Understanding the PictBridge menu, Menu Item, Action
 |
UPC - 734646010801
View all Lexmark 5470 manuals
Add to My Manuals
Save this manual to your list of manuals |
Page 71 highlights
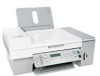
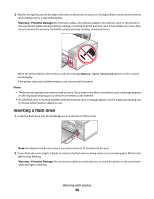
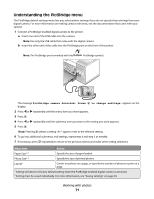
Understanding the PictBridge menu The PictBridge default settings menu lets you select printer settings if you do not specify those settings from your digital camera. For more information on making camera selections, see the documentation that came with your camera. 1 Connect a PictBridge-enabled digital camera to the printer. a Insert one end of the USB cable into the camera. Note: Use only the USB cable that came with the digital camera. b Insert the other end of the cable into the PictBridge port on the front of the printer. Note: The PictBridge port is marked with the PictBridge symbol. The message PictBridge camera detected. Press display. to change settings. appears on the 2 Press or repeatedly until the menu item you want appears. 3 Press . 4 Press or repeatedly until the submenu item you want or the setting you want appears. 5 Press . Note: Pressing selects a setting. An * appears next to the selected setting. 6 To go into additional submenus and settings, repeat step 4 and step 5 as needed. 7 If necessary, press repeatedly to return to the previous menus and make other setting selections. Menu Item Action Paper Size1, 2 Specify the size of paper loaded. Photo Size1, 2 Specify the size of printed photos. Layout1 Center one photo on a page, or specify the number of photos to print on a page. 1 Setting will return to factory default setting when the PictBridge-enabled digital camera is removed. 2 Setting must be saved individually. For more information, see "Saving settings" on page 40. Working with photos 71
-
 1
1 -
2
-
3
-
4
-
5
-
6
-
7
-
8
-
9
-
10
-
11
-
12
-
13
-
14
-
15
-
16
-
17
-
18
-
19
-
20
-
21
-
22
-
23
-
24
-
25
-
26
-
27
-
28
-
29
-
30
-
31
-
32
-
33
-
34
-
35
-
36
-
37
-
38
-
39
-
40
-
41
-
42
-
43
-
44
-
45
-
46
-
47
-
48
-
49
-
50
-
51
-
52
-
53
-
54
-
55
-
56
-
57
-
58
-
59
-
60
-
61
-
62
-
63
-
64
-
65
-
 66
66 -
 67
67 -
 68
68 -
 69
69 -
 70
70 -
 71
71 -
 72
72 -
 73
73 -
 74
74 -
 75
75 -
 76
76 -
77
-
78
-
79
-
80
-
81
-
82
-
83
-
84
-
85
-
86
-
87
-
88
-
89
-
90
-
91
-
92
-
93
-
94
-
95
-
96
-
97
-
98
-
99
-
100
-
101
-
102
-
103
-
104
-
105
-
106
-
107
-
108
-
109
-
110
-
111
-
112
-
113
-
114
-
115
-
116
-
117
-
118
-
119
-
120
-
121
-
122
-
123
-
124
-
125
-
126
-
127
-
128
-
129
-
130
-
131
-
132
-
133
-
134
-
135
-
136
-
137
-
138
-
139
-
140
-
141
-
142
-
143
-
144
-
145
-
146
-
147
-
148
-
149
-
150
-
151
-
152
-
153
-
154
-
155
-
156
-
157
-
158
-
159
-
160
-
161
-
162
-
163
-
164
-
165
-
166
-
167
-
168
-
169
-
170
-
171
-
172
-
173
-
174
-
175
-
176
-
177
-
178
-
179
-
180
-
181
-
182
-
183
-
184
-
185
-
186
-
187
-
188
-
189
-
190
-
191
-
192
-
193
-
194
-
195
-
196
-
197
-
198
-
199
-
200
-
201
-
202
 |
 |