Lexmark 650dtn Help Menu Pages - Page 3
Windows instructions for network attached printers - drivers
 |
UPC - 734646083355
View all Lexmark 650dtn manuals
Add to My Manuals
Save this manual to your list of manuals |
Page 3 highlights
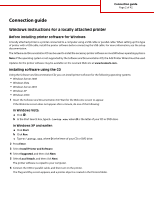
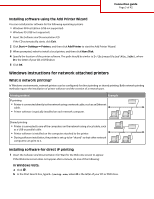
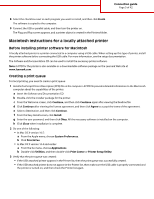
Connection guide Page 3 of 42 Installing software using the Add Printer Wizard You can install printer software for the following operating systems: • Windows 98 First Edition (USB not supported) • Windows 95 (USB not supported) 1 Insert the Software and Documentation CD. If the CD automatically starts, click Exit. 2 Click Start Œ Settings Œ Printers, and then click Add Printer to start the Add Printer Wizard. 3 When prompted, select to install a local printer, and then click Have Disk. 4 Specify the location of the printer software. The path should be similar to D:\Drivers\Print\Win_9xMe\, where D is the letter of your CD or DVD drive. 5 Click OK. Windows instructions for network attached printers What is network printing? In Windows environments, network printers can be configured for direct printing or shared printing. Both network printing methods require the installation of printer software and the creation of a network port. Printing method Example IP printing • Printer is connected directly to the network using a network cable, such as an Ethernet cable. • Printer software is typically installed on each network computer. Shared printing • Printer is connected to one of the computers on the network using a local cable, such as a USB or parallel cable. • Printer software is installed on the computer attached to the printer. • During software installation, the printer is set up to be "shared" so that other network computers can print to it. Installing software for direct IP printing 1 Insert the Software and Documentation CD. Wait for the Welcome screen to appear. If the Welcome screen does not appear after a minute, do one of the following: In Windows Vista: a Click . b In the Start Search box, type D:\setup.exe, where D is the letter of your CD or DVD drive.
-
 1
1 -
 2
2 -
 3
3 -
 4
4 -
 5
5 -
 6
6 -
 7
7 -
 8
8 -
 9
9 -
10
-
11
-
12
-
13
-
14
-
15
-
16
-
17
-
18
-
19
-
20
-
21
-
22
-
23
-
24
-
25
-
26
-
27
-
28
-
29
-
30
-
31
-
32
-
33
-
34
-
35
-
36
-
37
-
38
-
39
-
40
-
41
-
42
 |
 |
