Lexmark C710 Quick Reference Guide - Page 2
Loading Paper and Transparencies, Clearing Printer Paper Jams, Clearing Duplex Unit Paper Jams
 |
UPC - 734646151009
View all Lexmark C710 manuals
Add to My Manuals
Save this manual to your list of manuals |
Page 2 highlights
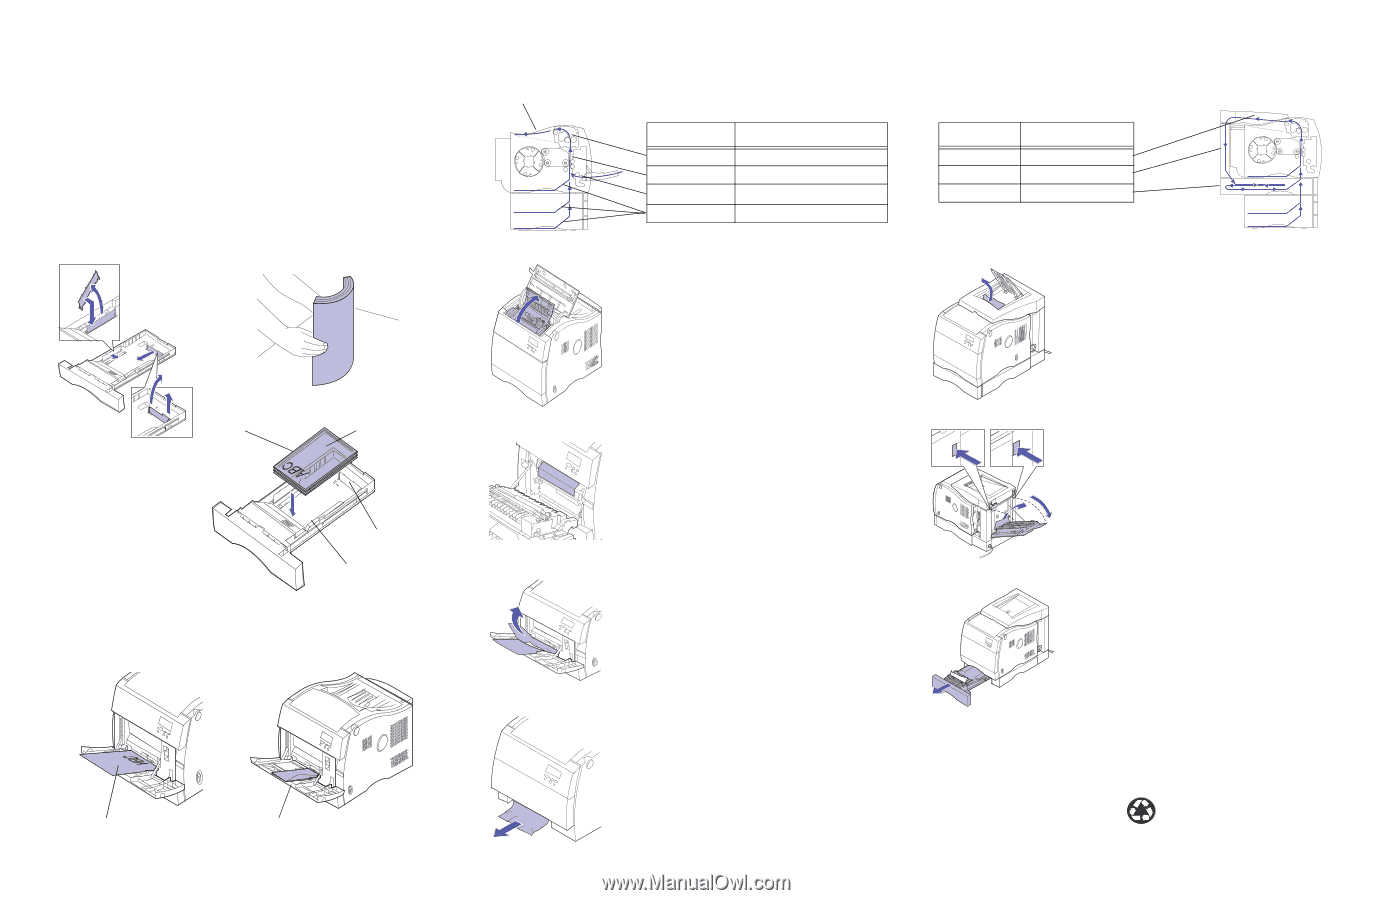
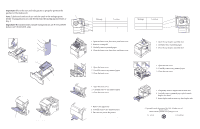
Loading Paper and Transparencies Important! Move the rear and side guides to properly position the guides for the media size. Note: Labels and card stock can only be used in the multipurpose feeder. Transparencies can only be fed from the multipurpose feeder or tray 1. Important! Recommended Lexmark transparencies are P/N 12A5150 (letter) or P/N 12A5151 (A4). Adjust Guides Flex Paper Clearing Printer Paper Jams Printer Paper Path Top output bin Message 202 Paper Jam 201 Paper Jam 250 Paper Jam 24x Paper Jam Location Fuser and output rollers Transfer belt and fuser Multipurpose feeder Paper tray 202 Paper Jam - Fuser and Output Rollers 1 Open the fuser cover, fuser door, and front cover. 2 Remove coating roll. 3 Carefully remove jammed paper. 4 Close the front cover, fuser door, and fuser cover. Note: Paper jammed in the fuser rollers must be removed from the underside of the fuser. Paper face up top edge entering printer Paper or transparencies Load Paper Tray Rear guide 201 Paper Jam - Transfer Belt and Fuser 1 Open the front cover. 2 Carefully remove any jammed paper. 3 Close the front cover. Multipurpose Feeder Maximum stack height 250 Paper Jam - Multipurpose Feeder 1 Open the front cover. 2 Carefully remove any jammed paper. 3 Close the front cover. Paper face down top edge entering printer Envelope face down with flap to the right 24x Paper Jam - Check Paper Tray x 1 Remove the paper tray. 2 Carefully remove any jammed paper. 3 Place the tray inside the printer. Note: You may have to remove the drawer above the paper jam or clear the jam from inside the front cover. Clearing Duplex Unit Paper Jams Duplex Unit Paper Path Message 230 Paper Jam 231 Paper Jam 232 Paper Jam Location Top duplex assembly Rear duplex assembly Duplex unit base and tray 230 Paper Jam - Top Duplex Assembly 1 Open the top duplex assembly door. 2 Carefully remove jammed paper. 3 Close the top duplex assembly door. 231 Paper Jam - Rear Duplex Assembly 1 Open the rear cover. 2 Carefully remove any jammed paper. 3 Close the rear cover. 232 Paper Jam - Duplex Unit Base and Tray 1 Completely remove duplex unit inverter tray. 2 Carefully remove jammed paper (check inside duplex unit base). 3 Insert duplex unit inverter tray into duplex unit. © Copyright Lexmark International, Inc. 1999. All rights reserved. Printed in U.S.A. This document is printed on recycled paper. 9/99 E.C. 1C0105 P/N 10E0243
-
 1
1 -
 2
2
 |
 |