Lexmark C752 Quick Reference - Page 2
Set Paper Type and Paper Size - itu
 |
View all Lexmark C752 manuals
Add to My Manuals
Save this manual to your list of manuals |
Page 2 highlights
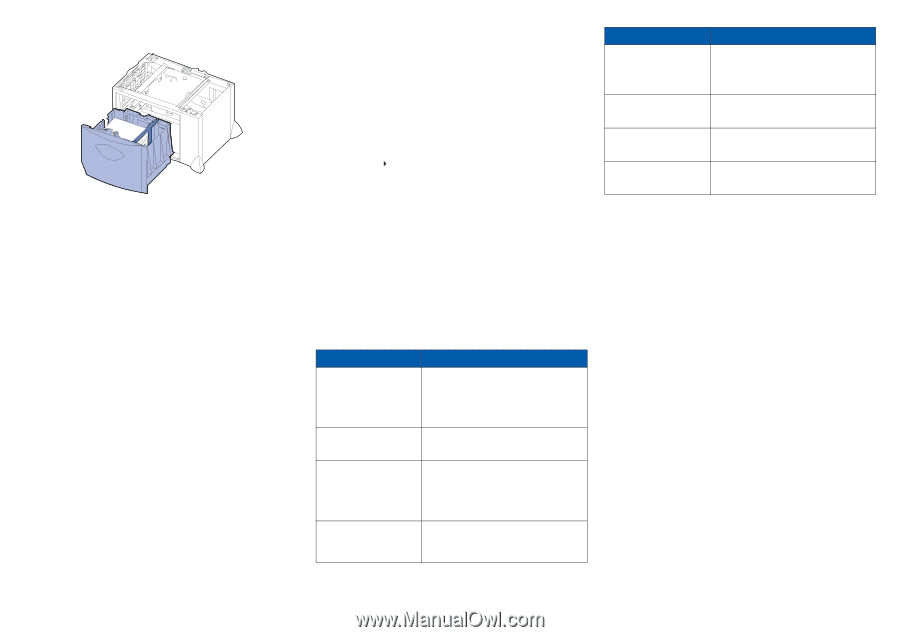
6 Place the paper against the back left corner of the tray, print side down. Do not load bent or wrinkled print media. 7 Close the tray. Make sure the tray is pushed completely into the printer. Note: Do not exceed the maximum stack height. Overfilling the tray may cause paper jams. Loading the optional envelope tray For information about loading the optional envelope tray, refer to the publications CD that came with the printer. Set Paper Type and Paper Size If you have set Paper Type and Paper Size to the correct values, any trays containing the same type and size of paper are automatically linked by the printer. Note: If the type of the media you are loading is the same as the media previously loaded, you do not need to change the Paper Type setting. To change a Paper Type or Paper Size setting: 1 Press Menu until you see Paper Menu, and then press Select. 2 Press Menu until you see Paper Type (or Paper Size), and then press Select. Tray 1 Type (or Tray 1 Size) appears on the second line of the display. 3 Press Select if you want to change the Tray 1 Type (or Tray 1 Size) setting or press Menu to scroll to another source. 4 Press Menu to scroll through a list of possible paper types (or sizes). 5 When you see the correct paper type (or size), press Select to save the setting as the default. 6 Press Go to return the printer to the Ready state. Printing a menu settings page To verify Paper Size and Paper Type settings, and check installed options and memory, print a menu settings page: 1 Press Menu until you see Utilities Menu, and then press Select. 2 Press Menu until you see Print Menus, and then press Select. The menu settings page prints. Printing on specialty media (transparencies, labels, etc.) Follow these instructions when you want to print on media such as transparencies, card stock, glossy paper, labels, or envelopes. 1 Load the print media as specified for the tray you are using. See Load paper or other print media for help. 2 From the printer operator panel, set the Paper Type and Paper Size according to the print media you loaded. See Set Paper Type and Paper Size for help. 3 From the computer's software application, set the paper type, size, and source according to the media you loaded. a In your word processor, spreadsheet, browser, or other application, select File Print. b Click Properties (or Options, Printer, or Setup, depending on the application) to view the printer driver settings. c Select the tray containing the specialty media from the Form Source list box. d Select your media type (transparencies, envelopes, and so on) from the Media Type list box. e Select the size of the specialty media from the Form Type list box. f Click OK, and then send your print job as usual. Canceling a print job To cancel a print job after it has started printing: 1 Press Menu until you see Job Menu, and then press Select. 2 Press Menu until you see Cancel Job, and then press Select. Common printer messages Message Actions Change The printer is requesting a different size or type of paper than what is loaded. • Remove the currently loaded paper from the specified tray, and then load the requested paper. • Press Select to clear the message and print on the media currently loaded in the tray. • Cancel the current job. 2 Paper Jam The printer detects a paper jam. Clear the paper path. Refer to the publications CD or Clearing Jams card for more information. Load Manual The printer is ready for paper to be inserted into the multipurpose feeder. • Load the multipurpose feeder with the paper specified on the second line of the display. • Press Select or Go to ignore the manual feed request and print on paper already installed in one of the paper trays. • Cancel the current job. Waiting The printer has received data to print but is waiting for a command or additional data. • Press Go to print the contents of the buffer. • Cancel the current job. Message Flushing Buffer The printer is discarding the current print job. ITU/Fuser Maint The image transfer unit and fuser require maintenance. 80 Fuser Maintenance The fuser needs replacing. 83 ITU Maintenance The image transfer unit needs replacing. Actions • Wait for the message to clear. • Sometimes this message means the driver data did not match what the printer was expecting. If the situation recurs, try printing from another printer driver. Replace the image transfer unit and the fuser. Refer to the publications CD for information about ordering and replacing these maintenance items. Replace the fuser. Refer to the publications CD for information about ordering and replacing the fuser. Replace the image transfer unit. Refer to the publications CD for information about ordering and replacing the image transfer unit. If you need more information • Refer to the Setup Guide or the publications CD that came with your printer for helpful information about using and maintaining your printer. • Contact your administrator or Help desk if you have questions about network printing. P/N 15G1981 E.C. 3G0049 © Copyright Lexmark International, Inc. All rights reserved. Printed in China 03/03
-
 1
1 -
 2
2
 |
 |