Lexmark C782 IPDS Printer and Host Setup Guide - Page 13
Step 7, Verify IPDS Printing, Troubleshooting - configuration page
 |
View all Lexmark C782 manuals
Add to My Manuals
Save this manual to your list of manuals |
Page 13 highlights
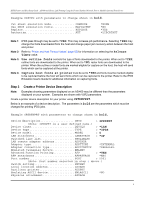
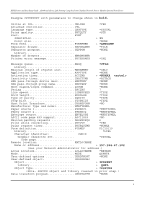
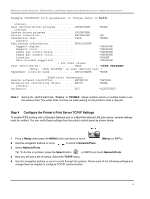
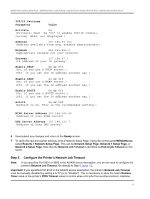
IPDS Printer and Host Setup Guide AS/400 and iSeries LAN Printing Using the Printer Standard Network Port or MarkNet Internal Print Server Note 1: If the IPDS code release on an MFP is 3.00-01090 or higher, "Copy Interrupt" is supported: an IPDS job can be interrupted by copy jobs and will resume printing automatically. At lower release levels, intervening copy jobs will be spooled to disk (when available) and be processed after the IPDS job is finished. Note 2: The supported printers and MFPs do not contain an Advanced Function Common Control Unit (AFCCU). Step 7 Verify IPDS Printing If you have completed the steps above to configure the host and printer, you are ready to print your first IPDS job. It is assumed that TCP/IP communications is installed and started on the host. 1 Vary ON the device. VRYCFG CFGOBJ(IPDSPRT) CFGTYPE(*DEV) STATUS(*ON) 2 Start the writer. STRPRTWTR IPDSPRT 3 Send an IPDS job from your host system. 4 Observe the printer control panel. When the first job data is received, BUSY should be displayed in the printer control panel. If the job does not print, go to Step 8 Troubleshooting. 5 After the last page of the IPDS job prints, BUSY will remain displayed until the host or printer ends the session. This is controlled by the Release Timer on the host or by the IPDS Timeout on the printer. 6 You may want to refer to the IPDS Emulation User's Guide to determine if other IPDS MENU settings need to be changed. Step 8 Troubleshooting If the IPDS job does not print, try the following. 1 If BUSY is not displayed in the printer control panel or if the printer remains in Ready mode, check to be sure the printer is connected to the network. Try to PING the printer. 2 If BUSY is not displayed in the printer control panel or if the printer remains in Ready mode, check all host and printer settings to be sure they are correct. 3 If you receive an IPDS Negative Acknowledgement (NACK) beginning with '08C1' indicating that the job is printing outside the printer valid printable area, choose one of the following solutions: a) Change the Printable Area setting to Physical Page. Using the control panel MENU/Menus, select Option Card Menu > IPDS MENU > EMULATION > Printable Area. b) Change your application to position the text within the printable area. Refer to Printable Area in the IPDS Emulation User's Guide for more information. c) Change the Exception Ctrl setting to Sup Beyond VPA. Using the control panel MENU/Menus, select Option Card Menu > IPDS MENU > EMULATION > Exception Ctrl. The printer will not send a NACK to the host when printing outside the valid printable area. 4 If you receive an IPDS Negative Acknowledgement (NACK) beginning with '0821' indicating there are undefined characters in the job, choose one of the following solutions: a) Change your application to send only valid characters and control codes. 13
-
 1
1 -
2
-
3
-
4
-
5
-
6
-
7
-
 8
8 -
 9
9 -
 10
10 -
 11
11 -
 12
12 -
 13
13 -
 14
14 -
 15
15 -
 16
16 -
 17
17 -
 18
18 -
19
-
20
-
21
-
22
-
23
-
24
-
25
-
26
-
27
-
28
-
29
-
30
-
31
-
32
-
33
-
34
-
35
-
36
-
37
-
38
-
39
-
40
-
41
-
42
-
43
-
44
-
45
-
46
-
47
-
48
-
49
-
50
-
51
-
52
-
53
-
54
-
55
-
56
-
57
-
58
-
59
-
60
-
61
-
62
 |
 |
