Lexmark CX735 Quick Reference - Page 1
Lexmark CX735 Manual
 |
View all Lexmark CX735 manuals
Add to My Manuals
Save this manual to your list of manuals |
Page 1 highlights
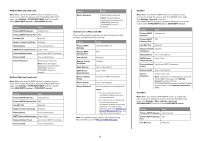
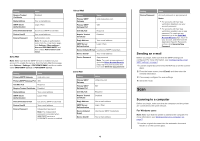
Quick Reference Copy Making copies 1 Load an original document into the ADF tray or on the scanner glass. Note: To avoid a cropped image, make sure that the original document and output have the same paper size. 2 From the home screen, touch Copy, and then specify the number of copies. If necessary, adjust the copy settings. 3 Copy the document. Note: To make a quick copy, from the home screen, touch . Copying on both sides of the paper 1 Load an original document into the ADF tray or on the scanner glass. 2 From the home screen, touch Copy > Sides. 3 Touch 1 sided to 2 sided or 2 sided to 2 sided. 4 Copy the document. Copying multiple pages onto a single sheet 1 Load an original document into the ADF tray or on the scanner glass. 2 From the home screen, touch Copy > Pages per Side. 3 Adjust the settings. 4 Copy the document. E-mail Configuring the e‑mail SMTP settings Configure the Simple Mail Transfer Protocol (SMTP) settings to send a scanned document through e-mail. The settings vary with each e‑mail service provider. Before you begin, make sure that the printer is connected to a network and that the network is connected to the Internet. Using the Embedded Web Server 1 Open a web browser, and then type the printer IP address in the address field. Notes: • View the printer IP address on the printer home screen. The IP address appears as four sets of numbers separated by periods, such as 123.123.123.123. • If you are using a proxy server, then temporarily disable it to load the web page correctly. 2 Click Settings > E‑mail. 3 From the E‑mail Setup section, configure the settings. Notes: • For more information on the password, see the list of e‑mail service providers. • For e‑mail service providers that are not on the list, contact your provider and ask for the settings. 4 Click Save. Using the Settings menu in the printer 1 From the home screen, touch Settings > E‑mail > E‑mail Setup. 2 Configure the settings. Notes: • For more information on the password, see the list of e‑mail service providers. • For e‑mail service providers that are not on the list, contact your provider and ask for the settings. E‑mail service providers • AOL Mail • Comcast Mail 1 • Gmail • iCloud Mail • Mail.com • NetEase Mail (mail.126.com) • NetEase Mail (mail.163.com) • NetEase Mail (mail.yeah.net) • Outlook Live or Microsoft 365 • QQ Mail • Sina Mail • Sohu Mail • Yahoo! Mail • Zoho Mail Notes: • If you encounter errors using the settings provided, then contact your e‑mail service provider. • For e‑mail service providers that are not on the list, contact your provider. AOL Mail Setting Value Primary SMTP Gateway smtp.aol.com Primary SMTP 587 Gateway Port Use SSL/TLS Required Require Trusted Certificate Disabled Reply Address Your e‑mail address SMTP Server Authentication Login / Plain Device‑Initiated E‑mail Use Device SMTP Credentials Device UserID Your e‑mail address Device Password App password Note: To create an app password, go to the AOL Account Security page, log in to your account, and then click Generate app password.
-
 1
1 -
 2
2 -
 3
3 -
 4
4 -
 5
5 -
 6
6 -
 7
7 -
8
-
9
-
10
-
11
-
12
-
13
-
14
-
15
-
16
-
17
 |
 |