Lexmark E238 Quick Reference - Page 2
Clearing paper jams, If you need more information, Operator panel - photoconductor
 |
View all Lexmark E238 manuals
Add to My Manuals
Save this manual to your list of manuals |
Page 2 highlights
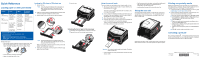
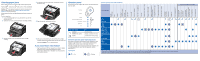
Clearing paper jams When a paper jam occurs, the printer stops and the operator panel Paper Jam and Continue lights come on. Press and release Continue twice quickly to display the specific secondary error paper jam light sequence. See Common operator panel light sequences for more information. We recommend that you clear the entire paper path when a paper jam occurs. To clear a paper jam: 1 If you are feeding paper from a tray, remove the tray, and then remove any jams. 2 Open the front cover, and remove the print cartridge assembly. 3 Remove any jams in the area behind the print cartridge assembly. 4 Lift the flap at the front of the printer, and remove any jams beneath the flap. 5 Open the rear exit, and remove any jams. 6 After you have cleared the jams, reinstall the print cartridge assembly, make sure all printer covers and trays are closed, and then press Continue to resume printing. If you need more information • See the publications CD that came with your printer for helpful information about using and maintaining your printer. • Contact your administrator or Help desk if you have questions about network printing. Ready / Power Saver Busy Waiting Flushing / Resolution reduced Not ready (printer is offline) Close door Load media Load manual feeder Print side two of a duplex job Toner low Photoconductor kit life warning Replace photoconductor Replace photoconductor kit (printer hard stop) Unsupported print cartridge Change cartridge invalid refill Cartridge region mismatch Cancel job / Reset printer Service error Printer error * Paper jam printer error * Paper jam at the input sensor † Paper jam in the manual feeder Paper jam under the toner cartridge Paper jam as a printed job exits the printer Paper jam in Tray 1 Paper jam in Tray 2 Operator panel The operator panel has 5 lights and 2 buttons. The Continue button also has a light. Common operator panel light sequences Paper jam secondary error codes* Continue Cancel Printer Condition Ready Toner Low / Replace PC Kit Load Paper Paper Jam Error Press and release Continue Continue twice quickly Cancel To Resume printing. Display a secondary error code. Cancel the job currently printing. Common operator panel light sequences The operator panel lights mean different things, depending on their sequence. Lights that are off, on, and/or blinking indicate printer conditions such as printer status, intervention, or service. The table on the right shows the most common light sequences. For more detailed information about the light sequences, see the publications CD. Light legend = On = Blinking Continue Ready Toner Low / Replace PC Kit Load Paper Paper Jam Error * When the Error (or Paper Jam) and Continue lights are both on, a secondary error has occurred. Press and release Continue twice quickly to display the secondary error code light sequence. † Paper jams at the input sensor can be either after the paper leaves the tray and enters the printer or in the manual feeder.
-
 1
1 -
 2
2
 |
 |
