Lexmark E360 Clearing Jams Guide - Page 2
paper jam - toner
 |
View all Lexmark E360 manuals
Add to My Manuals
Save this manual to your list of manuals |
Page 2 highlights
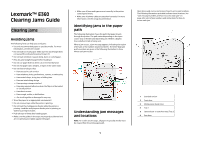
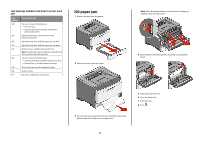
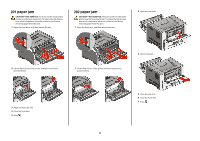
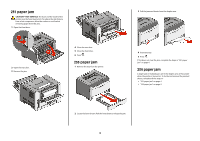
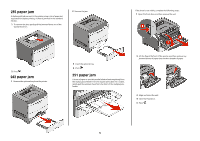
Jam message numbers and how to access each jam Jam number 200 201 202 231 233 234 235 242 251 To access the jam Try one or more of the following: • Remove Tray 1. • Open the front door, and then remove the photoconductor kit. Open the front door, and then remove the photoconductor kit. Open the front door, and then open the rear door. Open the front door, and then open the rear door. Remove Tray 1, and then depress the lever. Note: For alternative access to the jam, open the front door, and then open the rear door. Try one or more of the following: • Open the front door, and then open the rear door. • Remove Tray 1, and then depress the lever. Remove the jam from the standard exit bin. Remove Tray 2. Open the multipurpose feeder door. 200 paper jam 1 Remove the tray from the printer. 2 Remove the jam if you see it here. Note: When the photoconductor kit and toner cartridge are together, they are called a unit. 4 Lift the flap in front of the printer, and remove any jammed sheets. 3 If you do not see it, open the front door, and then remove the photoconductor kit and toner cartridge (unit). 5 Align and insert the unit. 6 Close the front door. 7 Insert the tray. 8 Press . 2
-
 1
1 -
 2
2 -
 3
3 -
 4
4 -
 5
5
 |
 |
