Lexmark E460DW Printing guide - Page 9
Setting the Paper Size and Paper Type, Printing on specialty media
 |
UPC - 734646083669
View all Lexmark E460DW manuals
Add to My Manuals
Save this manual to your list of manuals |
Page 9 highlights
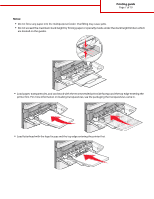
Printing guide Page 9 of 10 Setting the Paper Size and Paper Type When the Paper Size and Paper Type settings are the same for any trays, the trays are automatically linked. Note: If you load a tray with paper that is the same size as the paper that was previously loaded in the tray, you do not need to change the Paper Size setting. 1 Make sure the printer is on and Ready appears. 2 From the printer control panel, press . Paper Menu appears. 3 Press . 4 Press the up or down arrow button until Paper Size/Type appears, and then press . 5 Press the up or down arrow button until the correct tray or feeder appears, and then press . 6 Press the left or right arrow button until the correct size appears, and then press . Paper Type appears. 7 Press the left or right arrow button until the correct type appears, and then press . Submitting selection appears, followed by Paper Size/Type. Printing on specialty media Specialty media is card stock, transparencies, labels, and envelopes, so it is all media that is not paper. 1 Load specialty media as specified for the tray or multipurpose feeder. See one of these sections for help if needed: • "Loading trays" on page 1 • "Using the multipurpose feeder" on page 4 2 From the printer control panel, set the Paper Type and Paper Size according to the specialty media you loaded. 3 From the computer software application, set the paper type, size, and source according to the specialty media you loaded. Do one of the following: For Windows users a With a document open, click File Print. b Click Properties, Preferences, Options, or Setup. c From the Form Source list box, select the source containing the paper you loaded. d From the Form Type list box, select the paper type. e From the Form Size list box, select the paper size. f Click OK, and then click Print. For Macintosh users In Mac OS X: a Customize the settings as needed in the Page Setup dialog. 1 With a document open, choose File > Page Setup. 2 From the Paper Size pop-up menu, choose a paper size or create a custom size to match the loaded paper. 3 Click OK.
-
 1
1 -
2
-
3
-
 4
4 -
 5
5 -
 6
6 -
 7
7 -
 8
8 -
 9
9 -
 10
10
 |
 |
