Lexmark M410 Quick Reference Guide - Page 2
Lexmark Optra M410 and, M412 Quick Reference
 |
UPC - 734646261005
View all Lexmark M410 manuals
Add to My Manuals
Save this manual to your list of manuals |
Page 2 highlights
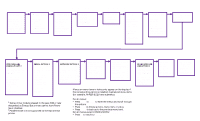
Lexmark Optra M410 and M412 Quick Reference Loading Print Material in the 250-Sheet Input Tray 1 Remove the input tray completely from the printer. 2 Press down on the metal plate until it locks into place. 3 Press down on the length guide tab and slide the length guide to the correct position for the size print material you are using. 4 Press down on the width guide tab and slide the guide to the far right side of the tray 5 Flex the sheets of print material back and forth, then fan them. 6 Place the print material against the left side of the tray with the recommended print side face down and the front edge of the stack placed toward the front of the tray. Note: Do not exceed the maximum stack height indicator when loading print material. It is located on the left inside surface of the tray near the metal stop. 7 Fit the print material under the metal stop. 8 Push on the right side of the width guide to move it to the left until it lightly touches the edge of the print material. 9 Slide the tray all the way into the printer until it snaps into place. 3 Length Guide Tab Length Guide Width Guide 4 Width Guide Tab 2 Operator Panel 8 LCD Maximum Stack Height Indicator Menu Select Return 7 Metal Stop Accessing Paper Jam Areas If a paper jam should occur, you may be required to open doors and covers, remove paper trays or remove options. CAUTION: The rear portion of the inside of the printer may be hot. Rear Output Bin Door Upper Front Door Lower Front Door and Multipurpose Feeder 250-Sheet Input Tray Optional 500-Sheet Drawer © Copyright Lexmark International, Inc. 2000. All rights reserved. Printed in U.S.A. This document is 100% recyclable. 5/00 E.C. 1G0002 P/N 17G0074 Printer Indicator Light Go Stop • At the Ready message, takes the printer offline (out of the Ready state) and enters the menus. • At the Busy message, takes the printer to the JOB MENU. • When the printer is offline, press the Menu> button to go to the next item in the menus or press the to scroll forward or
-
 1
1 -
 2
2
 |
 |
