Lexmark MX911 Accessibility Guide - Page 2
Adjusting the brightness of the printer
 |
View all Lexmark MX911 manuals
Add to My Manuals
Save this manual to your list of manuals |
Page 2 highlights
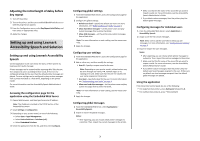
2 From the control panel, press . Note: For more information, see the printer User's Guide. Adjusting the fax speaker settings Adjust the fax speaker settings to make it more audible. Note: This feature is available only in some printer models. 1 From the home screen, navigate to: > Settings > Fax Settings > Analog Fax Setup 2 Do the following: • Set the speaker mode to "Always on" or "On Until Connected." • Set the speaker volume to high. • Turn on the ringer. 3 Apply the changes. Adjusting the audio feedback for button and icon presses Note: This feature is available only in some printer models. 1 From the home screen, navigate to: > Settings > General Settings > Audio Feedback 2 Turn on the audio feedback for the home screen buttons and icons, and then adjust the volume. 3 Apply the changes. 4 Press to return to the home screen. Notes: • This button has two tactile bumps for easy recognition. • When in Ready state, the printer issues a double beep feedback for every press of the icon or button. • When a printer error occurs, the feedback volume increases and an error message appears on the display. Enabling touch screen feedback Note: This feature is available only in some printer models. 1 From the home screen, navigate to: > Settings > General Settings > Tactile Touchscreen Feedback > Enabled 2 Apply the changes. Adjusting the brightness of the printer display To save energy, or if you have trouble reading from the display, adjust the brightness of the display. Using the Embedded Web Server 1 Open a Web browser, and then type the printer IP address in the address field. Notes: • The IP address is located on the upper portion of the home screen. It appears as four sets of numbers separated by periods, such as 123.123.123.123. • If you are using a proxy server, then temporarily disable it to load the Web page correctly. 2 Select Settings > General Settings. 3 In the Screen Brightness field, enter the brightness percentage you want for the display. 4 Apply the changes. Using the control panel 1 From the home screen, navigate to: > Settings > General Settings 2 In the Screen Brightness field, enter the brightness percentage you want for the display. 3 Apply the changes. Setting the indicator light to blinking red when printer encounters an error 1 From the home screen, navigate to: > Settings > General Settings > Error Lighting 2 Select On, and then apply the changes. 2 Changing the output bin lighting mode 1 From the home screen, navigate to: > Settings > General Settings > Output Lighting 2 Select a lighting mode, and then apply the changes. Extending the inactivity timeout Note: This feature is available only in some printer models. 1 From the home screen, navigate to: > Settings > General Settings > Timeouts 2 Modify these settings: Use To Screen Timeout 15-300 Set how long before the printer returns to the home screen. Note: 30 seconds is the factory default setting. Prolong Screen Timeout On Off Let the printer prompt an option to extend the screen timeout. Notes: • Off is the factory default setting. • A prompt appears for 20 seconds after the timeout timer expires. Select Yes to extend the screen timeout by a factor of 10. 3 Apply the changes. Adjusting the number of presses per second for a repeating key 1 Turn off the printer. 2 Turn on the printer, and then press and hold 2 and 6 until the screen with the progress bar appears. 3 From the Configuration menu, select Key Repeat Rate, and then select an appropriate value. 4 Apply the changes.
-
 1
1 -
 2
2 -
 3
3 -
 4
4 -
 5
5
 |
 |