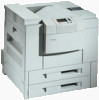
Lexmark Optra N model 240 User's Guide - Page 17
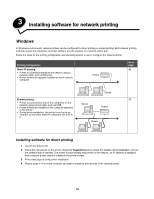
Setting up shared printing, Windows, Installing software on the computer attached to the printer
 |
View all Lexmark Optra N model 240 manuals
Add to My Manuals
Save this manual to your list of manuals |
Page 17 highlights
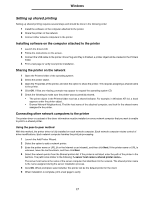
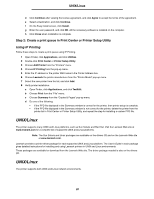
Windows Setting up shared printing Setting up shared printing requires several steps and should be done in the following order: 1 Install the software on the computer attached to the printer. 2 Share the printer on the network. 3 Connect other network computers to the printer. Installing software on the computer attached to the printer 1 Launch the drivers CD. 2 Follow the instructions on the screen. 3 Connect the USB cable to the printer. Once Plug and Play is finished, a printer object will be created in the Printers folder. 4 Print a test page to verify local printer installation. Sharing the printer on the network 1 Open the Printers folder of the operating system. 2 Select the printer object. 3 Open the Properties of the printer, and click the option to share the printer. This requires assigning a shared name to the printer. 4 Click OK. If files are missing, prompts may appear to request the operating system CD. 5 Check the following to make sure the printer was successfully shared. • The printer object in the Printers folder now has a shared indicator. For example, in Windows NT 4.0, a hand appears under the printer object. • Browse Network Neighborhood. Find the host name of the attached computer, and look for the shared name assigned to the printer. Connecting other network computers to the printer The printer driver or a subset of the driver information must be installed on every network computer that you want to enable to print to a shared printer. Using the peer-to-peer method With this method, the printer driver is fully installed on each network computer. Each network computer retains control of driver modifications. Each network computer handles the print job processing. 1 Launch the Add Printer Wizard. 2 Select the option to add a network printer. 3 Enter the printer name or URL (if on the Internet or an intranet), and then click Next. If the printer name or URL is unknown, leave the text box blank, and then click Next. 4 Select the network printer from the Shared printers list. If the printer is not listed, enter the path of the printer in the text box. The path looks similar to the following: \\\. The server host name is the name of the server computer that identifies it to the network. The shared printer name is the name assigned during the server installation process. 5 Click OK. When prompted, select whether this printer will be the default printer for the client. 6 When installation is complete, print a test page to verify. 17
-
 1
1 -
2
-
3
-
4
-
5
-
6
-
7
-
8
-
9
-
10
-
11
-
 12
12 -
 13
13 -
 14
14 -
 15
15 -
 16
16 -
 17
17 -
 18
18 -
 19
19 -
 20
20 -
 21
21 -
 22
22 -
23
-
24
-
25
-
26
-
27
-
28
-
29
-
30
-
31
-
32
-
33
-
34
-
35
-
36
-
37
-
38
-
39
-
40
-
41
-
42
-
43
-
44
-
45
-
46
-
47
-
48
-
49
-
50
-
51
-
52
-
53
-
54
-
55
-
56
-
57
-
58
-
59
-
60
-
61
-
62
-
63
-
64
-
65
-
66
-
67
-
68
-
69
-
70
-
71
-
72
-
73
-
74
-
75
-
76
-
77
-
78
-
79
-
80
-
81
-
82
-
83
-
84
-
85
-
86
-
87
-
88
-
89
-
90
-
91
-
92
-
93
-
94
-
95
-
96
-
97
-
98
-
99
-
100
-
101
-
102
-
103
-
104
-
105
-
106
-
107
-
108
-
109
-
110
 |
 |