Lexmark Prospect Pro205 User's Guide - Page 57
Copying a two-sided document, Enlarging or reducing images, Photo Reprint, Sided Copies, Resize
 |
View all Lexmark Prospect Pro205 manuals
Add to My Manuals
Save this manual to your list of manuals |
Page 57 highlights
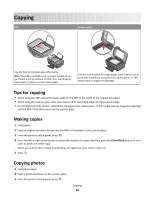
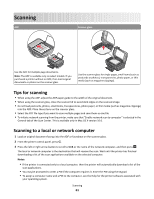
4 Press the up or down arrow button to scroll to Photo Reprint. 5 Press the left or right arrow button to select the desired photo size. 6 Press . Note: For best results, allow the prints to dry at least 24 hours before stacking, displaying, or storing. Copying a two-sided document 1 Load paper. 2 Load an original document faceup into the ADF or facedown on the scanner glass. 3 From the printer control panel, press . 4 Press the up or down arrow button to scroll to 2-Sided Copies. 5 Press the left or right arrow button to scroll to 2 to 1 or 2 to 2. • Select 2 to 1 to make single-sided copies of the two-sided document. • Select 2 to 2 to make two-sided copies (like the original document). 6 Press . 7 Follow the instructions on the display. Enlarging or reducing images 1 Load paper. 2 Load an original document facedown on the scanner glass. 3 From the printer control panel, press . 4 Press the up or down arrow button to scroll to Resize. 5 Press the left or right arrow button to select the setting that you want. Notes: • If you select Custom %, then press , and then press the left or right arrow button to select the desired custom percent value. Press to save the setting. • If you select Borderless, then the printer will reduce or enlarge the document or photo as necessary to print a borderless copy on the paper size that you selected. For best results with this resize setting, use photo paper and set the paper type to Photo, or let the printer automatically detect the paper type. 6 Press . Note: After the copy job is finished, press to reset the settings to the default. The resize setting also switches to 100% after two minutes of printer inactivity. Copying 57
-
 1
1 -
2
-
3
-
4
-
5
-
6
-
7
-
8
-
9
-
10
-
11
-
12
-
13
-
14
-
15
-
16
-
17
-
18
-
19
-
20
-
21
-
22
-
23
-
24
-
25
-
26
-
27
-
28
-
29
-
30
-
31
-
32
-
33
-
34
-
35
-
36
-
37
-
38
-
39
-
40
-
41
-
42
-
43
-
44
-
45
-
46
-
47
-
48
-
49
-
50
-
51
-
 52
52 -
 53
53 -
 54
54 -
 55
55 -
 56
56 -
 57
57 -
 58
58 -
 59
59 -
 60
60 -
 61
61 -
 62
62 -
63
-
64
-
65
-
66
-
67
-
68
-
69
-
70
-
71
-
72
-
73
-
74
-
75
-
76
-
77
-
78
-
79
-
80
-
81
-
82
-
83
-
84
-
85
-
86
-
87
-
88
-
89
-
90
-
91
-
92
-
93
-
94
-
95
-
96
-
97
-
98
-
99
-
100
-
101
-
102
-
103
-
104
-
105
-
106
-
107
-
108
-
109
-
110
-
111
-
112
-
113
-
114
-
115
-
116
-
117
-
118
-
119
-
120
-
121
-
122
-
123
-
124
-
125
-
126
-
127
-
128
-
129
-
130
-
131
-
132
-
133
-
134
-
135
-
136
-
137
-
138
-
139
-
140
-
141
-
142
-
143
-
144
-
145
-
146
-
147
-
148
-
149
-
150
-
151
-
152
-
153
-
154
-
155
-
156
-
157
-
158
-
159
-
160
-
161
-
162
-
163
-
164
-
165
-
166
-
167
-
168
-
169
-
170
-
171
-
172
-
173
-
174
-
175
-
176
-
177
-
178
-
179
-
180
-
181
-
182
 |
 |
