Lexmark T630 Setup Guide
Lexmark T630 - Printer - B/w Manual
 |
UPC - 734646385756
View all Lexmark T630 manuals
Add to My Manuals
Save this manual to your list of manuals |
Lexmark T630 manual content summary:
- Lexmark T630 | Setup Guide - Page 1
T630, T632 Setup Guide January 2003 www.lexmark.com - Lexmark T630 | Setup Guide - Page 2
printer complies with the limits for a Class B digital device (without a network card installed) and for a Class A digital device instructions, to a professional service person. • This product is designed, tested, and approved to meet strict global safety standards with the use of specific Lexmark - Lexmark T630 | Setup Guide - Page 3
Installing an output expander 24 Installing a 5-bin mailbox 27 Attaching labels to print media handling options 29 Step 3: Install memory and option cards 30 Accessing the printer system board 30 Installing printer memory 32 Installing an optional flash memory or firmware card 33 Contents iii - Lexmark T630 | Setup Guide - Page 4
Attaching a network cable 42 Step 6: Install drivers for local printing 44 Windows 45 Macintosh 49 UNIX/Linux 50 Serial connections 51 Step 7: Verify printer setup 54 Printing a menu settings page 54 Printing a network setup page 54 Printing Quick Reference information 55 Step 8: Configure - Lexmark T630 | Setup Guide - Page 5
Step 10: Using the Publications CD 61 Viewing and using the CD contents 61 Contents v - Lexmark T630 | Setup Guide - Page 6
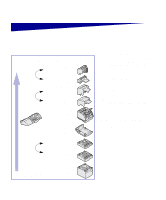
Introduction About the printer Lexmark™ T family of printers Base model and options * or Envelope feeder Page 17 5-bin Mailbox Page 27 Output expander Page 24 High-capacity output stacker Page 22 StapleSmart™ Finisher Page 19 Printer Page 14 Print cartridge Page 14 Duplex unit Page 13 250-sheet - Lexmark T630 | Setup Guide - Page 7
CD is also available on our Lexmark Web site at www.lexmark.com/publications. Quick Reference pages are stored inside the printer. They provide information about loading print media, diagnosing and solving print problems, and clearing jams from the printer. We strongly recommend that you - Lexmark T630 | Setup Guide - Page 8
the device to see if furniture or other hardware needs to be set up first. Preparing for setup CAUTION: The printer weighs 17 printer for proper ventilation. • Provide the proper environment: - A firm, level surface - Away from the direct airflow of air conditioners, heaters, or ventilators - Free - Lexmark T630 | Setup Guide - Page 9
(5) Drivers CD (6) Wire bail (7) Operator panel protector overlay If any items are missing or damaged, 7 refer to the Publications CD for information about contacting Lexmark customer support. 2 6 Save the carton and packing material in case you need to repack the printer. 4 5 3 Unpack - Lexmark T630 | Setup Guide - Page 10
Step 2: Set up the printer and print media handling options Finisher High-capacity output stacker Output expander 5-bin mailbox O u T630 t p page 6.) 2000-sheet drawer 250-sheet drawer 500-sheet drawer Duplex unit Set up the printer and print media handling options 5 Envelope feeder - Lexmark T630 | Setup Guide - Page 11
faxes, you may need additional furniture. More information is available on our Lexmark Web site at www.lexmark.com/multifunctionprinters. If you have a 2000-sheet drawer, position it in the location you have chosen for your printer. 1 Remove all items shown in the illustration from the carton. If - Lexmark T630 | Setup Guide - Page 12
trays you are using, including the standard tray. Save the carton and packing material in case you need to repack the 2000-sheet drawer for service or storage. 16 AWG power cord Jumper cord Note: The 16 AWG power cord is included only with units intended to operate at 100-127V - Lexmark T630 | Setup Guide - Page 13
you set the printer so the edges are aligned properly. Make sure the printer is securely in place. CAUTION: Make sure your fingers are not under the printer when you set it down. Use the handholds on the printer or ask someone to help you lift it. Set up the printer and print media handling options - Lexmark T630 | Setup Guide - Page 14
instead of using the power cord provided with the printer you must use the 16 AWG power cord provided then use the original power cord provided with the printer. The 16 AWG power cord should always remain with power cord provided with the printer. Plug the power cord into the back of the - Lexmark T630 | Setup Guide - Page 15
options one at a time. Make sure your fingers are not under the printer when you set it down. Use the handholds on the printer or ask someone to help you lift it. Paper size selector knob A5 color associated with the paper size you select. Set up the printer and print media handling options 10 - Lexmark T630 | Setup Guide - Page 16
More information is available on our Lexmark Web site at www.lexmark.com/multifunctionprinters. Decals Optional drawers attach under the printer and optional duplex unit. The printer automatically recognizes any drawer that is installed. A drawer consists of a tray and a support unit. The 250-sheet - Lexmark T630 | Setup Guide - Page 17
holes on top of any drawer help you position the support unit so the edges are aligned properly. Make sure the support unit is securely in place. Square hole 3 Attach another optional drawer, a Tab duplex unit, or the printer. Round peg Set up the printer and print media handling options 12 - Lexmark T630 | Setup Guide - Page 18
our Lexmark Web site at www.lexmark.com/multifunctionprinters. The duplex unit attaches under the printer, below installed drawers, or the table or printer cabinet where you plan to use the printer. The tab, round peg, and square with printers that have a 250-sheet standard tray, while an optional - Lexmark T630 | Setup Guide - Page 19
duplex unit help you position the printer so the edges are aligned properly. Make sure the printer is securely in place. Tab Round peg Handle 2 Remove the print cartridge packaging. a Push the release latch and open the printer upper front door. b Grasp the print cartridge by the handle and pull - Lexmark T630 | Setup Guide - Page 20
of the red plastic to remove the packaging from the print cartridge. Retain the packaging. d Align the slides on the cartridge with the slots on the cartridge cradle. Use the colored arrows inside the printer for placement. e Guide the cartridge down as it drops and snaps into place. f Close the - Lexmark T630 | Setup Guide - Page 21
the protector overlay. a Align the tab on the bottom of the protector overlay as shown, and slide the tab into the slot. Set up the printer and print media handling options 16 - Lexmark T630 | Setup Guide - Page 22
the groove as shown. Static brush holder Plastic bracket Installing an envelope feeder 6 If you are not installing any print media handling options, attach the wire bail: a Remove the printer top cover and slide the plastic bracket onto the static brush holder. Adjust the bracket so it is centered - Lexmark T630 | Setup Guide - Page 23
front door. 2 Lift open the envelope feeder connector door. 3 Align the tabs on the envelope feeder with the slots on both sides of the printer, and then gently push Tab the envelope feeder into the opening until it snaps into place. The envelope feeder tilts downward at a slight angle when - Lexmark T630 | Setup Guide - Page 24
media only. Excess weight may damage it. 1 Remove the top cover or any previously installed print media handling options. Note: The finisher must be positioned directly above the printer and below other print media handling options. It cannot be used with a high-capacity output stacker. You can - Lexmark T630 | Setup Guide - Page 25
slots under the output bin cover. 5 Slide the end of the paper bail out until the arrow is aligned with the paper size for your print job. Set up the printer and print media handling options 20 - Lexmark T630 | Setup Guide - Page 26
the tips of the wire bail into the ends of the plastic bracket so that the bail curves downward. The wire bail rests in the printer output bin. Wire bail 8 If you are not attaching any more print media handling options, attach the top cover to the finisher. Set up the - Lexmark T630 | Setup Guide - Page 27
mounting brackets could damage tabletops or fabrics. Bracket and wire bail Labels Note: The high-capacity output stacker must be positioned directly above the printer and below other print media handling options. It cannot be used with a finisher. 1 Remove the top cover or any previously installed - Lexmark T630 | Setup Guide - Page 28
on the bottom of the high-capacity output stacker. Static brush holder Mounting slot 3 Insert the mounting brackets into the slots on top of the printer or print media handling option. Make sure the high-capacity output stacker is positioned securely. Set up the - Lexmark T630 | Setup Guide - Page 29
Note: If you have purchased a finisher or a high-capacity output stacker, that print media handling option must be installed directly on the printer, before the output expander. Each output expander consists of a support and a removable bin. A wire bail, bracket, and labels are also included. After - Lexmark T630 | Setup Guide - Page 30
1 Remove the top cover from the printer, finisher, or high-capacity output stacker. Plastic bracket Mounting bracket 2 Slide slot 3 Insert the mounting brackets into the slots on top of the printer or print media handling option. Make sure the output expander is positioned securely. Set up the - Lexmark T630 | Setup Guide - Page 31
4 If you are mounting the output expander on the printer or another output expander, attach the wire bail. Place the upper slots. 7 If you are not attaching any more print media handling options, attach the top cover to the output expander. Set up the printer and print media handling options 26 - Lexmark T630 | Setup Guide - Page 32
5-bin mailbox cannot be used with a T630. If you have purchased a finisher, it must be installed directly on the printer, before the mailbox. 1 Remove the top cover from the printer, finisher, output expander, or previously installed mailbox. Set up the printer and print media handling options 27 - Lexmark T630 | Setup Guide - Page 33
mailbox. Plastic bracket Note: If the mailbox will be the topmost print media handling option, remove the wire bail from the bracket on the top slot 3 Insert the mounting brackets into the slots on top of the printer, finisher, output expander, or previously installed 5-bin mailbox. Make sure the - Lexmark T630 | Setup Guide - Page 34
downward. The bail rests in the output bin of the expander below it, or in the printer output bin. 6 Adjust the paper stops for the appropriate print media size. Attaching labels to print media handling options Paper stops If you purchased an output expander, high-capacity output stacker, or - Lexmark T630 | Setup Guide - Page 35
your printer memory capacity and connectivity by adding optional cards. The instructions in Printer hard disk - RS-232 serial interface card - Parallel 1284-B interface card - MarkNet™ N2100 Series internal print servers (also called internal network adapters or INAs) Accessing the printer - Lexmark T630 | Setup Guide - Page 36
1 Press the release latches to open the upper and lower front doors. 2 Press down on the side door latches and open the side door. Screws 3 Loosen, but do not remove, the six screws on the shield. Use a small Phillips screwdriver to loosen these screws. Screws Install memory and option cards 31 - Lexmark T630 | Setup Guide - Page 37
before you touch the memory option. Memory connector 1 Memory connector 2 Follow the instructions in this section to install printer memory. 1 Unpack the optional printer memory card. Avoid touching the connection points along its edge. Save the packaging materials. 2 Open both latches on the - Lexmark T630 | Setup Guide - Page 38
options offered for other Lexmark printers cannot be used with your printer. Refer to the Publications CD for specifications. Ridge Notch Latch Notch instructions in this section to install an optional flash memory or firmware card. The system board has two connection locations which can support - Lexmark T630 | Setup Guide - Page 39
the flash memory or firmware card is firmly in place. Installing an option card Your printer has either one or two connectors that support the following option cards: • Hard disk with adapter card • MarkNet internal print server • RS-232 Serial Interface Card Install memory and option cards 34 - Lexmark T630 | Setup Guide - Page 40
electricity. Touch something metal on the printer before you touch the card. Connector 1 Connector 2 • Parallel 1284-B Interface Card • Coax/Twinax Adapter for SCS Refer to the documentation included with each card for detailed information about that specific card. Use a small Phillips screwdriver - Lexmark T630 | Setup Guide - Page 41
the extra screws shipped with the card). 6 Tighten the screws to secure the card. Replacing the shield After you have installed option cards on the printer system board, follow these steps to reattach the shield and close the doors. 1 Grasp the shield by the tabs and align the three keyholes on - Lexmark T630 | Setup Guide - Page 42
slide it down onto the screws. Tighten all six screws. 2 Close the side door. 3 Close the upper and lower front doors. Install memory and option cards 37 - Lexmark T630 | Setup Guide - Page 43
tray may cause jams. This applies to all printer trays, drawers, and feeders. Before loading print media into any source, flex the sheets back not fold or crease the print media. Straighten the edges of the stack on a level surface. Complete these instructions to load print media into any of the - Lexmark T630 | Setup Guide - Page 44
width guide to the left until it lightly rests against the edge of the print media stack. 6 If you are loading an optional tray, adjust the knob to show the size of the print media currently loaded. This setting serves as a visual reminder only; it has no effect on the operation of the printer - Lexmark T630 | Setup Guide - Page 45
2000-sheet drawer Elevator button Follow these instructions to load the 2000-sheet drawer. Do not load any print media other than plain paper in the stack of paper as shown and place it on the elevator tray with the preferred print side facing down. Align the stack of paper to the back of the drawer - Lexmark T630 | Setup Guide - Page 46
You can attach your printer locally using a USB, parallel, or serial connection. USB Be sure to match the USB symbol on the cable to the USB symbol on the printer. A USB port is standard. Windows 98 SE, Windows Me, Windows 2000, and Windows XP operating systems support USB connections. Some UNIX - Lexmark T630 | Setup Guide - Page 47
the display, refer to the Publications CD for instructions on clearing the message. Look for information about understanding printer messages. Parallel Serial 4 Turn on your computer and any other peripherals. 5 Go to "Install drivers for local printing" on page 44. A parallel port is included on - Lexmark T630 | Setup Guide - Page 48
for hardware instructions. 802.11b wireless options Your printer can be converted to wireless networking by using an optional 802.11b Wireless Print Adapter. This adapter is a piece of hardware that plugs into the Ethernet port on your printer. If you purchased this adapter for your printer, refer - Lexmark T630 | Setup Guide - Page 49
50 All serial printing Serial 51 * If you attach a USB printer cable while your printer and computer are turned on, the Windows hardware wizard launches immediately. Find the instructions for your operating system and use them to answer the plug and play screens. Install drivers for local - Lexmark T630 | Setup Guide - Page 50
created and appears in the Printers folder. Using Windows XP with USB or parallel cable Note: Business versions of Windows XP require that you have administrative access to install printer drivers on your computer. In addition to the following driver installation instructions, you may need to refer - Lexmark T630 | Setup Guide - Page 51
Note: You need administrative access to install printer drivers on your computer. Using Windows Me with USB or parallel cable Note: Depending on the software and printers already installed on your computer, your screens may vary from those in the instructions. When the Found New Hardware Wizard - Lexmark T630 | Setup Guide - Page 52
Using Windows 98 with a USB or parallel cable Note: Depending on the software and printers already installed on your computer, your screens may vary from those in the instructions. 5 Select your printer and driver from the list, and then click OK. Make sure you select the driver in the correct - Lexmark T630 | Setup Guide - Page 53
NT operating systems. Note: You need administrative access to install printer drivers on your computer. Using Windows 95 with a parallel cable Note: USB support is not available for Windows 95 operating systems. 11 Select Yes to print a test page, and then click Finish. All the necessary files - Lexmark T630 | Setup Guide - Page 54
. Note: A PPD for your printer is also available in a downloadable software package from our Lexmark Web site at www.lexmark.com. Macintosh OS 8.6 or later is required for USB printing. To print locally to a USB-attached printer, you must create a desktop printer icon (Macintosh 8.6-9.x) or create - Lexmark T630 | Setup Guide - Page 55
the Printer List, you can quit Print Center. UNIX/Linux Local printing is supported on many UNIX and Linux platforms, such as Sun Solaris and Red Hat. The Sun Solaris and Linux packages are available on the drivers CD and on our Lexmark Web site at www.lexmark.com. The User's Guide Install drivers - Lexmark T630 | Setup Guide - Page 56
All the printer driver packages support local printing using a parallel connection. The driver package for Sun Solaris supports USB connections to Sun Ray appliances and Sun workstations. Visit our Lexmark Web site at www.lexmark.com for a complete list of supported UNIX and Linux platforms. Serial - Lexmark T630 | Setup Guide - Page 57
want to use. 6 Click Finish to complete the printer software installation. Setting parameters in the communications (COM) port After the printer driver is installed, you must set the serial parameters in the communications port assigned to the printer driver. Install drivers for local printing 52 - Lexmark T630 | Setup Guide - Page 58
the Port Settings tab, set the serial parameters to the same serial parameters in the printer. Look for the printer settings under the Serial Standard (or Serial Option X) heading on the Menu Settings page you printed earlier. 6 Click OK, and then close all the windows. 7 Print a test page to verify - Lexmark T630 | Setup Guide - Page 59
Information." 6 Verify that the trays are configured for the sizes and types of print media you loaded. Printing a network setup page If the printer is attached to a network, print a network setup page to verify the network connection. This page also provides important information that helps - Lexmark T630 | Setup Guide - Page 60
Quick Reference information stored on the CD: 1 Launch the CD. 2 Click Quick Reference. 3 Print the documents. The same Quick Reference pages are stored in the printer. To print them: 1 Make sure the printer is on. 2 Press Menu until you see Help Menu, and then press Select. 3 When you see Quick - Lexmark T630 | Setup Guide - Page 61
" heading on the network setup page you printed in "Printing a network setup page" on page 54. 2 Go to "Verifying the IP settings" on page 57 and begin with step 2. If your network is not using DHCP, then you must manually assign an IP address to the printer. An easy way to do this is - Lexmark T630 | Setup Guide - Page 62
network, you receive a reply. Configuring for Pull Printing If your printer has an optional ImageQuick firmware card installed, you can configure for Pull Printing once an IP address has been assigned to the printer. For detailed configuration instructions, refer to the CD that shipped with the - Lexmark T630 | Setup Guide - Page 63
information about each of these network printing methods is on the drivers CD that shipped with your printer. Read the detailed instructions on the drivers CD. Click View Documentation and look for information about network printer installation for your specific Windows environment. If you choose to - Lexmark T630 | Setup Guide - Page 64
XP Supported printer drivers • Windows system printer driver • Lexmark custom printer driver System drivers are built into Windows operating systems. Custom drivers are available on the drivers CD. Updated system and custom drivers are available on our Lexmark Web site at www.lexmark.com. To print - Lexmark T630 | Setup Guide - Page 65
at www.lexmark.com. Lexmark provides a printer driver package for each supported UNIX and Linux platform. The User's Guide in each package gives detailed instructions for installing and using Lexmark printers in UNIX and Linux environments. You can download these packages from our Lexmark Web site - Lexmark T630 | Setup Guide - Page 66
55 for printing instructions. You can also give the Publications CD to a network administrator or Help desk, or you can copy the entire contents of the CD (or specific files) to a shared network drive or intranet site. Copies of the printer documentation are also available on our Lexmark Web site - Lexmark T630 | Setup Guide - Page 67
P/N 10G0901 E.C. 10G039 Lexmark and Lexmark with diamond design are trademarks of Lexmark International, Inc., registered in the United States and/or other countries. © 2003 Lexmark International, Inc. 740 West New Circle Road Lexington, Kentucky 40550 www.lexmark.com
-
 1
1 -
 2
2 -
 3
3 -
 4
4 -
 5
5 -
 6
6 -
 7
7 -
8
-
9
-
10
-
11
-
12
-
13
-
14
-
15
-
16
-
17
-
18
-
19
-
20
-
21
-
22
-
23
-
24
-
25
-
26
-
27
-
28
-
29
-
30
-
31
-
32
-
33
-
34
-
35
-
36
-
37
-
38
-
39
-
40
-
41
-
42
-
43
-
44
-
45
-
46
-
47
-
48
-
49
-
50
-
51
-
52
-
53
-
54
-
55
-
56
-
57
-
58
-
59
-
60
-
61
-
62
-
63
-
64
-
65
-
66
-
67
 |
 |
www.lexmark.com
Setup Guide
January 2003
T630, T632