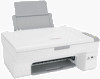
Lexmark X2450 Getting Started - Page 3
English - printer cartridge
 |
View all Lexmark X2450 manuals
Add to My Manuals
Save this manual to your list of manuals |
Page 3 highlights
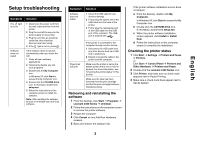
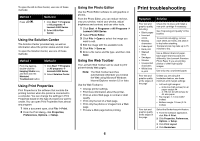
Setup troubleshooting Symptom The light is not lit Software does not install Solution 1 Disconnect the power cord from the wall outlet and then from the printer. 2 Plug the cord all the way into the power supply on the printer. 3 Plug the cord into an electrical outlet that other electrical devices have been using. 4 If the light is not on, press . If the software does not launch automatically when you insert the CD: 1 Close all open software applications. 2 Temporarily disable any antivirus programs. 3 Double-click the My Computer icon. In Windows XP, click Start to access the My Computer icon. 4 Double-click the CD-ROM drive icon. If necessary, double-click setup.exe. 5 Follow the instructions on the computer screen to install the software. Note: After installing the software, be sure to re-enable your anti-virus software. Symptom Software does not install Solution 1 Check the USB cable for any obvious damage. 2 Firmly plug the square end of the USB cable into the back of the printer. 3 Firmly plug the rectangular end of the USB cable into the USB port of the computer. The USB port is marked with . Page does not print If the printer is connected to the computer through another device: 1 Disconnect the USB cable from any other device such as a USB hub or switch box. 2 Directly connect the cable to the printer and the computer. Make sure the printer is set as the default printer and is not on hold or paused. For more information, see "Checking the printer status" in this booklet. Make sure the tape has been removed from the print cartridge and that the print cartridge has been installed properly. Removing and reinstalling the software 1 From the desktop, click Start Æ Programs Æ Lexmark 2400 Series Æ Uninstall. 2 Follow the instructions on the computer screen to remove the printer software. 3 Restart the computer. 4 Click Cancel on any Add New Hardware screens. 5 Eject and reinsert the software CD. If the printer software installation screen does not appear: a From the desktop, double-click My Computer. In Windows XP, click Start to access the My Computer icon. b Double-click the CD-ROM drive icon. If necessary, double-click setup.exe. c When the printer software installation screen appears, click Install or Install Now. d Follow the instructions on the computer screen to complete the installation. Checking the printer status 1 Click Start Æ Settings Æ Printers and Faxes or Printers. or Click Start Æ Control Panel Æ Printers and Other Hardware Æ Printers and Faxes. 2 Double-click the Lexmark 2400 Series icon. 3 Click Printer, and make sure no check mark appears next to Pause Printing. 4 Make sure a check mark does appear next to Set As Default. 3 English
-
 1
1 -
 2
2 -
 3
3 -
 4
4 -
 5
5 -
 6
6 -
 7
7 -
 8
8 -
 9
9
 |
 |
