Lexmark X4875 User's Guide (Mac) - Page 83
Understanding the software, Installing the printer software - driver
 |
UPC - 734646316996
View all Lexmark X4875 manuals
Add to My Manuals
Save this manual to your list of manuals |
Page 83 highlights
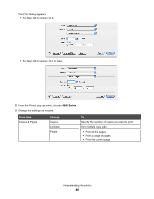
Understanding the Scan Mode menu To access the Scan Mode menu: 1 From the control panel, press or repeatedly until Scan is highlighted. 2 Press . 3 If your printer is connected to more than one computer: a Press or repeatedly until the computer to which you want to scan is highlighted. b Press . If you set a PIN during network setup and are being asked for it: 1 Enter the PIN by pressing and to select a digit location, and then press and for that digit. 2 Press . 4 Wait until the printer has finished downloading the scan applications list. to select a value From here Scan to Color Quality Original Size Change Scan Default Settings You can Choose the computer to save your scan if there is more than one computer connected to the printer. Choose to scan your document in color or black and white. Choose a scan quality: 150 dots per inch (dpi), 300 dpi, or 600 dpi. Set the size of the original document: Auto Detect, L, 2L, A6, A5, B5, A4, Wallet, 3x5 in, 4x6 in, 4x8 in, 5x7 in, 8x10 in, or letter. Change the default scan settings. These settings include: Color, Quality, and Original Size. Related topics: • "Using the control panel" on page 78 Understanding the software Installing the printer software Using the CD that came with the printer: 1 Close all open software applications. 2 Insert the printer software CD. 3 From the Finder desktop, double-click the printer CD icon that automatically appears. 4 Double-click the Install icon. 5 Follow the instructions on the computer screen. Using the World Wide Web: 1 Go to the Lexmark Web site at www.lexmark.com. 2 From the home page, navigate through the menu selection, and then click Drivers & Downloads. Understanding the printer 83
-
 1
1 -
2
-
3
-
4
-
5
-
6
-
7
-
8
-
9
-
10
-
11
-
12
-
13
-
14
-
15
-
16
-
17
-
18
-
19
-
20
-
21
-
22
-
23
-
24
-
25
-
26
-
27
-
28
-
29
-
30
-
31
-
32
-
33
-
34
-
35
-
36
-
37
-
38
-
39
-
40
-
41
-
42
-
43
-
44
-
45
-
46
-
47
-
48
-
49
-
50
-
51
-
52
-
53
-
54
-
55
-
56
-
57
-
58
-
59
-
60
-
61
-
62
-
63
-
64
-
65
-
66
-
67
-
68
-
69
-
70
-
71
-
72
-
73
-
74
-
75
-
76
-
77
-
 78
78 -
 79
79 -
 80
80 -
 81
81 -
 82
82 -
 83
83 -
 84
84 -
 85
85 -
 86
86 -
 87
87 -
 88
88 -
89
-
90
-
91
-
92
-
93
-
94
-
95
-
96
-
97
-
98
-
99
-
100
-
101
-
102
-
103
-
104
-
105
-
106
-
107
-
108
-
109
-
110
-
111
-
112
-
113
-
114
-
115
-
116
-
117
-
118
-
119
-
120
-
121
-
122
-
123
-
124
-
125
-
126
-
127
-
128
-
129
-
130
-
131
-
132
-
133
-
134
-
135
-
136
-
137
-
138
-
139
-
140
-
141
-
142
-
143
-
144
-
145
-
146
-
147
-
148
-
149
-
150
-
151
-
152
-
153
-
154
-
155
-
156
-
157
-
158
-
159
-
160
-
161
-
162
-
163
-
164
-
165
-
166
 |
 |
