Lexmark X5450 User's Guide - Page 42
Installing the printer software, Installing the optional XPS driver (Windows Vista users only) - download driver vista
 |
View all Lexmark X5450 manuals
Add to My Manuals
Save this manual to your list of manuals |
Page 42 highlights
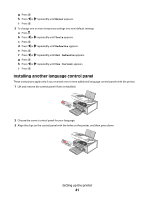
Installing the printer software Using the installation software CD (Windows users only) Using the CD that came with the printer: 1 Start Windows. 2 When the desktop appears, insert the software CD. The software installation screen appears. 3 Click Install. Using the installation software CD (Macintosh users only) 1 Close all open software applications. 2 Insert the software CD. 3 From the Finder desktop, double-click the printer CD icon that automatically appears. 4 Double-click the Install icon. 5 Follow the instructions on the computer screen. Using the World Wide Web 1 Go to the Lexmark Web site at www.lexmark.com. 2 From the home page, navigate through the menu selection, and then click Drivers & Downloads. 3 Choose the printer and the printer driver for your operating system. 4 Follow the instructions on the computer screen to download the driver and install the printer software. Installing the optional XPS driver (Windows Vista users only) The XML Paper Specification (XPS) driver is an optional printer driver designed to make use of the advanced XPS color and graphics features that are available only for Windows Vista users. To use XPS features, you must install the XPS driver as an additional driver after you install the regular printer software. Notes: • Before installing the XPS driver, you must install the printer on your computer. • Before installing the XPS driver, you must install the Microsoft QFE Patch and then extract the driver files from the installation software CD. To install the patch, you must have administrator privileges on the computer. To install the Microsoft QFE Patch and extract the driver: 1 Insert the installation software CD, and then click Cancel when the Setup Wizard appears. 2 Click Œ Computer. Setting up the printer 42
-
 1
1 -
2
-
3
-
4
-
5
-
6
-
7
-
8
-
9
-
10
-
11
-
12
-
13
-
14
-
15
-
16
-
17
-
18
-
19
-
20
-
21
-
22
-
23
-
24
-
25
-
26
-
27
-
28
-
29
-
30
-
31
-
32
-
33
-
34
-
35
-
36
-
 37
37 -
 38
38 -
 39
39 -
 40
40 -
 41
41 -
 42
42 -
 43
43 -
 44
44 -
 45
45 -
 46
46 -
 47
47 -
48
-
49
-
50
-
51
-
52
-
53
-
54
-
55
-
56
-
57
-
58
-
59
-
60
-
61
-
62
-
63
-
64
-
65
-
66
-
67
-
68
-
69
-
70
-
71
-
72
-
73
-
74
-
75
-
76
-
77
-
78
-
79
-
80
-
81
-
82
-
83
-
84
-
85
-
86
-
87
-
88
-
89
-
90
-
91
-
92
-
93
-
94
-
95
-
96
-
97
-
98
-
99
-
100
-
101
-
102
-
103
-
104
-
105
-
106
-
107
-
108
-
109
-
110
-
111
-
112
-
113
-
114
-
115
-
116
-
117
-
118
-
119
-
120
-
121
-
122
-
123
-
124
-
125
-
126
-
127
-
128
-
129
-
130
-
131
-
132
-
133
-
134
-
135
-
136
-
137
-
138
-
139
-
140
-
141
-
142
-
143
-
144
-
145
-
146
-
147
-
148
-
149
-
150
-
151
-
152
-
153
-
154
-
155
-
156
-
157
-
158
-
159
-
160
-
161
-
162
-
163
-
164
-
165
-
166
-
167
-
168
-
169
-
170
-
171
-
172
-
173
-
174
-
175
-
176
-
177
-
178
-
179
-
180
-
181
-
182
-
183
-
184
-
185
-
186
-
187
-
188
-
189
-
190
-
191
-
192
-
193
-
194
-
195
-
196
-
197
-
198
-
199
-
200
-
201
-
202
 |
 |