Lexmark X652DE Common Criteria Installation Supplement and Administrator Guide - Page 6
Before configuring the device required - system board
 |
UPC - 734646093835
View all Lexmark X652DE manuals
Add to My Manuals
Save this manual to your list of manuals |
Page 6 highlights
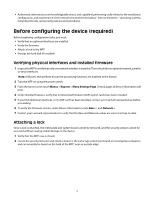
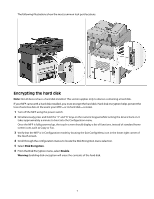
• Authorized administrators are knowledgeable about, and capable of performing tasks related to the installation, configuration, and maintenance of the network environment including-but not limited to-operating systems, network protocols, and security policies and procedures. Before configuring the device (required) Before beginning configuration tasks, you must: • Verify that no optional interfaces are installed • Verify the firmware • Attach a lock to the MFP • Encrypt the hard disk (if installed) Verifying physical interfaces and installed firmware 1 Inspect the MFP to verify that only one network interface is installed. There should be no optional network, parallel, or serial interfaces. Note: USB ports that perform document processing functions are disabled at the factory. 2 Turn the MFP on using the power switch. 3 From the home screen touch Menus > Reports > Menu Settings Page. Several pages of device information will print. 4 Under Installed Features, verify that no Download Emulator (DLE) option cards have been installed. 5 If you find additional interfaces, or if a DLE card has been installed, contact your Lexmark representative before proceeding. 6 To verify the firmware version, under Device Information, locate Base =, and Network =. 7 Contact your Lexmark representative to verify that the Base and Network values are correct and up-to-date. Attaching a lock Once a lock is attached, the metal plate and system board cannot be removed, and the security jumper cannot be accessed without causing visible damage to the device. 1 Verify that the MFP case is closed. 2 Locate the security lock port and attach a lock. It is the same type of lock port found on most laptop computers, and can normally be found on the back of the MFP, near an outside edge. 6
-
 1
1 -
 2
2 -
 3
3 -
 4
4 -
 5
5 -
 6
6 -
 7
7 -
 8
8 -
 9
9 -
 10
10 -
 11
11 -
 12
12 -
13
-
14
-
15
-
16
-
17
-
18
-
19
-
20
-
21
-
22
-
23
-
24
-
25
-
26
-
27
-
28
-
29
-
30
-
31
-
32
-
33
-
34
-
35
-
36
-
37
-
38
-
39
-
40
-
41
-
42
-
43
-
44
-
45
-
46
-
47
-
48
-
49
-
50
-
51
-
52
-
53
-
54
-
55
-
56
-
57
-
58
 |
 |