Lexmark X864 IPDS Printer and Host Setup Guide - Page 32
Step 5, Verify IPDS Printing, Troubleshooting, MENU/Menus > Option Card Menu > IPDS
 |
View all Lexmark X864 manuals
Add to My Manuals
Save this manual to your list of manuals |
Page 32 highlights
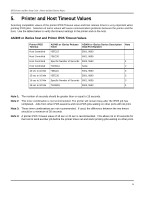
IPDS Printer and Host Setup Guide PSF/AIX LAN Printing Using an Internal LAN Print Server b) The recommended Host Resolution setting is "Auto". If you experience printing problems, set Host Resolution to "300". 3 If you are replacing a printer that used a 43xx Emulation setting, choose the "Resident" Emulation and change the following settings: a) Set Bar Code Size to "43xx" under BAR CODE > Bar Code Size. b) The recommended Host Resolution setting is "Auto". If you experience printing problems, set Host Resolution to "300". 4 If you are replacing a printer that used a 3812/3816 Emulation, select the "3812/3816" Emulation. This emulation only accepts 240 dpi resources (fonts, overlays, etc.) from the host and does not support DBCS printing. On MFPs, you can set the print priority of received faxes. Refer to the IPDS Emulation User's Guide for additional information about Fax Interrupt. This option is found under MENU/Menus > Option Card Menu > IPDS MENU > EMULATION. Refer to the IPDS Emulation User's Guide for information on these options and other IPDS MENU settings to format IPDS jobs. Note 1: On MFPs, "Copy Interrupt" is supported: an IPDS job can be interrupted by copy jobs and will resume printing automatically. Note 2: The supported printers and MFPs do not contain an Advanced Function Common Control Unit (AFCCU). Step 5 Verify IPDS Printing If you have completed the steps above to configure the host and printer, you are ready to print your first IPDS job. 1 Send an IPDS job from your host system. 2 Observe the printer control panel. When the first job data is received, BUSY should be displayed in the printer control panel. If the job does not print, go to Step 6 Troubleshooting. 3 After the last page of the IPDS job prints, BUSY will remain displayed until the host or printer ends the session. This is controlled by the Release Timer on the host or by the IPDS Timeout on the printer. 4 You may want to refer to the IPDS Emulation User's Guide to determine if other IPDS MENU settings need to be changed. Step 6 Troubleshooting If the IPDS job does not print, try the following. 1 If Busy or IPDS is not displayed in the printer control panel or if the printer remains in Ready mode, check to be sure the printer is connected to the network. Try to PING the printer. 2 If Busy or IPDS is not displayed in the printer control panel or if the printer remains in Ready mode, check all host and printer settings to be sure they are correct. 3 If you receive an IPDS Negative Acknowledgement (NACK) beginning with '08C1' indicating that the job is printing outside the printer valid printable area, choose one of the following solutions: a) Change the Printable Area setting to Physical Page. Using the control panel MENU/Menus, select Option Card Menu > IPDS MENU > EMULATION > Printable Area. 32
-
 1
1 -
2
-
3
-
4
-
5
-
6
-
7
-
8
-
9
-
10
-
11
-
12
-
13
-
14
-
15
-
16
-
17
-
18
-
19
-
20
-
21
-
22
-
23
-
24
-
25
-
26
-
 27
27 -
 28
28 -
 29
29 -
 30
30 -
 31
31 -
 32
32 -
 33
33 -
 34
34 -
 35
35 -
 36
36 -
 37
37 -
38
-
39
-
40
-
41
 |
 |