Lexmark X954 Maintenance Guide - Page 13
Ordering a maintenance kit, Replacing parts and supplies, Replacing a photoconductor unit - 160k maintenance kit
 |
View all Lexmark X954 manuals
Add to My Manuals
Save this manual to your list of manuals |
Page 13 highlights
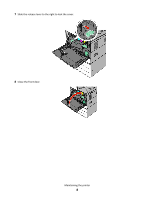
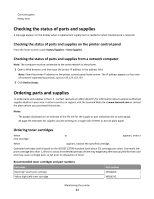
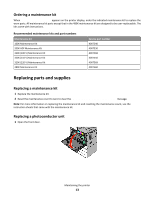
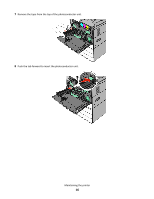
Ordering a maintenance kit When [x] Maintenance Kit appears on the printer display, order the indicated maintenance kit to replace the worn parts. All maintenance kit parts except that in the 480K maintenance kit are designed to be user‑replaceable. The kits come with instructions. Recommended maintenance kits and part numbers Maintenance kit 160K Maintenance Kit 200K ADF Maintenance Kit 320K (100 V) Maintenance Kit 320K (110 V) Maintenance Kit 320K (220 V) Maintenance Kit 480K Maintenance Kit Service part number 40X7540 40X7530 40X7568 40X7550 40X7569 40X7560 Replacing parts and supplies Replacing a maintenance kit 1 Replace the maintenance kit. 2 Reset the maintenance count to zero to clear the 80 scheduled maintenance [x] message. Note: For more information on replacing the maintenance kit and resetting the maintenance count, see the instruction sheets that came with the maintenance kit. Replacing a photoconductor unit 1 Open the front door. Maintaining the printer 13
-
 1
1 -
2
-
3
-
4
-
5
-
6
-
7
-
 8
8 -
 9
9 -
 10
10 -
 11
11 -
 12
12 -
 13
13 -
 14
14 -
 15
15 -
 16
16 -
 17
17 -
 18
18 -
19
-
20
-
21
-
22
-
23
-
24
-
25
-
26
-
27
-
28
-
29
-
30
-
31
-
32
-
33
-
34
 |
 |
