Lexmark XC4143 Quick Reference - Page 7
Paper jam behind door E, Paper jam in the multipurpose feeder, Paper jam in the standard bin
 |
View all Lexmark XC4143 manuals
Add to My Manuals
Save this manual to your list of manuals |
Page 7 highlights
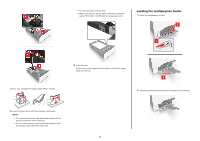
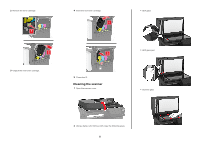
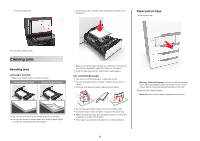
4 Insert the tray. Paper jam in the standard bin 1 Remove the jammed paper. Note: Make sure that all paper fragments are removed. 3 Insert the tray. Paper jam behind door E 1 Open door E. 3 Close door E. Paper jam in the multipurpose feeder 1 Remove paper from the multipurpose feeder. 2 Pull out the tray. 3 Remove the jammed paper. Note: Make sure that all paper fragments are removed. 2 Open doors A and D, and then remove any paper fragments. CAUTION-HOT SURFACE: The inside of the printer might be hot. To reduce the risk of injury from a hot component, allow the surface to cool before touching it. 2 Remove the jammed paper. Note: Make sure that all paper fragments are removed. 7
-
 1
1 -
 2
2 -
 3
3 -
 4
4 -
 5
5 -
 6
6 -
 7
7 -
 8
8 -
 9
9
 |
 |

3
Insert the tray.
Paper jam behind door E
1
Open door E.
2
Remove the jammed paper.
Note:
Make sure that all paper fragments are removed.
3
Close door E.
Paper jam in the multipurpose feeder
1
Remove paper from the multipurpose feeder.
2
Pull out the tray.
3
Remove the jammed paper.
Note:
Make sure that all paper fragments are removed.
4
Insert the tray.
Paper jam in the standard bin
1
Remove the jammed paper.
Note:
Make sure that all paper fragments are removed.
2
Open doors A and D, and then remove any paper fragments.
CAUTION—HOT SURFACE:
The inside of the printer
might be hot. To reduce the risk of injury from a hot
component, allow the surface to cool before touching
it.
7