Lexmark XM1246 Quick Reference - Page 6
Identifying jam locations, Paper jam in door
 |
View all Lexmark XM1246 manuals
Add to My Manuals
Save this manual to your list of manuals |
Page 6 highlights
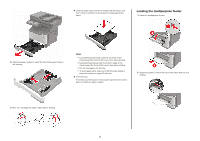
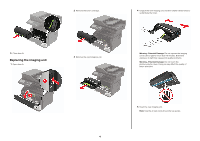
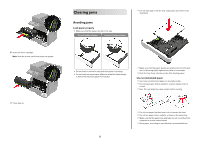
Identifying jam locations Notes: • When Jam Assist is set to On, the printer automatically flushes blank pages or partially printed pages with after a jammed page is cleared. Check your printed output for blank pages. • When Jam Recovery is set to On or Auto, the printer reprints jammed pages. Paper jam in door A 1 Remove the tray. Jam location 1 Automatic document feeder 2 Standard bin 3 Rear door 4 Standard 250‑sheet tray 5 Optional 250‑ or 550‑sheet ray 6 Multipurpose feeder 7 Door A 2 Open door A. 6 3 Remove the toner cartridge. 4 Remove the imaging unit. Warning-Potential Damage: Do not expose the imaging unit to direct light for more than 10 minutes. Extended exposure to light may cause print quality problems. Warning-Potential Damage: Do not touch the photoconductor drum. Doing so may affect the quality of future print jobs.
-
 1
1 -
 2
2 -
 3
3 -
 4
4 -
 5
5 -
 6
6 -
 7
7 -
 8
8 -
 9
9
 |
 |
