Lexmark XS864de Printer, Option, and Stand Compatibility Guide - Page 8
Input options, Notes
 |
View all Lexmark XS864de manuals
Add to My Manuals
Save this manual to your list of manuals |
Page 8 highlights
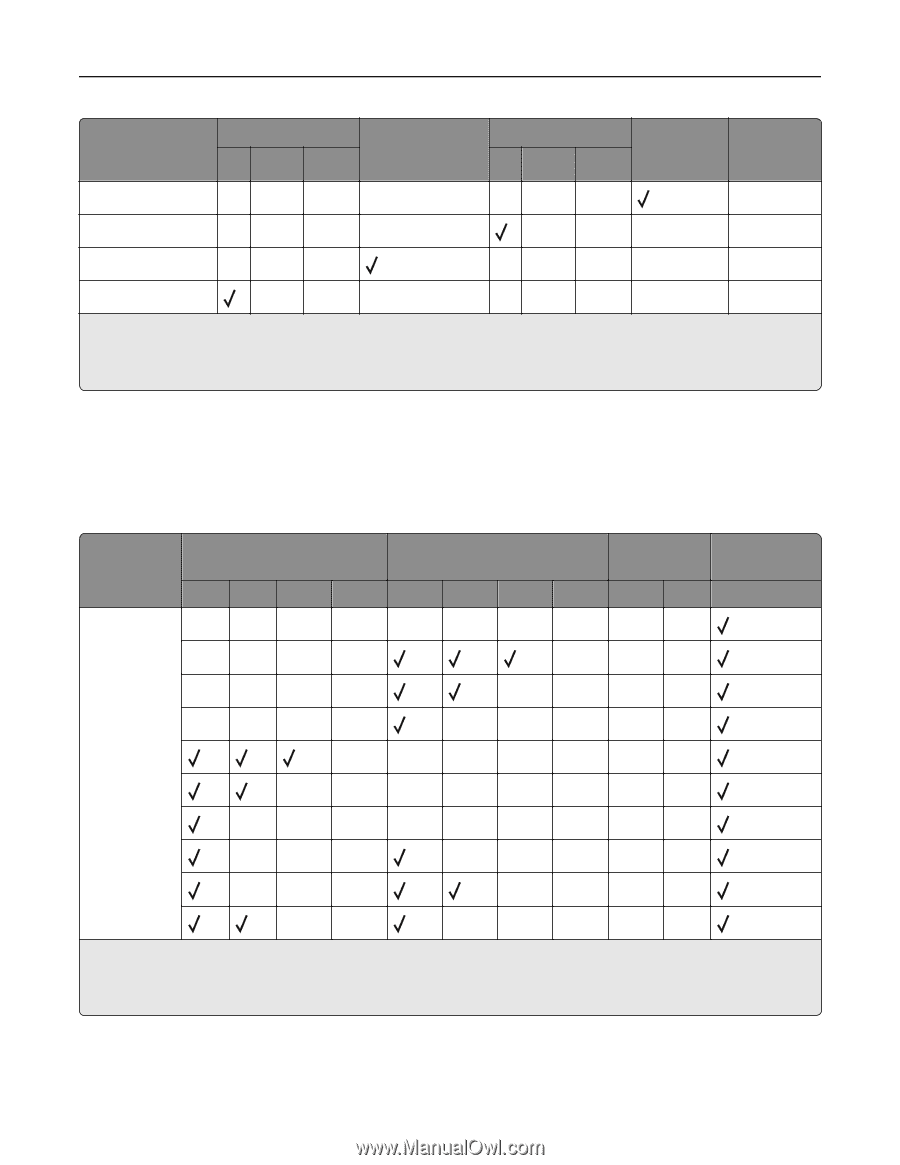
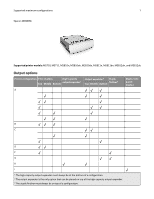
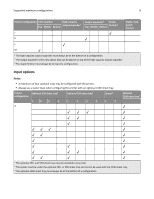
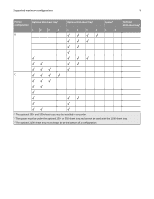
Supported maximum configurations 8 Printer configuration 4‑bin mailbox High‑capacity Output expander2 Staple Top Middle Bottom output expander1 Top Middle Bottom finisher3 J Staple, hole punch finisher K L M 1 The high-capacity output expander must always be at the bottom of a configuration. 2 The output expander is the only option that can be placed on top of the high‑capacity output expander. 3 The staple finisher must always be on top of a configuration. Input options Notes: • A maximum of four optional trays may be configured with the printer. • Always use a caster base when configuring the printer with an optional 2100‑sheet tray. Printer Optional 250‑sheet tray1 configuration Optional 550‑sheet tray1 Spacer2 1 2 3 4 1 2 3 4 1 2 A Optional 2100‑sheet tray3 1 The optional 250‑ and 550‑sheet trays may be installed in any order. 2 The spacer must be under the optional 250‑ or 550‑sheet tray and cannot be used with the 2100‑sheet tray. 3 The optional 2100‑sheet tray must always be at the bottom of a configuration.
-
 1
1 -
2
-
 3
3 -
 4
4 -
 5
5 -
 6
6 -
 7
7 -
 8
8 -
 9
9 -
 10
10 -
 11
11 -
 12
12 -
 13
13 -
14
-
15
-
16
-
17
-
18
-
19
-
20
-
21
-
22
-
23
-
24
-
25
-
26
-
27
-
28
-
29
-
30
-
31
-
32
-
33
-
34
-
35
-
36
-
37
-
38
-
39
-
40
-
41
-
42
-
43
 |
 |