LiftMaster 3130 Owners Manual - Page 10
Attach the Rail to the Header Bracket - garage opener
 |
View all LiftMaster 3130 manuals
Add to My Manuals
Save this manual to your list of manuals |
Page 10 highlights
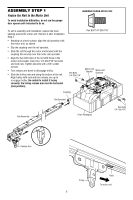
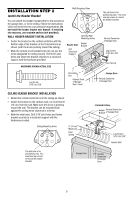
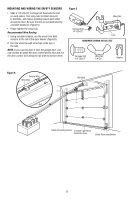
Header Wall Header Bracket Rail Bracket INSTALLATION STEP 3 Attach the Rail to the Header Bracket • Position the opener on the garage floor below the header bracket. Use packing material as a protective base. NOTE: If the door spring is in the way you'll need help. Have someone hold the opener securely on a temporary support to allow the rail to clear the spring. • Position the rail bracket against the header bracket. • Align the bracket holes and join with a clevis pin as shown. • Insert a ring fastener to secure. Garage Door Rail Ring Fastener Header Bracket Clevis Pin 5/16"x2-3/4" Spacer Rail Bracket Rail Spacer Opener Carton or Temporary Support HARDWARE SHOWN ACTUAL SIZE Clevis Pin 5/16"x2-3/4" Ring Fastener 10 Spacer
-
 1
1 -
2
-
3
-
4
-
 5
5 -
 6
6 -
 7
7 -
 8
8 -
 9
9 -
 10
10 -
 11
11 -
 12
12 -
 13
13 -
 14
14 -
 15
15 -
16
-
17
-
18
-
19
-
20
-
21
-
22
-
23
-
24
-
25
-
26
-
27
-
28
-
29
-
30
-
31
-
32
-
33
-
34
-
35
-
36
 |
 |

10
INSTALLATION STEP 3
Attach the Rail to the Header Bracket
•
Position the opener on the garage floor below the
header bracket. Use packing material as a protective
base.
NOTE:
If the door spring is in the way you’ll need
help. Have someone hold the opener securely on a
temporary support to allow the rail to clear the spring.
•
Position the rail bracket against the header bracket.
•
Align the bracket holes and join with a clevis pin
as shown.
•
Insert a ring fastener to secure.
HARDWARE SHOWN ACTUAL SIZE
Header Wall
Header Bracket
Rail Bracket
Rail
Rail
Rail
Bracket
Opener Carton or
Temporary Support
Garage Door
Header Bracket
Spacer
Spacer
Ring Fastener
Clevis Pin
5/16"x2-3/4"
Ring Fastener
Spacer
Clevis Pin
5/16"x2-3/4"