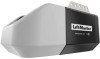
LiftMaster 81602MC Users Guide - English French Spanish - Page 7
Programming, Remote Control, Wireless Keyless Entry, To Erase the Memory
 |
View all LiftMaster 81602MC manuals
Add to My Manuals
Save this manual to your list of manuals |
Page 7 highlights
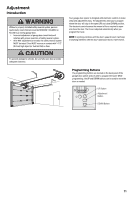
Programming Remote Control Below are the steps to program a new or existing remote control. Test remote control before reprogramming. 1. Press and release the LEARN Button on the garage door opener. 2. Press and hold the button on the remote control that you wish to use. Release the button when the garage door opener lights blink or two clicks are heard. OR For Multi-Function Control Panel 882LMW 1. Press the LEARN button on the door control to enter Programming Mode. LEARN Button 2. Press the LEARN button again, the LED will flash once. 3. Press the button on the remote control that you wish to operate your garage door. OR For Push Button Door Control 883LMW 1. Press and hold the Light button and the Push button until the Push Button Push button LED begins to blink. 2. Press the button on the remote control that you wish to operate your garage door. Light/Learn Button If your vehicle is equipped with a Homelink®, you may require an external adapter depending on the make, model, and year of your vehicle. Visit www.homelink.com for additional information. Wireless Keyless Entry Refer to the instructions provided with your keyless entry OR go to LiftMaster.com to download instructions. To Erase the Memory Erase ALL Remote Controls and Keyless Entries Press and hold the LEARN button until LEARN Button the LED goes out (approximately 6 seconds). All remote controls and keyless entries are now erased. Erase ALL Devices (Including myQ® enabled accessories) 1. Press and hold the LEARN button until the LED goes out (approximately 6 seconds). 2. Immediately press and hold the LEARN button until the LED goes out. All codes are now erased. Erase the Wi-Fi Network from the Garage Door Opener Press and hold the adjustment button until 3 beeps are heard (approximately 6 seconds). Adjustment Button 7
-
 1
1 -
 2
2 -
 3
3 -
 4
4 -
 5
5 -
 6
6 -
 7
7 -
 8
8 -
 9
9 -
 10
10 -
 11
11 -
 12
12 -
13
-
14
-
15
-
16
-
17
-
18
-
19
-
20
-
21
-
22
-
23
-
24
-
25
-
26
-
27
-
28
-
29
-
30
-
31
-
32
-
33
-
34
-
35
-
36
-
37
-
38
-
39
-
40
-
41
-
42
-
43
-
44
-
45
-
46
-
47
-
48
-
49
-
50
-
51
-
52
-
53
-
54
-
55
-
56
-
57
-
58
-
59
-
60
 |
 |
