LiftMaster 850LM 850LM 3-Channel Universal Receiver Manual - Page 2
Programming, Wiring Continued - receiver
 |
View all LiftMaster 850LM manuals
Add to My Manuals
Save this manual to your list of manuals |
Page 2 highlights
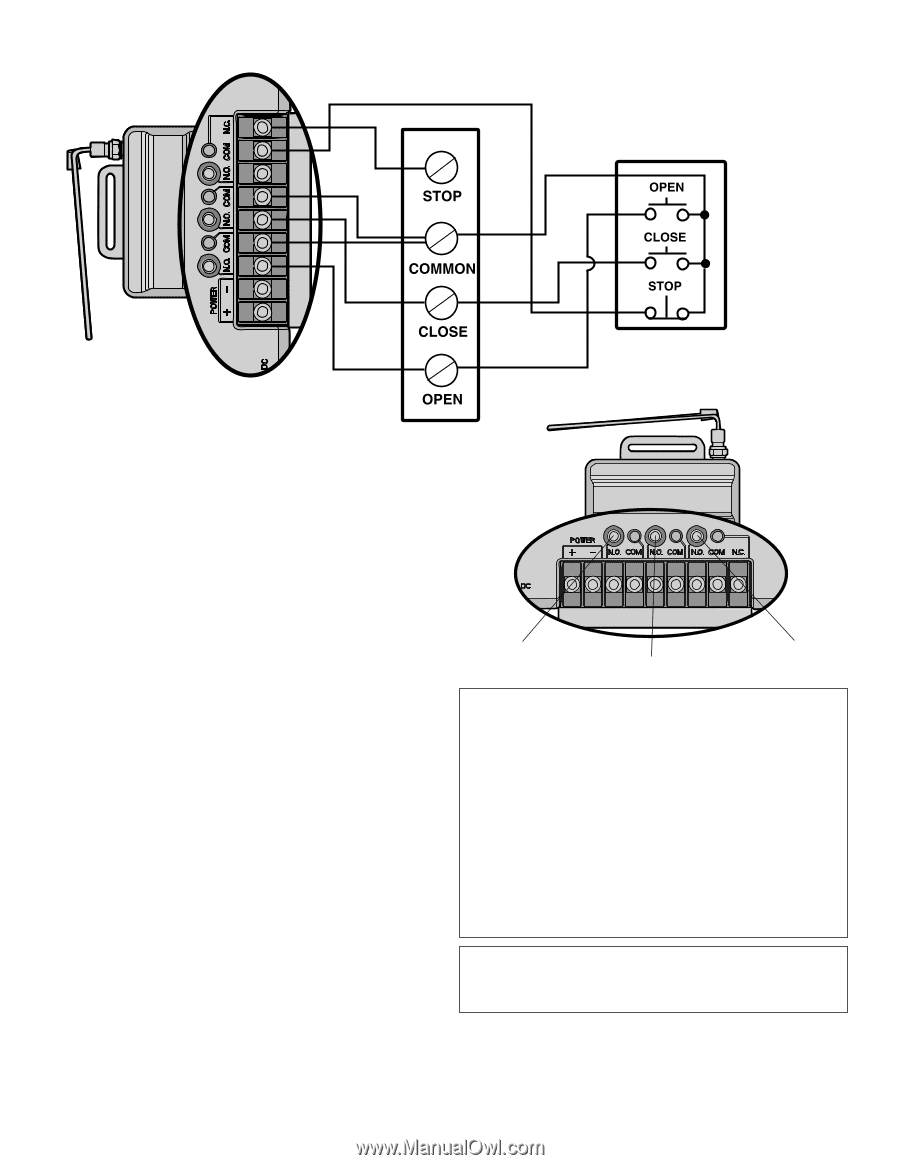
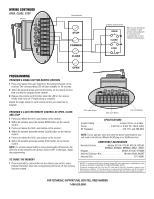
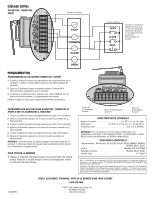
WIRING CONTINUED OPEN, CLOSE, STOP Receiver Single Operator 3-Button Control Device Refer to your commercial door operator or gate operator wiring diagrams for instructions on connecting two or more 3-Button control devices. PROGRAMMING PROGRAM A SINGLE BUTTON REMOTE CONTROL 1 Press and release the Learn button for the selected channel on the receiver. The corresponding LED will glow steadily for 30 seconds. 2 Within 30 seconds press and hold the button on the remote control that you wish to program to the receiver. 3 Release the remote control button when the LED on the receiver blinks, then turns off. Programming is complete. Repeat the steps above for each remote control you would like to program. PROGRAM A 3-BUTTON REMOTE CONTROL AS OPEN, CLOSE, AND STOP 1 Press and release the CH1 Learn button on the receiver. 2 Within 30 seconds press the desired OPEN button on the remote control. 3 Press and release the CH2 Learn button on the receiver. 4 Within 30 seconds press the desired CLOSE button on the remote control. 5 Press and release the CH3 Learn button on the receiver. 6 Within 30 seconds press the desired STOP button on the remote control. NOTE: If a remote control button is not pressed within 30 seconds, the LED next to the selected Learn button will turn OFF. In that case, repeat the programming. TO ERASE THE MEMORY 1 Press and hold the Learn button for the channel you want to erase. Release the button when the corresponding LED turns off; the memory has been erased. CH1 Learn Button CH2 Learn Button CH3 Learn Button SPECIFICATIONS Contact Rating 5 Amps 28 Vac or dc Max. Power 9-30V AC or 9-34V DC, 50mA, 60Hz RF Frequency 310, 315, and 390 MHz NOTE: If your operator does not meet the power specifications you will need a transformer (Model 85LM plug-in or 95LM wired-in). COMPATIBLE ACCESSORIES Remote Controls Models 811LM, 813LM, 891LM, 893LM, 890MAX, 893MAX, 895MAX, 892LT, 894LT Keypads Models 877LM, 877MAX Antenna Extension Kits Models 86LM, 86LMT Antenna Only K77-36541 NOTICE: To comply with FCC and/or Industry Canada (IC) rules. adjustment or modifications of this receiver are prohibited. THERE ARE NO USER SERVICEABLE PARTS. This device complies with Part 15 of the FCC rules and IC RSS-210. Operation is subject to the following two conditions: (1) this device may not cause harmful interference, and (2) this device must accept any interference received, including interference that may cause undesired operation. FOR TECHNICAL SUPPORT DIAL OUR TOLL FREE NUMBER: 1-800-528-2806
-
 1
1 -
 2
2 -
 3
3 -
 4
4
 |
 |