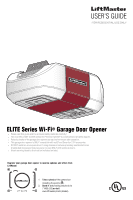
LiftMaster 8580WLB 8550W 8550WL 8550WLB 8550WLB-267 8557W 8587W WLED WLED-267 - Page 3
Important Safety Instructions, Power, SAVE THESE, INSTRUCTIONS.
 |
View all LiftMaster 8580WLB manuals
Add to My Manuals
Save this manual to your list of manuals |
Page 3 highlights
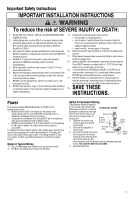
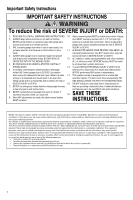
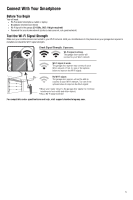
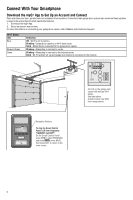
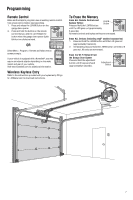
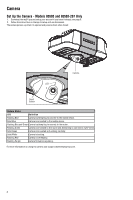
Important Safety Instructions IMPORTANT INSTALLATION INSTRUCTIONS To reduce the risk of SEVERE INJURY or DEATH: 1. READ AND FOLLOW ALL INSTALLATION WARNINGS AND 9. Install wall-mounted garage door control: INSTRUCTIONS. l within sight of the garage door. 2. Install garage door opener ONLY on properly balanced and l out of reach of small children at a minimum height of lubricated garage door. An improperly balanced door may 5 feet (1.5 m) above floors, landings, steps or any other NOT reverse when required and could result in SEVERE adjacent walking surface. INJURY or DEATH. l away from ALL moving parts of the door. 3. ALL repairs to cables, spring assemblies and other hardware 10. Place entrapment warning label on wall next to garage door MUST be made by a trained door systems technician BEFORE control. installing opener. 4. Disable ALL locks and remove ALL ropes connected to 11. Place manual release/safety reverse test label in plain view on inside of garage door. garage door BEFORE installing opener to avoid 12. Upon completion of installation, test safety reversal system. entanglement. 5. Where possible, install the door opener 7 feet (2.13 m) or more above the floor. Door MUST reverse on contact with a 1-1/2" (3.8 cm) high object (or a 2x4 laid flat) on the floor. 13. To avoid SERIOUS PERSONAL INJURY or DEATH from 6. Mount the emergency release within reach, but at least 6 feet electrocution, disconnect ALL electric and battery power (1.83 m) above the floor and avoiding contact with vehicles BEFORE performing ANY service or maintenance. to avoid accidental release. 14. DO NOT install on a one-piece door if using devices or 7. NEVER connect garage door opener to power source until features providing unattended close. Unattended devices instructed to do so. and features are to be used ONLY with sectional doors. SAVE THESE 8. NEVER wear watches, rings or loose clothing while installing or servicing opener. They could be caught in garage door or 15. opener mechanisms. INSTRUCTIONS. Power To prevent possible SERIOUS INJURY or DEATH from electrocution or fire: l Be sure power is NOT connected to the opener, and disconnect power to circuit BEFORE removing cover to establish permanent wiring connection. l Garage door installation and wiring MUST be in compliance with ALL local electrical and building codes. l NEVER use an extension cord, 2-wire adapter, or change plug in ANY way to make it fit outlet. Be sure the opener is grounded. To reduce the risk of electric shock, your garage door opener has a grounding type plug with a third grounding pin. This plug will only fit into a grounding type outlet. If the plug doesn't fit into your outlet, contact a qualified electrician to install the proper outlet. Option A Typical Wiring 1. Plug in the garage door opener into a grounded outlet. 2. DO NOT run garage door opener at this time. Option B Permanent Wiring If permanent wiring is required by your local code, refer to the PERMANENT WIRING following procedure. To make a permanent connection through the 7/8 inch hole in the top of Ground Tab the motor unit (according to local code): 1. Remove the motor unit cover screws and set the Green Ground Screw Black Wire cover aside. 2. Remove the attached 3- prong cord. 3. Connect the black (line) wire to the screw on the brass Ground Wire White Wire Black Wire terminal; the white (neutral) wire to the screw on the silver terminal; and the ground wire to the green ground screw. The opener must be grounded. 4. Reinstall the cover. 3
-
 1
1 -
 2
2 -
 3
3 -
 4
4 -
 5
5 -
 6
6 -
 7
7 -
 8
8 -
 9
9 -
10
-
11
-
12
-
13
-
14
-
15
-
16
-
17
-
18
-
19
-
20
-
21
-
22
-
23
-
24
-
25
-
26
-
27
-
28
-
29
-
30
-
31
-
32
-
33
-
34
-
35
-
36
 |
 |
