LiftMaster 881LM Instructions - Page 4
Feature Settings, Warranty
 |
View all LiftMaster 881LM manuals
Add to My Manuals
Save this manual to your list of manuals |
Page 4 highlights
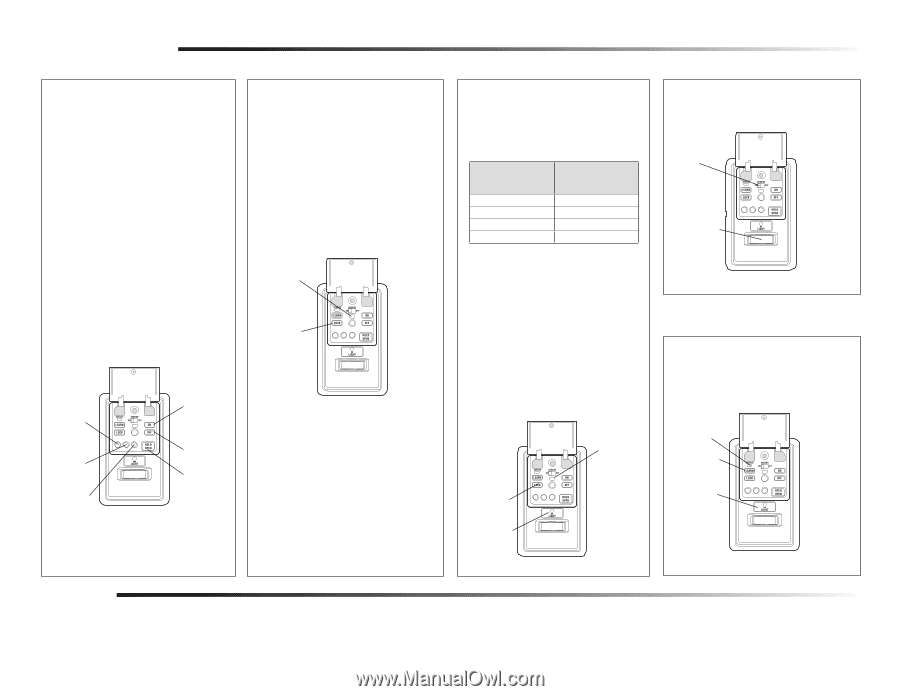
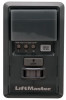
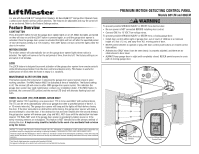
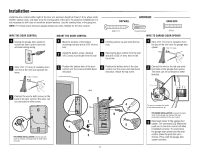
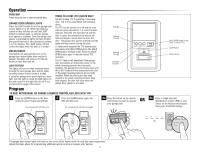
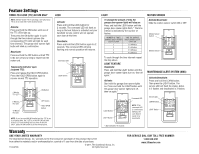
Feature Settings TIMER-TO-CLOSE (TTC) 881LM ONLY LOCK LIGHT MOTION SENSOR NOTE: DO NOT enable TTC if operating a one-piece door. TTC is to be used ONLY with sectional doors. Activate: Press and hold the ON button until one of the TTC LEDs light up. Then press the ON button again to cycle through the time interval options (the corresponding TTC LED will light for each time interval). The garage door opener light bulbs will blink as confirmation. Deactivate: Press and hold the OFF button until all TTC LEDs turn off and a beep is heard from the motor unit. Temporarily hold door open (suspend TTC): Press and release the HOLD OPEN button. Press the HOLD OPEN button again to resume normal TTC operation. 1 Minute TTC LED ON Button 5 Minute TTC LED 10 Minute TTC LED OFF Button HOLD OPEN Button NOTE: If you have an 880LM installed and the TTC is set to a custom time, the 3 LED's on the 881LM will blink. If the 3 LED's are blinking and you have an 881LM ONLY, press the ON button to set the time properly. Activate: Press and hold the LOCK button for 2 seconds. The command LED will flash as long as the lock feature is activated and your handheld remote control will not operate your door at this time. Deactivate: Press and hold the LOCK button again for 2 seconds. The command LED will stop flashing and normal operation will resume. Command LED LOCK Button To change the amount of time the garage door opener lights will stay on: Press and hold the LOCK button until the garage door opener lights flash.* The time interval is indicated by the number of flashes. NUMBER OF TIMES GARAGE DOOR OPENER LIGHTS FLASH 1 2 3 4 TIME THE GARAGE DOOR OPENER LIGHT STAYS ON 1 ½ Minutes 2 ½ Minutes 3 ½ Minutes 4 ½ Minutes To cycle through the time intervals repeat the step above. LIGHT FEATURE Deactivate: Press and hold the LIGHT button until the garage door opener lights turn on, then off again.* Activate: Start with the garage door opener lights on. Press and hold the LIGHT button until the garage door opener lights turn off, then on again.* Command LED LOCK Button LIGHT Button NOTE: If the command LED is continuously blinking, the Lock feature needs to be deactivated. Activate/Deactivate: Slide the motion sensor switch ON or OFF. Motion Sensor Switch Motion Sensor MAINTENANCE ALERT SYSTEM (MAS) Activate/Deactivate: Press and hold the LEARN button. Then press the LIGHT button. The service LED will flash the status; Active is 2 flashes and deactivated is 3 flashes. Service LED LEARN Button LIGHT Button * Approximately 10 seconds Warranty ONE YEAR LIMITED WARRANTY The Chamberlain Group, Inc. warrants to the first consumer purchaser of this product that is free from defect in materials and/or workmanship for a period of 1 year from the date of purchase. 114A4216C © 2011, The Chamberlain Group, Inc. All Rights Reserved FOR SERVICE DIAL OUR TOLL FREE NUMBER: 1-800-528-9131 www.liftmaster.com
-
 1
1 -
 2
2 -
 3
3 -
 4
4
 |
 |