LiftMaster CAPXLV2 Installation Manual - English French Spanish - Page 10
ACCOUNT SETUP, Setup a myQ® Community Account, Sign up for myQ® Community Services
 |
View all LiftMaster CAPXLV2 manuals
Add to My Manuals
Save this manual to your list of manuals |
Page 10 highlights
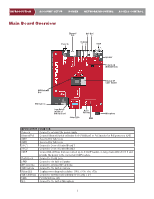
INTRODUCTION ACCOUNT SETUP POWER NETWORK/MOUNTING ACCESS CONTROL The following services are required for CAPXLV2 to fully function Setup a myQ® Community Account NIONTTE:RIOf yDouUhCaTveIOanNexisting mAyCQC® OacUcoNuTnt,SyEouTrUmPyQ® CoPmOmWunEityRaccounNtEwTillWhaOvRe Kth/eMsaOmUeNpTasIsNwGord. Go to: account.myQ.com and login. If you do not have a myQ® Community account: Method 1 1. Call LiftMaster Customer Care at 877.247.6764 to create a myQ® Community account. 2I.NTYRouOwDilUl gCeTt aIOwNelcome emAaCil fCroOmULNifTtMSasEteTr.UAPccept thPeOinWvitEatRion andNreEgTisWterOoRr Klog/MinOtoUyNouTrING account. 3. Setup the facility, select a subscription plan, add residents, and credentials (refer to the available Help in myQ® Community). 4. Continue with the installation of the CAPXLV2 in this manual. MIeNthToRdO2DUCTION ACCOUNT SETUP 1. Navigate to account.myq.com. POWER NETWORK/MOUNTING 2. Click the Sign Up button. 3. Follow on screen steps to set-up a facility, select Community Manager, or Dealer, select subscription plan, add residents, and credentials. 4. Continue with the installation of the CAPXLV2 in this manual. ACCESS CONTROL ACCESS CONTROL ACCESS CONTROL Sign up for myQ® Community Services Service subscriptions are required for CAPXLV2 to fully function. To sign up for services: 1. Set up a myQ Community account a. Go to: account.myQ.com b. If you don't have a myQ® account, choose Sign Up and follow the prompts to complete account signup. c. If you have an existing myQ® account, your myQ® Community account will have the same password. Choose Log In. 2. Create a new community a. If you don't have any communities in your account, you will be prompted to create a new community. Follow the prompts to complete community creation. 3. Add devices/subscription plan a. Under Device Management, select CAPXLV2 and any other LiftMaster access control devices. b. Subscription plan is pre-selected based on selected devices. Select any add-on services and check out. c. Follow the prompts to finish adding CAPXLV2 and any other LiftMaster acess control devices. 4. Configure the community a. Under People-People Management, add residents. Also make sure to assign at least one access group to each resident. b. Under People-Mobile App License Management, assign myQ Community App licenses to residents. c. For more, visit https://support.partner.liftmaster.com/s/community-access-support/admins-and-community-managers. 5. Continue with the installation of the CAPXLV2 in this manual. For Support, call 877.247.6764 or visit https://support.partner.liftmaster.com/s/community-access-support NOTE: VoIP service is required for calling function. LiftMaster partners exclusively with Phone.com to provide the best integrated solution for voice and video calling. Other VoIP providers are not compatible with our CAPXLV2. 10
-
 1
1 -
2
-
3
-
4
-
 5
5 -
 6
6 -
 7
7 -
 8
8 -
 9
9 -
 10
10 -
 11
11 -
 12
12 -
 13
13 -
 14
14 -
 15
15 -
16
-
17
-
18
-
19
-
20
-
21
-
22
-
23
-
24
-
25
-
26
-
27
-
28
-
29
-
30
-
31
-
32
-
33
-
34
-
35
-
36
-
37
-
38
-
39
-
40
-
41
-
42
-
43
-
44
-
45
-
46
-
47
-
48
-
49
-
50
-
51
-
52
-
53
-
54
-
55
-
56
-
57
-
58
-
59
-
60
-
61
-
62
-
63
-
64
-
65
-
66
-
67
-
68
-
69
-
70
-
71
-
72
-
73
-
74
-
75
-
76
-
77
-
78
-
79
-
80
-
81
-
82
-
83
-
84
 |
 |
