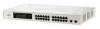
Linksys EF24G2 User Guide - Page 10
Link Status, Admin Status, Space Bar, Enabled, Disabled, Enter, Auto Negotiate, Space, Speed/Duplex
 |
UPC - 745883550319
View all Linksys EF24G2 manuals
Add to My Manuals
Save this manual to your list of manuals |
Page 10 highlights
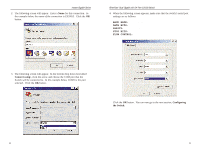
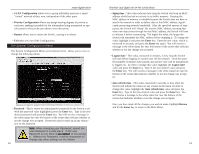
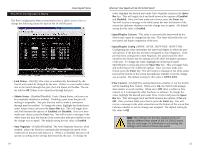
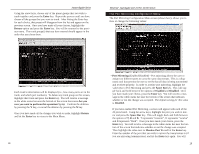
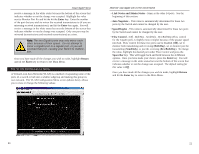
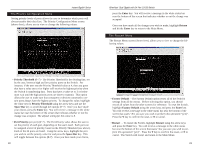
The Port Configuration Menu Instant Gigabit®Series The Port Configuration Menu screen (shown here), allows you to view or change the following values for each of the 24 10/100 ports: • Link Status - (On/Off) This value is automatically determined by the Switch and cannot be changed by the user. If there is a successful connection to the Switch through that port, the Link Status will be On. The status will be Off if there is no connection through that port. • Admin Status - (Enabled/Disabled) Under Admin Status, each port can be completely disabled or enabled. Disabling a port turns the port off, making it inoperable. Any port that you wish to make a connection through must be enabled. To change the value, highlight the desired port under Admin Status and press the Space Bar key. This will toggle back and forth between the options of Enabled and Disabled. Once you have made your choice, press the Enter key. You will receive a message in the white status bar near the bottom of the screen that indicates whether or not the change was accepted. The default setting for this value is Enabled. • Auto Negotiate - (Enabled/Disabled) The Auto Negotiate function, when enabled, allows the Switch to automatically determine the speed of the connection of that port and adjust to it. When it is disabled, that port will operate according to the settings determined by the user. To change the 14 EtherFast® Dual Gigabit with 24-Port 10/100 Switch value, highlight the desired port under Auto Negotiate and press the Space Bar key. This will toggle back and forth between the options of Enabled and Disabled. Once you have made your choice, press the Enter key. You will receive a message in the white status bar near the bottom of the screen that indicates whether or not the change was accepted. The default setting for this value is Enabled. • Speed/Duplex Current - This value is automatically determined by the Switch and cannot be changed by the user. The value will reflect the current speed and duplex negotation of the port. • Speed/Duplex Config (10HDX, 10FDX, 100TX-HDX, 100TX-FDX) Configuring this value determines the speed and duplex at which the port will operate, if the port has not been configured to Auto Negotiate. If the port has been configured to Auto Negotiate, the speed would be determined by the Switch, but this setting will still affect the duplex operation of the port. To change the value, highlight the desired port under Speed/Duplex Config and press the Space Bar key. This will toggle back and forth between the 4 different options. Once you have made your choice, press the Enter key. You will receive a message in the white status bar near the bottom of the screen that indicates whether or not the change was accepted. The default setting for this value is 100TX-FDX. • Flow Control - (On/Off) This setting determines whether or not the Switch will be handling flow control. When set to On, the Switch will manage data transfer to avoid overflow. When set to Off, there is either no flow control, or it is managed by other hardware or software. To change the value, highlight the desired port under Flow Control and press the Space Bar key. This will toggle back and forth between the options of On and Off. Once you have made your choice, press the Enter key. You will receive a message in the white status bar near the bottom of the screen that indicates whether or not the change was accepted. The default setting for this value is Off. Note: The settings for the two Gigabit ports are slightly different than those of the 24 10/100 ports. See the next page for information concerning the settings and values of these two ports. 15
-
 1
1 -
2
-
3
-
4
-
 5
5 -
 6
6 -
 7
7 -
 8
8 -
 9
9 -
 10
10 -
 11
11 -
 12
12 -
 13
13 -
 14
14 -
 15
15 -
16
-
17
-
18
-
19
 |
 |
