Linksys WET54GS5 User Guide - Page 16
Connecting the Wireless-G Ethernet Bridge for Setup - antenna
 |
UPC - 745883559022
View all Linksys WET54GS5 manuals
Add to My Manuals
Save this manual to your list of manuals |
Page 16 highlights
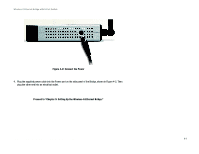
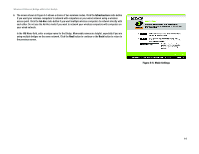
Wireless-G Ethernet Bridge with 5-Port Switch Chapter 4: Connecting the Wireless-G Ethernet Bridge for Setup 1. Attach the Bridge's antenna. 2. Plug the included Ethernet network cable into one of the five LAN ports on the back panel of the Bridge, shown in Figure 4-1. Figure 4-1: Connect to the Network 3. Plug the other end of the Ethernet network cable into the RJ-45 port of the hub, switch, or PC you wish to use to configure the Bridge. Chapter 4: Connecting the Wireless-G Ethernet Bridge for Setup 10
-
 1
1 -
2
-
3
-
4
-
5
-
6
-
7
-
8
-
9
-
10
-
 11
11 -
 12
12 -
 13
13 -
 14
14 -
 15
15 -
 16
16 -
 17
17 -
 18
18 -
 19
19 -
 20
20 -
 21
21 -
22
-
23
-
24
-
25
-
26
-
27
-
28
-
29
-
30
-
31
-
32
-
33
-
34
-
35
-
36
-
37
-
38
-
39
-
40
-
41
-
42
-
43
-
44
-
45
-
46
-
47
-
48
-
49
-
50
-
51
-
52
-
53
-
54
-
55
-
56
-
57
-
58
-
59
-
60
-
61
-
62
-
63
-
64
-
65
-
66
-
67
-
68
-
69
 |
 |

10
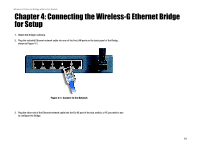
Chapter 4: Connecting the Wireless-G Ethernet Bridge for Setup
Wireless-G Ethernet Bridge with 5-Port Switch
Chapter 4: Connecting the Wireless-G Ethernet Bridge
for Setup
1.
Attach the Bridge’s antenna.
2.
Plug the included Ethernet network cable into one of the five LAN ports on the back panel of the Bridge,
shown in Figure 4-1.
3.
Plug the other end of the Ethernet network cable into the RJ-45 port of the hub, switch, or PC you wish to use
to configure the Bridge.
Figure 4-1: Connect to the Network