Logitech 980-000085 User Manual - Page 4
Setup and Installation, Using Your Speakers
 |
UPC - 097855047618
View all Logitech 980-000085 manuals
Add to My Manuals
Save this manual to your list of manuals |
Page 4 highlights
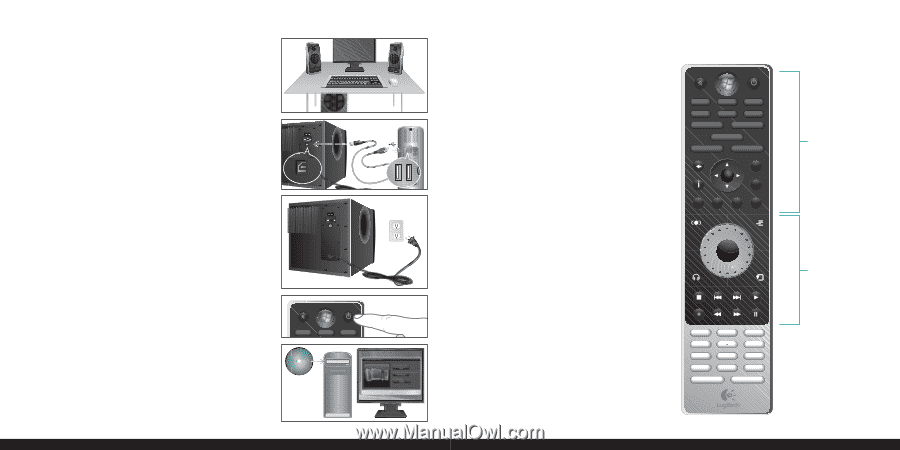
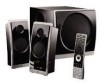
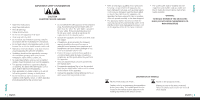
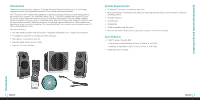
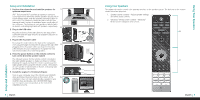
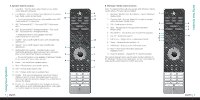
Setup and Installation 1. Position the subwoofer and satellite speakers for 1. optimum experience SRS® TruSurround HD™ provides an optimum surround sound experience when the satellite speakers are placed an equal distance apart, with the primary listening location in the center. The subwoofer should be placed on the floor, leaving at least 6 inches of ventilation space on all sides of the enclosure. The bottom of each speaker is labeled with an R and L, indicating Right and Left speakers, respectively. 2. 2. Plug-in the USB cable Plug the small end of the USB cable into the back of the USB subwoofer and the large end into an available USB port on your computer. 3. Plug-in the AC power cable First, plug the small end into the back of the subwoofer. Then, plug the large end into the AC plug on the wall. After 3. plugging in the AC power cable, you may need to wait a few minutes for your computer to recognize the new system and enable the Z Cinéma speakers. 4. Press the power button on the remote control to turn on the Z Cinéma speaker system The infrared receiver for the remote control is located in the right satellite speaker, so make sure there is nothing blocking the signal and that the remote is pointing at the right speaker when using the remote control. The bottom of each satellite is labeled with an R and L, indicating right 4. and left speakers, respectively. 5. Install the Logitech® Z Cinéma Software Turn on your computer, insert the CD into your CD/DVD drive and follow the instructions on the screen. If the installation does not start automatically, navigate to your CD/DVD drive and double-click CDSTART.EXE. Make sure to register your new product at the end of the installation process. 5. usb aux Logitech® Z Cinéma Software Le logiciel Z Cinéma V1. 0 Microsoft® Windows® XP Media Center Edition Microsoft Windows Vista® ©2007 Logitech. All rights reserved. Logitech, the Logitech logo, and other Logitech marks are owned by Logitech and may be registered. All other trademarks are the property of their respective owners. ©2007 Logitech. Tous droits réservés. Logitech, le logo Logitech et les autres marques Logitech sont la propriété exclusive de Logitech et sont susceptibles d'être des marques déposées. Toutes les autres marques sont la propriété exclusive de leurs détenteurs respectifs. www.logitech.com display Setup and Installation |5 English Using Your Speakers The advanced remote control is the primary interface to the speaker system. The buttons on the remote control serve two purposes: 1. Speaker system controls - Adjust speaker settings and other audio controls. 2. Windows® Media Center controls - Windows® Media Center navigation and control. usb aux display music video photos recorded tv live tv full screen 2 guide dvd menu back more 1 Ch+ OK channel Ch- 2 3 4 presets stop replay skip play rec 1 rew fwd 2 abc pause 3 def 4 ghi 5 jkl 6 mno 7 pqrs 8 tuv 9 wxyz clear 0 # clear enter 1 | English 6 Using Your Speakers
-
 1
1 -
 2
2 -
 3
3 -
 4
4 -
 5
5 -
 6
6 -
 7
7 -
 8
8 -
 9
9 -
 10
10
 |
 |