MSI 945GT User Guide
MSI 945GT Manual
 |
View all MSI 945GT manuals
Add to My Manuals
Save this manual to your list of manuals |
MSI 945GT manual content summary:
- MSI 945GT | User Guide - Page 1
945GT Speedster MS-9632 (V1.X) Workstation Board G52-96321X1 i - MSI 945GT | User Guide - Page 2
, please try the following help resources for further guidance. Visit the MSI website at http://www.msi.com.tw/program/service/faq/ faq/esc_faq_list.php for FAQ, technical guide, BIOS updates, driver updates, and other information. Contact our technical staff at http://support.msi.com.tw/. ii - MSI 945GT | User Guide - Page 3
1. Always read the safety instructions carefully. 2. Keep this User's Manual for future reference. 3. Keep this . 11. If any of the following situations arises, get the equipment checked by a service personnel: † The power cord or plug is damaged. † Liquid has penetrated into the equipment - MSI 945GT | User Guide - Page 4
if not installed and used in accordance with the instructions, may cause harmful interference to radio communications. However, limits. VOIR LANOTICE D'INSTALLATIONAVANT DE RACCORDER AU RESEAU. Micro-Star International MS-9632 This device complies with Part 15 of the FCC Rules. Operation is subject - MSI 945GT | User Guide - Page 5
WEEE (Waste Electrical and Electronic Equipment) Statement v - MSI 945GT | User Guide - Page 6
vi - MSI 945GT | User Guide - Page 7
vii - MSI 945GT | User Guide - Page 8
...ii Revision History ...ii Technical Support ...ii Safety Instructions ...iii FCC-B Radio Frequency Interference MSI Special Feature 1-5 Chapter 2. Hardware Setup 2-1 Quick Components Guide 2-2 CPU (Central Processing Unit 2-3 CPU 2-17 Jumpers ...2-17 BIOS Flash Jumper: BIOS_WP1 2-18 viii - MSI 945GT | User Guide - Page 9
ICH7R SATA RAID A-1 ICH7R Introduction A-2 BIOS Configuration A-2 Using the Intel Matrix Stroage Manager Option ROM A-3 Installing Software A-8 Install Driver in W indows XP / 2000 A-9 Installation of Intel Matrix Storage Console A-10 RAID Migration Instructions A-14 Create RAID Volume from - MSI 945GT | User Guide - Page 10
Sound Effect B-5 Mixer ...B-8 Audio I/O ...B-13 Microphone B-18 3D Audio Demo B-19 Information B-20 Hardware Setup B-23 x - MSI 945GT | User Guide - Page 11
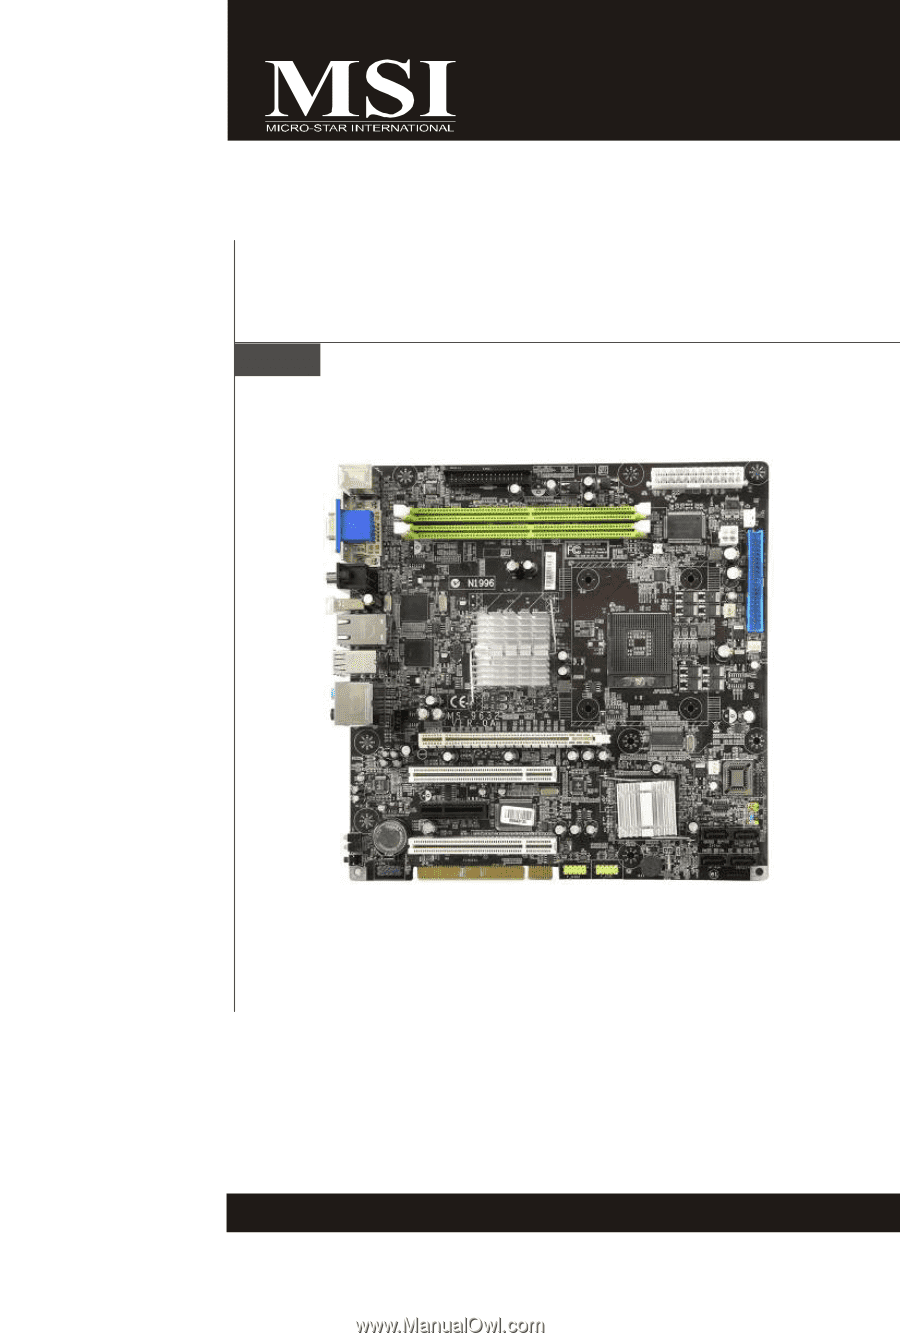
an excellent u-ATX workstation board from MSI. Based on the innovative Intel® 945GT & ICH7R controllers for optimal system efficiency, the 945GT Speedster server board accommodates the latest Intel® Core Duo/Core Solo/Celeron M processors in 478-pin package and supports up to two 240-pin 533/667MHz - MSI 945GT | User Guide - Page 12
Core Technology to 533/667MHz and up Supported FSB - 533/667MHz Chipset - North Bridge: Intel® 945GT chipset - South Bridge: Intel® ICH7R chipset Memory Support - DDRII 533/667 SDRAM (4GB Max) - 2 DIMMs DDRII (240pin / 1.8V) LAN - Supports PCI Express LAN GB Fast Ethernet by Intel 82573E/L IEEE 1394 - MSI 945GT | User Guide - Page 13
Supports Express x 4 slot - 2 32-bit/33MHz PCI slots Form Factor - u-ATX (24.4cm X 24.4 cm) Mounting - 9 mounting holes MS-95J9 Card - W ith 2 PCI slots - Could extend u-ATX form factor to ATX form factor - 18.016 cm X 6.1 cm For more information on compatible components, please visit http://www.msi - MSI 945GT | User Guide - Page 14
ALC880 PCI3 PCI1 BATT + PCI2 J1394_1 Intel 9 4 5G T AT X 1 DIMM1 DIMM2 COM1 JPW1 CPU FAN1 IDE 1 SYSFAN2 Intel ICH7R SYSFAN1 BIOS JFP1 F_USB2 F_USB1 SATA4 SATA3 C LR_C MO S1 SATA2 SATA1 JLPC1 MS-95J9 Extension Card PCI1 PCI2 945GT Speedster (MS-9632 v1.X) u-ATX Workstation Board 1-4 - MSI 945GT | User Guide - Page 15
Getting Started MSI Special Feature Core Center (Optional) The Core Center is a new utility you Vcore, 3.3V, +5V and 12V. In the right side it shows the current PC hardware status such as the CPU & system temperatures and all fans speeds. W hen you click the red triangles in the left and right sides, - MSI 945GT | User Guide - Page 16
M S-9632 Workstation Board Left-side: Current system status In the left sub-menu the desired FSB you just configured. Also you may click Auto to start testing the maximal CPU overclocking value. The CPU FSB will automatically increase the testing value until the PC reboots. Or you may click Default - MSI 945GT | User Guide - Page 17
Hardware Setup Chapter 2 Hardware Setup This chapter provides you with the information about hardware setup procedures. While doing the installation, be careful in holding the components and follow the installation procedures. For some components, if you install in the wrong orientation, the - MSI 945GT | User Guide - Page 18
M S-9632 Workstation Board Quick Components Guide Back Panel I/O, p.2-8 JCD1, p.2-14 PCI-E Slot, p.2-19 PCI Slots, p.2-19 PCI-E Slot, p.2-19 FDD1, p.2-11 DDRII DIMMs, p.2-6 ATX1, p.2-10 COM1,p.2-15 JPW1, p.2-10 IDE1, p.2-11 CPUFAN1/ SYSFAN2, p.2-13 CPU, p.2-3 SYSFAN1, p.2-13 BIO S JLPC1, - MSI 945GT | User Guide - Page 19
supports Intel® Core Duo/Core Solo/Celeron M processors in 478-pin package. The mainboard uses Socket 478 for easy CPU installation. W hen you are installing the CPU, make sure the CPU .msi.com. tw/program/products/server/svr/pro_svr_qvl.php . Important 1. Overheating will seriously damage the CPU - MSI 945GT | User Guide - Page 20
M S-9632 Workstation Board CPU & Cooler Set Installation 1. Place the CPU on top of the socket. Make sure to align the gold arrow on the CPU with the arrow key on the socket. 2. Push the CPU down until its pins securely fit into the socket. 3. On the front end of the CPU socket is a locking - MSI 945GT | User Guide - Page 21
Hardware Setup 5. Mount the cooler set (fan & heatsink bundled) on top of the CPU and fit it into the retention mechanism. 6. Secure the metal clips back to the 7. Connect the fan power cable from the retention mechanism. mounted fan to the 3-pin fan power con- nector on the mainboard. 2-5 - MSI 945GT | User Guide - Page 22
M S-9632 Workstation Board Memory The mainboard provides two 240-pin non-ECC DDRII 533/667 DIMMs and supports up to 4GB system memory. For more information on compatible components, please visit http://www.msi.com. tw/program/products/server/svr/pro_svr_qvl.php. DDRII 240-pin, 1.8V 64x2=128 pin - MSI 945GT | User Guide - Page 23
Hardware Setup Installing DDRII Modules 1. The memory module has only one notch on the center and will only fit in the right orientation. 2. Insert the DIMM memory module vertically into the DIMM slot. Then push it in until the golden finger on the memory module is deeply inserted in the socket. - MSI 945GT | User Guide - Page 24
M S-9632 Workstation Board Back Panel Mouse VGA Port RCA Gb LAN L-In RS-Out L-Out CS-Out Keyboard DVI other end of the cable is properly connected to your monitor (refer to your monitor manual for more information.) RCA Connector The RCA connector allows users to connect display devices for - MSI 945GT | User Guide - Page 25
Hardware Setup Important After system resetting, we have to use hard keys to switch to the desired display device if the currently used type is different from the default type. (For example, if we use a VGA cable to connect the VGA port in the previous operation, the default display device will be - MSI 945GT | User Guide - Page 26
M S-9632 Workstation Board Power Supply SSI 24-Pin System Power Connector 11, 12, 23 & 24 to avoid wrong installation. pin 12 SSI 4-Pin CPU Power Connector: JPW1 This connector provides 12V power output to the CPU. ATX1 1 12 13 24 ATX1 Pin Definition PIN SIGNAL PIN SIGNAL 1 +3.3V 13 - MSI 945GT | User Guide - Page 27
Hardware Setup Connectors Floppy Disk Drive Connector: FDD1 This standard FDD connector supports 360K, 720K, 1.2M, 1.44M and 2.88M floppy disk types. FDD1 ATA133 Hard Disk Connector: IDE1 The . Refer to the hard disk documentation supplied by hard disk vendors for jumper setting instructions. 2-11 - MSI 945GT | User Guide - Page 28
M S-9632 Workstation Board Serial ATA Connectors: SATA1~SATA4 SATA1~SATA4 are high-speed SATA II interface ports and support SATA II data rates of 300MB/s. Each SATA II connector can connect to 1 hard disk device and is fully compliant with Serial ATA 2.0 specifications. Please - MSI 945GT | User Guide - Page 29
Ground Fan Power Connectors: CPUFAN1, SYSFAN1, SYSFAN2 The fan power connectors support system cooling fan with +12V. W hen connecting the wire to the has a System Hardware Monitor chipset on-board, you must use a specially designed fan with speed sensor to take advantage of the CPU fan c on tr ol - MSI 945GT | User Guide - Page 30
M S-9632 Workstation Board CD-In Connector: JCD1 This connector is provided for CD-ROM connection to the front panel switches and LEDs. The JFP1 is compliant with Intel® Front Panel I/O Connectivity Design Guide. JFP1 1 HDD + LED - Reset Switch + 9 2 Power LED + Power - Switch 10 JFP1 Pin - MSI 945GT | User Guide - Page 31
Hardware Setup FWH/LPC Debugging Pin Header: JLPC1 The pin header is for internal debugging only. JLPC1 1 2 13 14 JLPC1 Pin Definition PIN SIGNAL 1 LCLK 3 LRST# 5 LAD0 7 LAD1 9 LAD2 11 LAD3 13 LFRAME# PIN SIGNAL 2 Key (no pin) 4 VCC3 6 FID0_LRST 8 VCC5 10 Key(no pin) 12 - MSI 945GT | User Guide - Page 32
M S-9632 Workstation Board Front USB Connectors: F_USB1, F_USB2 The mainboard provides two USB 2.0 pinheaders (optional USB 2.0 bracket available) that are compliant with Intel® I/O Connectivity Design Guide. USB 2.0 technology increases data transfer rate up to a maximum throughput of 480Mbps, - MSI 945GT | User Guide - Page 33
Hardware Setup Jumpers Clear CMOS Jumper: CLR_CMOS1 There is a CMOS RAM onboard that has a power supply from external battery to keep the data of system configuration. With the CMOS RAM, the system can automatically boot OS every time it is turned on. If you want to clear the system configuration, - MSI 945GT | User Guide - Page 34
M S-9632 Workstation Board BIOS Flash Jumper: BIOS_WP1 This jumper is used to enable/disable the BIOS flash. W hen you intend to update the BIOS code, uncap this jumper first. Under normal operation, we suggest that you disable the BIOS flash by capping the BIOS_WP1 jumper to protect the system BIOS - MSI 945GT | User Guide - Page 35
doubling the capability of existing AGP 8x designs with transfer rates of 4.0 GB/s over a PCI Express x16 lane for graphics controllers, while PCI Express x1 supports transfer rate of 250 MB/s. PCI Express x16 Slot PCI Express x4 Slot PCI (Peripheral Component Interconnect) Slots The PCI slots - MSI 945GT | User Guide - Page 36
M S-9632 Workstation Board FINGER1 Golden Finger The FINGER1 enables connection to the MS-95J9 Extension Card: (1) to provide the system with two additional 32-bit PCI slots and, (2) to extend the mainboard from u-ATX form factor to ATX form factor. BIOS FINGER1 PCI1 PCI2 MS-95J9 Extension Card - MSI 945GT | User Guide - Page 37
This chapter provides information on the BIOS Setup program and allows you to configure the system for optimum use. You may need to run the Setup program when: ² An error message appears - MSI 945GT | User Guide - Page 38
M S-9632 Workstation Board Entering Setup Power on the computer and the system will to BIOS maker as A = AMI, W = AWARD, and P = PHOENIX. 2nd - 5th digit refers to the model number. 6th digit refers to the chipset as I = Intel, N = nVidia, and V = VIA. 7th - 8th digit refers to the customer as MS = - MSI 945GT | User Guide - Page 39
BIOS Setup Control Keys Enter> Move to the sub-menu. If you want to return to the main menu, just press the . General Help The BIOS setup program provides a General Help screen. You can call up this screen from any menu by simply pressing . The - MSI 945GT | User Guide - Page 40
system's chipset. PC Health This entry monitors your hardware health status. Security Use this menu to set Supervisor and User Passwords. System This entry shows your system summary. Boot Use this menu to specify the priority of boot devices. Exit This menu allows you to load the BIOS default values - MSI 945GT | User Guide - Page 41
Main BIOS Setup Date (mm:dd:yy) The date format is , . Time (hh:mm:ss) The time format is . IDE Channel 0/1 Master/Slave Press PgUp/ or PgDn/ to select [Manual], [None] or [Auto] type. Note that the specifications of your drive must match - MSI 945GT | User Guide - Page 42
M S-9632 Workstation Board Drive A This item allows you to set the type of floppy drives installed. Base/Extended/Total M emory The three items show the memory status of the system. (Read-only) 3-6 - MSI 945GT | User Guide - Page 43
Advanced BIOS Setup Advanced BIOS Features The sub-menu is used to configure chipset features for optimal system performance. 3-7 - MSI 945GT | User Guide - Page 44
on the DRAM module. Setting to [By SPD] enables DRAM timing to be determined automatically by BIOS based on the configurations on the SPD. Selecting [Manual] allows users to configure the following fields manually. CAS Latency Time This controls the timing delay (in clock cycles) before SDRAM starts - MSI 945GT | User Guide - Page 45
, it defaults to the onboard graphics processor. W hen set to [Auto], the BIOS checks to see if a PCI Express graphics card is installed. If it detects that a PCI Express graphics card is present, the motherboard boots up using that card. Otherwise, it defaults to the onboard graphics processor. On - MSI 945GT | User Guide - Page 46
M S-9632 Workstation Board Video Connector This setting specifies the connector for video devices. Integrated Peripherals Press to enter the sub-menu and the following screen - MSI 945GT | User Guide - Page 47
indows ME, XP or a third-party IDE bus master driver). If your hard drive and your system software both support Ultra DMA/33, Ultra DMA/66, Ultra DMA/100 and Ultra DMA/133, select [Auto] to enable BIOS support. *** On-Chip Serial ATA Setting *** SATA Mode This setting specifies the SATA controller - MSI 945GT | User Guide - Page 48
M S-9632 Workstation Compliancy Mode This setting specifies the compliancy mode of the PCI-Express ports (1.0 or 1.0a). USB Controller This setting is used interfaced keyboard/mouse in the operating system that does not support or have any USB driver installed, such as DOS and SCO Unix. Azalia/AC97 - MSI 945GT | User Guide - Page 49
BIOS Setup Super IO Device Press to enter the sub-menu and the following screen appears: Onboard FDC Controller Select [Enabled] if your system has a - MSI 945GT | User Guide - Page 50
9632 Workstation Board Power Management Setup Press to enter the sub-menu and the following screen appears: PCI Express PME Function This setting specifies whether the system will be awakened by the PCI Express If your operating system supports ACPI, such as lost (CPU or chipset) and hardware - MSI 945GT | User Guide - Page 51
BIOS Setup Soft-Off by PWR-BTTN This feature allows users to configure the power button function. Settings are: [Instant-Off] The power button functions as a - MSI 945GT | User Guide - Page 52
M S-9632 Workstation Board Spread Spectrum W hen the motherboard's clock generator reduced to flatter curves. Important 1. If you do not have any EMI problem, leave the setting at [Disabled] for optimal system stability and performance. But up. CPU Clock This item specifies the clock frequency of the - MSI 945GT | User Guide - Page 53
PC Health BIOS Setup Smart Fan Setting The sub-menu is used to control fan speeds for optimal system performance. 3-17 - MSI 945GT | User Guide - Page 54
M S-9632 Workstation Board Smart SYSFan1 / CPUFan1 Temperature Select a temperature setting here, and if the temperature of the CPU/system climbs up to the selected temperature setting, the system will automatically increase the speed of the CPU/system fan to cool down the overheated CPU/ system. - MSI 945GT | User Guide - Page 55
Setup utility. Set User Password User Password controls access to the system at boot. Security Option This specifies the type of BIOS password protection that is implemented. Settings are described below: Option [Setup] [System] Description The password prompt appears only when end users try - MSI 945GT | User Guide - Page 56
M S-9632 Workstation Board System System Summary Press to view the hardware specifications of your system. 3-20 - MSI 945GT | User Guide - Page 57
BIOS Setup Halt On The setting determines whether the system will stop if an error is detected at boot. W hen the system stops for the errors - MSI 945GT | User Guide - Page 58
M S-9632 Workstation Board Boot Removable Device Priority/Hard Disk Boot Priority/CD Device/Second Boot Device/Third Boot Device The items allow you to set the sequence of boot devices where BIOS attempts to load the disk operating system. Boot Other Device Setting the option to [Enabled] allows the - MSI 945GT | User Guide - Page 59
Setup Load Fail-Safe Defaults Use this menu to load the default values set by the BIOS vendor for stable system performance. Load Optimized Defaults Use this menu to load the default values set by the mainboard manufacturer specifically for optimal performance - MSI 945GT | User Guide - Page 60
M S-9632 Workstation Board 3-24 - MSI 945GT | User Guide - Page 61
Intel ICH7R SATA RAID Appendix A Intel ICH7R SATA RAID The ICH7R provides a hybrid solution that combines four independent SATAII ports for support of up to four Serial ATAII (Serial ATAII RAID) drives. It offers RAID level 0 (Striping), RAID level 1 (Mirroring and Duplexing), RAID level 5 (Block - MSI 945GT | User Guide - Page 62
M S-9632 Workstation Board ICH7R Introduction The ICH7R provides a hybrid solution that combines four independent SATAII ports for support of up to four Serial ATAII (Serial ATAII RAID) drives. Serial ATAII (SATAII) is the latest generation of the ATA interface. SATA hard drives deliver - MSI 945GT | User Guide - Page 63
BIOS on all motherboards with a supported Intel chipset. The Intel Matrix Stroage Manager Option ROM is the Intel RAID implementation and provides BIOS and DOS disk services following message will appear for a few seconds: Important The "Driver Model", "Serial #" and "Size" in the following example - MSI 945GT | User Guide - Page 64
M S-9632 Workstation Board After pressing the and keys simultaneously, the following window will appear: (1) Create RAID Volume 1. Select option 1 "Create RAID Volume" and press - MSI 945GT | User Guide - Page 65
Intel ICH7R SATA RAID 3. In the Disk field, press key and the following screen appears. Use key to select the disks you want to create for the RAID volume, then click key to finish selection. 4. Then select the strip value for the RAID array by using the "upper arrow" or " - MSI 945GT | User Guide - Page 66
M S-9632 Workstation Board Important Since you want to create two volumes (Intel Matrix RAID Technology), this default size (maximum) needs to be reduced. Type in a new - MSI 945GT | User Guide - Page 67
Intel ICH7R SATA RAID (2) Delete RAID Volume Here you can delete the RAID volume, but please be noted that all data on RAID drives will be lost. Important If your system currently boots to RAID and you delete the RAID volume in the Intel RAID Option ROM, your system will become unbootable. Select - MSI 945GT | User Guide - Page 68
M S-9632 Workstation Board (3) Reset Disks to Non-RAID Select option 3 Reset Disks to Non-RAID and press to delete the RAID volume and remove any - MSI 945GT | User Guide - Page 69
Setup screen, press the key. Setup will now load all device files and then continue the Windows XP/2000 installation. † Existing Windows XP/2000 Driver Installation 1. Insert the MSI CD into the CD-ROM drive. 2. The CD will auto-run and the setup screen will appear. 3. Under the - MSI 945GT | User Guide - Page 70
that contains important data. For this reason, you cannot remove or un-install this driver from the system after installation; however, you will have the ability to un-install all other non-driver components. Insert the MSI CD and click on the Intel IAA RAID Edition to install the software. Click - MSI 945GT | User Guide - Page 71
Intel ICH7R SATA RAID The InstallShield Wizard will begin automatically for installation showed as following: Click on the Next button to proceed the installation in the welcoming window. A-11 - MSI 945GT | User Guide - Page 72
M S-9632 Workstation Board The window shows the components to be installed. Click Next button to continue. After reading the license agreement in the following window, click Yes button to continue. A-12 - MSI 945GT | User Guide - Page 73
Intel ICH7R SATA RAID Select the folder in which you want the program to be installed in the following window, and click Next button to start installation. Select a program folder in the following window where you want Setup to add the program icon. A-13 - MSI 945GT | User Guide - Page 74
M S-9632 Workstation Board The following window appears to show the Intel Application Accelerator RAID Edition Setup installation status. Once the installation is complete, the following window appears. A-14 - MSI 945GT | User Guide - Page 75
drive. Refer to On Chip SATA Setting for properly setting of the BIOS. 2. Install the Intel Application Accelerator RAID Driver during W indows Setup. Refer to Installing Software for instructions on installing the driver during W indows Setup. 3. Install the Intel Matrix Storage Console after the - MSI 945GT | User Guide - Page 76
M S-9632 Workstation Board Create RAID Volume from Existing Disk To create a RAID volume from an existing disk, choose Action --> Create RAID Volume from Existing Hard Drive. - MSI 945GT | User Guide - Page 77
Intel ICH7R SATA RAID (1) Step 1: Configure Volume Here you can configure the new RAID volume by entering the volume name, selecting the RAID level and strip size. † RAID Volume Name: A desired RAID volume name needs to be typed in where the 'RAID_Volume1' text currently appears above. The RAID - MSI 945GT | User Guide - Page 78
M S-9632 Workstation Board expensive (requiring read-in prior to write, in order to be able to calculate the correct parity information), or similar to RAID-1 writes. - MSI 945GT | User Guide - Page 79
Intel ICH7R SATA RAID (3) Select Member Hard Drive(s) Then select the member disk (the target disk) that you wish to use and then click "-->" to move it to the Selected field. Then click Next to continue. Please note that the existing data on the selected hard drive(s) will be deleted permanently. - MSI 945GT | User Guide - Page 80
M S-9632 Workstation Board (4) Specify Volume Size Specify the amount of available array space to be used by the new RAID volume. You may enter the amount - MSI 945GT | User Guide - Page 81
Intel ICH7R SATA RAID (6) Start Migration The migration process may take up to two hours to complete depending on the size of the disks being used and the strip size selected. A dialogue window will appear stating that the migration process may take considerable time to complete, meanwhile a popup - MSI 945GT | User Guide - Page 82
M S-9632 Workstation Board Degraded RAID Array A RAID 1, RAID 5 or RAID 10 volume is reported as degraded when one of its hard drive members fails or is - MSI 945GT | User Guide - Page 83
(R) Storage Utility will be launched. Right-click the new hard drive and select 'Rebuild to this Disk'. The 'Rebuild W izard' will be launched which will guide you through the process of rebuilding to the new hard drive. A-23 - MSI 945GT | User Guide - Page 84
M S-9632 Workstation Board A-24 - MSI 945GT | User Guide - Page 85
Realtek ALC880 Audio Appendix B Realtek ALC880 Audio The Realtek ALC880 provides support for 8-channel audio output, including 2 Front, 2 Rear, 1 Center and 1 Subwoofer channel. ALC880 allows the board to attach 2, 4, 6 or 8 speakers for better surround sound effect. The - MSI 945GT | User Guide - Page 86
for Windows 2000/XP For W indows® 2000, you must install W indows® 2000 Service Pack4 or later before installing the driver. For Windows® XP, you must install W indows® XP Service Pack1 or later before installing the driver. The following illustrations are based on W indows® XP environment and could - MSI 945GT | User Guide - Page 87
Realtek ALC880 Audio 3. Click Next to install the Realtek High Definition Audio Driver. 4. Click Finish to restart the system. Click here Select this option Click here B-3 - MSI 945GT | User Guide - Page 88
M S-9632 Workstation Board Software Configuration After installing the audio driver, you are able to use the 2-, 4-, 6- or 8- channel audio feature now. Click the audio icon from the system tray at the lower-right corner of - MSI 945GT | User Guide - Page 89
Realtek ALC880 Audio Sound Effect Here you can select a sound effect you like from the Environment list. Load EQ Setting Reset EQ Setting EQ Setting On/Off Save Preset Delete EQ Setting You may choose the provided sound effects, and the equalizer will adjust automatically. If you like, you may also - MSI 945GT | User Guide - Page 90
M S-9632 Workstation Board Equalizer Selection Equalizer frees users from default settings; users may create their owned preferred settings by utilizing this tool. 10 bands of equalizer, - MSI 945GT | User Guide - Page 91
Realtek ALC880 Audio Frequently Used Equalizer Setting Realtek HD Audio Sound Manager provides you certain optimized equalizer settings that are frequently used for your quick enjoyment. [How to Use It] Other than the buttons "Pop" "Live" "Club" & "Rock" shown on the page, to pull down the arrow in - MSI 945GT | User Guide - Page 92
M S-9632 Workstation Board Mixer In the Mixer part, you may adjust the volumes of after you plug the speakers into the jacks on the front panel. 2. Multi-Stream Function ALC880 supports an outstanding feature called Multi-Stream, which means you may play different audio sources simultaneously and - MSI 945GT | User Guide - Page 93
Realtek ALC880 Audio W hen you are playing the first audio source (for example: use W indows Media Player to play DVD/VCD), the output will be played from the rear panel, which is the default setting. Then you must to select the Realtek HD Audio front output from the scroll list first, and use a - MSI 945GT | User Guide - Page 94
M S-9632 Workstation Board 3. Playback control Tool Mute Playback device This function is to let you freelydecide which ports to output the sound. And this is essential - MSI 945GT | User Guide - Page 95
4. Recording control Realtek ALC880 Audio Tool Recording device Back Line In/Mic, Front Line In Realtek HD Audio Digital Input Tool Show the following volume controls This is to let you freely decide which volume control items to be displayed. Advanced controls. Advanced control is a " - MSI 945GT | User Guide - Page 96
M S-9632 Workstation Board 5. Recording If you want to use microphone to record, usually the microphone is connected to the MIC jack (the pink one) in the - MSI 945GT | User Guide - Page 97
I/O aims to help you set jacks right. Moreover, other than blue to blue, pink to pink, the way that you used to do, Audio I/O would guide you to other right jacks that can also serve as microphone / speaker / headphone. Speaker Configuration Step 1: Plug in the device in any available jack. Step - MSI 945GT | User Guide - Page 98
M S-9632 Workstation Board Correct Message Assume to plug a headphone in the Green jack at back panel. The icon beside green jack become visible and the dialogue " - MSI 945GT | User Guide - Page 99
Realtek ALC880 Audio Global Connector Settings Click to access global connector settings. 1. Mute rear panel output when front headphone plugged in Once this item is checked, whenever front headphone is plugged, the music that is playing from the back panel, will be stopped. 2. Disable front - MSI 945GT | User Guide - Page 100
M S-9632 Workstation Board S/PDIF Short for Sony/Philips Digital Interface, a standard audio file transfer format. S/PDIF allows the transfer of digital audio signals from one device - MSI 945GT | User Guide - Page 101
Realtek ALC880 Audio Test Speakers You can select the speaker by clicking it to test its functionality. The one you select will light up and make testing sound. If any speaker fails to make sound, then check whether the cable is inserted firmly to the connector or replace the bad speakers with - MSI 945GT | User Guide - Page 102
M S-9632 Workstation Board Microphone In this tab you may set the function of the microphone. Select the Noise Suppression to remove the possible noise during recording, - MSI 945GT | User Guide - Page 103
Realtek ALC880 Audio 3D Audio Demo In this tab you may adjust your 3D positional audio before playing 3D audio applications like gaming. You may also select different environment to choose the most suitable environment you like. B-19 - MSI 945GT | User Guide - Page 104
M S-9632 Workstation Board Information In this tab it provides some information about this HD Audio Configuration utility, including Audio Driver Version, DirectX Version, Audio Controller & Audio Codec. You may also select the language of this utility by choosing from the Language list. Also there - MSI 945GT | User Guide - Page 105
, please complete the following steps: 1. Please install the pinheaders of the front panel according to Chapter 2. 2. Select AC97 or Azalia in the BIOS setting (Chapter 3). 3. If you are using Azalia setting, the microphone function on the front panel is fixed, but the headphone jack will auto - MSI 945GT | User Guide - Page 106
M S-9632 Workstation Board Hardware Setup Connecting the Speakers W hen you have set the Multi-Channel Audio Function mode properly in the software utility, connect your speakers - MSI 945GT | User Guide - Page 107
Realtek ALC880 Audio n 4-Channel Mode for 4-Speaker Output Back Panel 1 4 2 5 3 6 4-Channel Analog Audio Output Description: Connect two speakers to back panel's Line Out connector and two speakers to the real-channel Line Out connector. 1 Line In 2 Line Out (Front channels) 3 MIC 4 Line - MSI 945GT | User Guide - Page 108
M S-9632 Workstation Board n 6-Channel Mode for 6-Speaker Output Back Panel 1 4 2 5 3 6 6-Channel Analog Audio Output 1 Line In 2 Line Out (Front channels) 3 MIC 4 Line Out (Rear channels) 5 Line - MSI 945GT | User Guide - Page 109
Realtek ALC880 Audio n 8-Channel Mode for 8-Speaker Output Back Panel 1 4 2 5 3 6 8-Channel Analog Audio Output 1 Line Out (Side channels) 2 Line Out (Front channels) 3 MIC 4 Line Out (Rear channels) 5 Line Out (Center and Subwoofer channel) 6 Optical SPDIF Out (in 7.1CH / 5.1CH) Description
-
 1
1 -
 2
2 -
 3
3 -
 4
4 -
 5
5 -
 6
6 -
 7
7 -
8
-
9
-
10
-
11
-
12
-
13
-
14
-
15
-
16
-
17
-
18
-
19
-
20
-
21
-
22
-
23
-
24
-
25
-
26
-
27
-
28
-
29
-
30
-
31
-
32
-
33
-
34
-
35
-
36
-
37
-
38
-
39
-
40
-
41
-
42
-
43
-
44
-
45
-
46
-
47
-
48
-
49
-
50
-
51
-
52
-
53
-
54
-
55
-
56
-
57
-
58
-
59
-
60
-
61
-
62
-
63
-
64
-
65
-
66
-
67
-
68
-
69
-
70
-
71
-
72
-
73
-
74
-
75
-
76
-
77
-
78
-
79
-
80
-
81
-
82
-
83
-
84
-
85
-
86
-
87
-
88
-
89
-
90
-
91
-
92
-
93
-
94
-
95
-
96
-
97
-
98
-
99
-
100
-
101
-
102
-
103
-
104
-
105
-
106
-
107
-
108
-
109
 |
 |
945GT Speedster
MS-9632 (V1.X) Workstation Board
G52-96321X1