MSI CR640 User Manual - Page 36
Right Side View
 |
View all MSI CR640 manuals
Add to My Manuals
Save this manual to your list of manuals |
Page 36 highlights
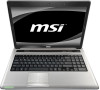
Introductions 2-14 Right Side View 1 2 3 45 1. Audio Port Connectors 2. USB Port 3. Optical Drive Device 4. Power Button 5. Kensington Lock Hole 1. Audio Port Connectors Make high quality sound blaster with stereo system and Hi-Fi function supported. Connect your speakers to the proper connectors as shown below. Headphone out: Used for speakers or headphones. Mic In/Line In: Used for an external microphone. 2. USB Port The USB port allows you to connect USB-interface peripheral devices, such as the mouse, keyboard, modem, portable hard disk module, printer and more.
-
 1
1 -
2
-
3
-
4
-
5
-
6
-
7
-
8
-
9
-
10
-
11
-
12
-
13
-
14
-
15
-
16
-
17
-
18
-
19
-
20
-
21
-
22
-
23
-
24
-
25
-
26
-
27
-
28
-
29
-
30
-
 31
31 -
 32
32 -
 33
33 -
 34
34 -
 35
35 -
 36
36 -
 37
37 -
 38
38 -
 39
39 -
 40
40 -
 41
41 -
42
-
43
-
44
-
45
-
46
-
47
-
48
-
49
-
50
-
51
-
52
-
53
-
54
-
55
-
56
-
57
-
58
-
59
-
60
-
61
-
62
-
63
-
64
-
65
-
66
-
67
-
68
-
69
-
70
-
71
-
72
-
73
-
74
-
75
-
76
-
77
-
78
-
79
-
80
-
81
-
82
-
83
-
84
-
85
-
86
-
87
-
88
-
89
-
90
-
91
-
92
-
93
-
94
-
95
-
96
-
97
-
98
 |
 |

2-14
Introductions
Right Side View
1. Audio Port Connectors
Make high quality sound blaster with stereo system and Hi-Fi function supported. Connect your
speakers to the proper connectors as shown below.
Headphone out:
Used for speakers or headphones.
Mic In/Line In:
Used for an external microphone.
2. USB Port
The USB port allows you to connect USB-interface peripheral devices, such as the mouse,
keyboard, modem, portable hard disk module, printer and more.
1.
Audio Port Connectors
2.
USB Port
3.
Optical Drive Device
4.
Power Button
5.
Kensington Lock Hole
4
3
1
2
5