MSI EX625 User Manual - Page 40
Rear Side View
 |
View all MSI EX625 manuals
Add to My Manuals
Save this manual to your list of manuals |
Page 40 highlights
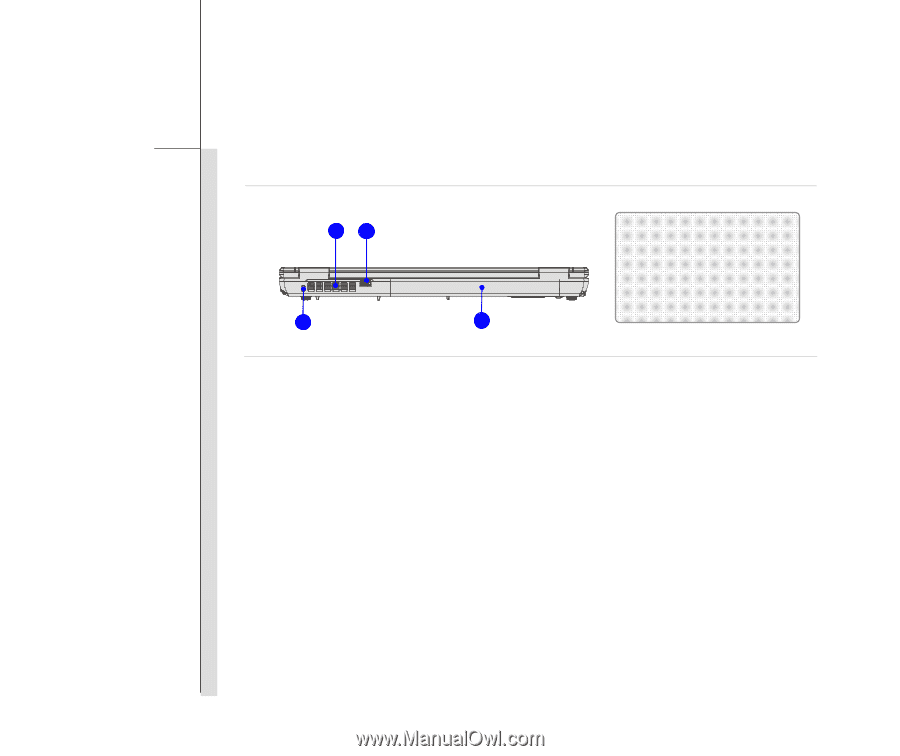
Introductions 2-19 Rear Side View 32 4 1 1. Battery Pack 2. USB Port 3. Ventilator 4. Kensington Lock 1. Battery Pack This notebook will be powered by the battery pack when the AC adapter is disconnected. 2. USB Port The USB 2.0 port allows you to connect USB-interface peripheral devices, such as the mouse, keyboard, modem, portable hard disk module, printer and more. 3. Ventilator The ventilator is designed to cool the system. DO NOT block the ventilator for air circulation. 4. Kensington Lock This notebook provides a Kensington Lock hole, which allows users to secure the notebook in place with a key or some mechanical PIN device and attached through a rubberised
-
 1
1 -
2
-
3
-
4
-
5
-
6
-
7
-
8
-
9
-
10
-
11
-
12
-
13
-
14
-
15
-
16
-
17
-
18
-
19
-
20
-
21
-
22
-
23
-
24
-
25
-
26
-
27
-
28
-
29
-
30
-
31
-
32
-
33
-
34
-
 35
35 -
 36
36 -
 37
37 -
 38
38 -
 39
39 -
 40
40 -
 41
41 -
 42
42 -
 43
43 -
 44
44 -
 45
45 -
46
-
47
-
48
-
49
-
50
-
51
-
52
-
53
-
54
-
55
-
56
-
57
-
58
-
59
-
60
-
61
-
62
-
63
-
64
-
65
-
66
-
67
-
68
-
69
-
70
-
71
-
72
-
73
-
74
-
75
-
76
-
77
-
78
-
79
-
80
-
81
-
82
-
83
-
84
-
85
 |
 |
2-19
Introductions
Rear Side View
1. Battery Pack
This notebook will be powered by the battery pack when the AC adapter is disconnected.
2. USB Port
The USB 2.0 port allows you to connect USB-interface peripheral devices, such as the
mouse, keyboard, modem, portable hard disk module, printer and more.
3. Ventilator
The ventilator is designed to cool the system. DO NOT block the ventilator for air circulation.
4. Kensington Lock
This notebook provides a Kensington Lock hole, which allows users to secure the notebook
in place with a key or some mechanical PIN device and attached through a rubberised
1.
Battery Pack
2.
USB Port
3.
Ventilator
4.
Kensington Lock
3
1
2
4