MSI HETISG41 User Guide - Page 22
System Introduction - hetis g41 e
 |
UPC - 816909061642
View all MSI HETISG41 manuals
Add to My Manuals
Save this manual to your list of manuals |
Page 22 highlights
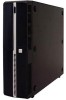
MS-6618 Barebone System Introduction The built-in mainboard (MS-7430) is designed for the Hetis G41 Series Barebone (MS-6618) only. Except the mainboard, the built-in components of the barebone include power supply and system fan. In this chapter, we will show you how to install CPU, CPU Cooler, memory module, hard disk drive, optical disk drive and card reader. Necessary Components 1. CPU 2. CPU Cooler 3. Memory Module 4. Hard Disk Drive (HDD) 5. Optical Disk Drive (ODD) 6. Card Reader Necessary Tools 1. Screwdriver (Crosshead) This can be used to do most of the installation. Choose one with a magnetic head would be better. 2. Pliers This can be used as an auxiliary tool to connect some connectors or cables. 3. Forceps This can be used to pick up tiny screws or set up the jumpers. 4. Rubber Gloves This can prevent yourself from being incised and suffering the static charge. 5. Electric Screwdriver This can be used to lock the stand. Necessary Screws Two types of screws are used in assembling the barebone: Round-headed screw and thumb screw. Round-Headed Screw: This type of screw is used to attach the HDD and Card Reader to the tray. 2-2
-
 1
1 -
2
-
3
-
4
-
5
-
6
-
7
-
8
-
9
-
10
-
11
-
12
-
13
-
14
-
15
-
16
-
 17
17 -
 18
18 -
 19
19 -
 20
20 -
 21
21 -
 22
22 -
 23
23 -
 24
24 -
 25
25 -
 26
26 -
 27
27 -
28
-
29
-
30
-
31
-
32
-
33
-
34
-
35
-
36
-
37
-
38
-
39
-
40
-
41
-
42
-
43
-
44
-
45
-
46
-
47
-
48
-
49
-
50
-
51
-
52
-
53
 |
 |
