MSI P45 NEO3-FR User Manual - Page 103
Installing Driver
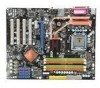 |
UPC - 816909045659
View all MSI P45 NEO3-FR manuals
Add to My Manuals
Save this manual to your list of manuals |
Page 103 highlights
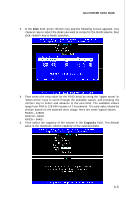
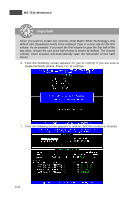
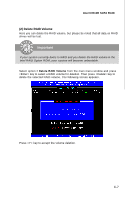
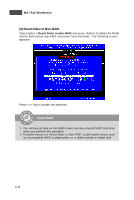
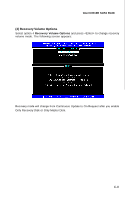
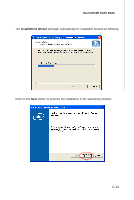
MS-7514 Mainboard Installing Driver Install Driver in Windows Vista / XP / 2000 † New Windows Vista / XP / 2000 Installation The following details the installation of the drivers while installing W indows XP / 2000. 1. W hen you start installing Windows XP and older operating systems, you may encounter a message stating, "Setup could not determine the type of one or more mass storage devices installed in your system". If this is the case, then you are already in the right place and are ready to supply the driver. If this is not the case, then press F6 when prompted at the beginning of W indows setup. 2. Press the "S" key to select "Specify Additional Device". 3. You should be prompted to insert a floppy disk containing the Intel® RAID driver into the A: drive. Note: For W indows Vista you can use Floppy, CD/DVD or USB. Important Please follow the instruction below to make an "Intel® RAID Driver" for yourself. 1. Insert the MSI CD into the CD-ROM drive. 2. Click the "Browse CD" on the Setup screen. 3. Copy all the contents in \\IDE\Intel\ICH10R\Floppy to a formatted floppy d is k e t te . 4. The driver diskette for Intel® ICH10R RAID Controller is done. 4. For W indows Vista: During the Operating system installation, after selecting the location to install Vista click on "Load Driver" button to install a third party SCSI or RAID driver. 5. W hen prompted, insert the floppy disk or media (Floppy, CD/DVD or USB) you created in step 3 and press Enter. 6. You should be shown a list of available SCSI Adapters. This list should include "Intel(R) 82801HEM SATA RAID Controller(ICH8M-E)" when the system is in RAID mode and "Intel(R) 82801HEM SATA AHCI Controller(ICH8M-E)" or "Intel(R) 82801HBM SATA AHCI Controller(ICH8M)" when the system is in AHCI mode. 7. Select the appropriate Intel RAID controller and press ENTER. 8. The next screen should confirm that you have selected the Intel® RAID controller. Press ENTER again to continue. 9. You have successfully installed the Intel® Matrix Storage Manager driver, and W indows setup should continue. 10. Leave the disk in the floppy drive until the system reboots itself. W indows setup will need to copy the files from the floppy again after the RAID volume is formatted, and W indows setup starts copying files. C-10
-
 1
1 -
2
-
3
-
4
-
5
-
6
-
7
-
8
-
9
-
10
-
11
-
12
-
13
-
14
-
15
-
16
-
17
-
18
-
19
-
20
-
21
-
22
-
23
-
24
-
25
-
26
-
27
-
28
-
29
-
30
-
31
-
32
-
33
-
34
-
35
-
36
-
37
-
38
-
39
-
40
-
41
-
42
-
43
-
44
-
45
-
46
-
47
-
48
-
49
-
50
-
51
-
52
-
53
-
54
-
55
-
56
-
57
-
58
-
59
-
60
-
61
-
62
-
63
-
64
-
65
-
66
-
67
-
68
-
69
-
70
-
71
-
72
-
73
-
74
-
75
-
76
-
77
-
78
-
79
-
80
-
81
-
82
-
83
-
84
-
85
-
86
-
87
-
88
-
89
-
90
-
91
-
92
-
93
-
94
-
95
-
96
-
97
-
 98
98 -
 99
99 -
 100
100 -
 101
101 -
 102
102 -
 103
103 -
 104
104 -
 105
105 -
 106
106 -
 107
107 -
 108
108 -
109
-
110
-
111
 |
 |