MSI S270 User Manual - Page 52
Removing the CD
 |
View all MSI S270 manuals
Add to My Manuals
Save this manual to your list of manuals |
Page 52 highlights
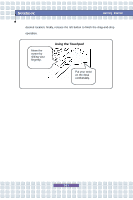
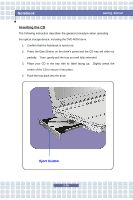
Notebook Getting Started Removing the CD 1. Confirm that the Notebook is turned off. 2. Press the Eject Button on the drive's panel and the CD tray will slide out partially. Then, gently pull the tray out until fully extended. 3. Hold the CD by its edge with your fingers and lift it up from the tray. 4. Push the tray back into the drive. 1. Confirm that the CD is placed correctly and securely in the tray before closing the tray. 2. Do not leave the CD tray open. 2-36
-
 1
1 -
2
-
3
-
4
-
5
-
6
-
7
-
8
-
9
-
10
-
11
-
12
-
13
-
14
-
15
-
16
-
17
-
18
-
19
-
20
-
21
-
22
-
23
-
24
-
25
-
26
-
27
-
28
-
29
-
30
-
31
-
32
-
33
-
34
-
35
-
36
-
37
-
38
-
39
-
40
-
41
-
42
-
43
-
44
-
45
-
46
-
 47
47 -
 48
48 -
 49
49 -
 50
50 -
 51
51 -
 52
52 -
 53
53 -
 54
54 -
 55
55 -
 56
56 -
 57
57 -
58
-
59
-
60
-
61
-
62
-
63
-
64
-
65
-
66
-
67
-
68
-
69
-
70
-
71
-
72
-
73
 |
 |

2-36
Notebook
Getting Started
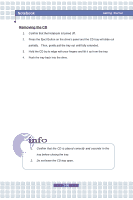
Removing the CD
1.
Confirm that the Notebook is turned off.
2.
Press the Eject Button on the drive
’
s panel and the CD tray will slide out
partially.
Then, gently pull the tray out until fully extended.
3.
Hold the CD by its edge with your fingers and lift it up from the tray.
4.
Push the tray back into the drive.
1.
Confirm that the CD is placed correctly and securely in the
tray before closing the tray.
2.
Do not leave the CD tray open.