MSI Z370 SLI PLUS User Manual - Page 86
Degraded RAID Array, Recovery Volume Options, Missing Hard Drive Member
 |
View all MSI Z370 SLI PLUS manuals
Add to My Manuals
Save this manual to your list of manuals |
Page 86 highlights
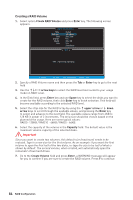
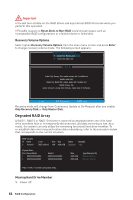
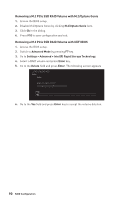
Important y You will lose all data on the RAID drives and any internal RAID structures when you perform this operation. y Possible reasons to Reset Disks to Non-RAID could include issues such as incompatible RAID configurations or a failed volume or failed disk. Recovery Volume Options Select option Recovery Volume Options from the main menu screen and press Enter to change recovery volume mode. The following screen appears: [ RECOVERY VOLUME OPTIONS ] 1. Enable Only Recovery Disk 2. Enable Only Master Disk [ HELP ] Enable Only Recovery Disk - enables recovery disk if available and disables master disk. Enable Only Master Disk - enables master disk if available and disables recovery disk. Actions will result in change from Continuous Update mode to On-Request. [ ↑↓] - select [ESC] - Previous Menu [ENTER] - Select Recovery mode will change from Continuous Update to On-Request after you enable Only Recovery Disk or Only Master Disk. Degraded RAID Array A RAID 1, RAID 5 or RAID 10 volume is reported as degraded when one of its hard drive members fails or is temporarily disconnected, and data mirroring is lost. As a result, the system can only utilize the remaining functional hard drive member. To re-establish data mirroring and restore data redundancy, refer to the procedure below that corresponds to the current situation. RAID Volumes ID Name 0 Volume0 Level Strip Size Status Bootable RAID 1(Mirror) N/A XXX.XGB Degraded Yes Physical Disks: Port Device Model 1 XXXXXXXXXXXXX 2 XXXXXXXXXXXXX Serial # XXXXXXXXXXXXX XXXXXXXXXXXXX Size XXX.XGB XXX.XGB Type/Status(Vol ID) Member Disk (0) Member Disk (0) Press to enter Configuration Utility.. Missing Hard Drive Member 1. Power off. 86 RAID Configuration
-
 1
1 -
2
-
3
-
4
-
5
-
6
-
7
-
8
-
9
-
10
-
11
-
12
-
13
-
14
-
15
-
16
-
17
-
18
-
19
-
20
-
21
-
22
-
23
-
24
-
25
-
26
-
27
-
28
-
29
-
30
-
31
-
32
-
33
-
34
-
35
-
36
-
37
-
38
-
39
-
40
-
41
-
42
-
43
-
44
-
45
-
46
-
47
-
48
-
49
-
50
-
51
-
52
-
53
-
54
-
55
-
56
-
57
-
58
-
59
-
60
-
61
-
62
-
63
-
64
-
65
-
66
-
67
-
68
-
69
-
70
-
71
-
72
-
73
-
74
-
75
-
76
-
77
-
78
-
79
-
80
-
 81
81 -
 82
82 -
 83
83 -
 84
84 -
 85
85 -
 86
86 -
 87
87 -
 88
88 -
 89
89 -
 90
90 -
 91
91 -
92
-
93
-
94
-
95
-
96
-
97
-
98
-
99
 |
 |
