Mackie 32.8Bus Owner's Manual - Page 25
Recording, RECORDING OVERVIEW, SETUP, RECORDING & OVERDUBBING, Using Buses, Monitoring,
 |
View all Mackie 32.8Bus manuals
Add to My Manuals
Save this manual to your list of manuals |
Page 25 highlights
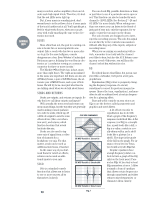
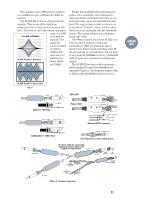
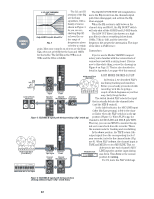
SECTION 4: RECORDING WITH THE MACKIE 8•BUS CONSOLE RECORDING OVERVIEW The recording process can be as simple as one microphone recorded on a monaural tape recorder. Not much advice needed for that. But since you've bought such a large mixing console, we expect you'll occasionally be doing pretty big sessions. This section will describe at least one way of approaching a large session- for example, a big drum set, bass, guitar, piano, scratch vocal and horns, with background vocals and synthesizer overdubs. Let's assume there is a 16-track recorder already patched in to the first 16 Tape In and the 16 Tape Out jacks on the 8•Bus Console. There is a set of Master Tracking, Overdub and Mixdown drawings farther on in this section for general reference. SETUP Okay, now let's get ready for your session. Make a diagram of your studio setup showing mic positioning. Then assign an input channel to each mic. Trying to make your microphone-to-input layout sensible now will avoid confusion later. Group similar instruments together. If there is a left-toright pattern to the mics (like drums mics or a vocal group), keep the same left-to-right sequence on the console. Plan your basic track assignments the same way. It's very confusing to have inputs randomly strewn across a mixing console. Now, normal your console (also called "zeroing"). This means check the position of every switch and every knob to be sure they are in the normal position. Your normal may be different from someone else's, but generally it means all switches off or up, all knobs either all the way down or at their Unity detent. If you are working in a certain mode, say, for example, all AUX 3-4 SHIFT switches in TAPE, this is the time to set them all. Lay a piece of 1/2" or 3/4" white paper tape across the top of the input faders and label all your inputs. (By the way, avoid masking tape. It will slime your console. Take the time to go to an art supply store or a recording supply store and get some better-quality "low tack" tape.) Since your multitrack returns will be coming into the MIX-B inputs on some of the same input strips, you might want to divide your label into multitrack track labeling and input labeling. See TRACKING drawings 1&2 on pages 25 and 26. If you have any careful submixing to do during the recording, you might want to lay strips of 1/4" white paper tape alongside each fader slot (bus faders too, if you need them). Then you can mark your place as you rehearse your fader moves. RECORDING AND OVERDUBBING Using Buses If you have to combine two or more inputs into one output (two trumpets on one track, five drum mics panned across a pair of tracks), you must assign the inputs to a common bus or pair of buses. If you have only one source going to one tape track, you have a choice: you can assign the channel to the bus feeding that track, or you can patch the tape track into the channel's Direct Out. Rationale for using a bus: • It's there, it's easy, it sounds great. • You meet interesting people on the bus. Rationale for using a Direct Out: • You've already assigned all eight of your buses to other duties. • You are a purist and you think you can hear the additional circuitry used in a bus. Monitoring The most straightforward way to monitor during a recording or overdubbing session is by listening to the output of the recorder, played through MIX-B. Properly configured, your recorder will automatically switch between source and playback as you put the deck into stop, play, fast wind, record and so on. That way, you're always hearing your instruments after they travel through the multitrack deck, regardless of whether or not the tape is rolling. MIX-B allows you to set up a custom mix of the tape tracks, independent of your recording levels. You can set level, pan, reverb and even EQ in your monitor mix while you record. You can even patch a cassette recording into the outputs of MIX-B for a rough mix of the session. Both the FLIP and MIX-B SOURCE buttons should be in their up positions. This connects the Tape In amplifier to the MIX-B level control, and MIX-B will monitor the recording machine. Cue Mix Initially, as you are setting up, set the Phones source to the MIX-B selection. This way, the musicians will at least have something to listen to right away so they can tune up and rehearse, 23 RECORDING
-
 1
1 -
2
-
3
-
4
-
5
-
6
-
7
-
8
-
9
-
10
-
11
-
12
-
13
-
14
-
15
-
16
-
17
-
18
-
19
-
 20
20 -
 21
21 -
 22
22 -
 23
23 -
 24
24 -
 25
25 -
 26
26 -
 27
27 -
 28
28 -
 29
29 -
 30
30 -
31
-
32
-
33
-
34
-
35
-
36
-
37
-
38
-
39
-
40
-
41
-
42
-
43
-
44
-
45
-
46
-
47
-
48
-
49
-
50
-
51
-
52
-
53
-
54
-
55
-
56
-
57
-
58
-
59
-
60
-
61
-
62
-
63
-
64
 |
 |
