Mackie MR8mk2 Owner's Manual - Page 7
Front Panel, Description - manual
 |
View all Mackie MR8mk2 manuals
Add to My Manuals
Save this manual to your list of manuals |
Page 7 highlights
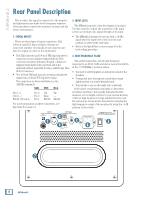
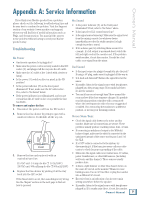
Owner's Manual Conversely, if the mixes are consistently too bright, then adding some additional high-frequency energy in the monitors satisfies your ears, and the resultant mix has less HF content. It's a real rush to mix really loud. But remember that the resulting mix only sounds good when you play it at least that loud. However strange it may sound, mixes made at lower levels sound even better when played loud, perhaps even a bit bigger than life. Get that sound level meter out. Decide what level to mix at and use the meter to help keep mixing at that level. Your ears will thank you, and your mixes will be better for it. 5. POWER SWITCH Switch up to turn the MR8mk2 on. Make sure the level control is down before you turn it on. When the power switch is turned on and the MR8mk2 is plugged into an AC outlet, the power LED on the front of the monitor lights up to let you know the MR8mk2 is ready to go. Press the bottom of this switch to put the speaker into standby mode. It will not function, but the circuits are still live. To remove AC power, either turn off the AC supply, or unplug the power cord from the speaker and the AC supply. 4. LOW FREQUENCY FILTER This switch tailors the overall low-frequency response by +2 dB or +4 dB at 100 Hz. • For most applications, use the "0 (NORMAL)" setting. This takes the equalization circuit out of the signal path. • If a little extra low-frequency output is necessary, use the +2 dB setting. • If even more low-frequency output is necessary, use the +4 dB setting. Remember how things work in reverse, so boosting the deep bass content on playback may actually decrease it in the final mix. 6. MAINS INPUT AND FUSE Connect the power cord to this IEC socket securely, and plug the other end into a live AC outlet. Make sure the AC outlet has the correct voltage indicated next to the IEC socket. The fuse is located behind the fuse cover, at the bottom of the IEC socket. See the "Troubleshooting" section on page 9 for information about replacing the fuse. 7. BASS REFLEX PORT A bass reflex system uses the radiation from the rear of the woofer cone to extend the low-frequency response of the speaker. The size of the port is carefully designed with respect to the volume of the cabinet and the characteristics of the woofer to produce low-frequency extension. Front Panel Description 8. Power Indicator The power indicator lights up when the power switch [5] on the back of the MR8mk2 8 is turned on and AC power is available at the mains input [6]. Owner's Manual 7
-
 1
1 -
 2
2 -
 3
3 -
 4
4 -
 5
5 -
 6
6 -
 7
7 -
 8
8 -
 9
9 -
 10
10 -
 11
11 -
 12
12 -
13
-
14
-
15
-
16
 |
 |
