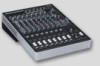
Mackie Onyx 1220i Quick Start Guide - Page 9
Line-level Sources and Guitars
 |
View all Mackie Onyx 1220i manuals
Add to My Manuals
Save this manual to your list of manuals |
Page 9 highlights
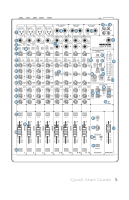
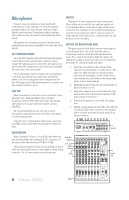
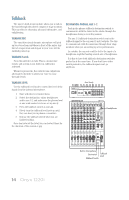
Line-level Sources and Guitars Connect your line-level sources to the 1/4" TRS line input connectors. Channels 1-4 have mono line inputs, and channels 5-12 are stereo. Each line input can accept TRS balanced or TS unbalanced sources. Line-level sources include keyboards, drum machines, electronic drum kits, CD players, iPod® docks, guitar preamp outputs and so on. If you have a mono source and the mono channels are already in use, plug it into the left input (labeled left/ mono) of the stereo channels, and the signal will appear equally on the left and right of the main mix. If you have a stereo source and want to use channels 1 and 2 for example, plug the left side into channel 1, and set the pan control fully-left. Plug the right side into channel 2 and set the pan control fully-right. LINE/HI-Z Engage this switch if you want to connect guitars directly to the 1/4" line inputs of channels 1 or 2. For line-level sources, disengage this switch. To connect guitars to other channels, you will need a DI box, or they will not sound good, particularly the high frequency response. This applies to most mixers and channels in general, unless they have a hi-z switch. LOW CUT Channels 1-4 have a low-cut switch that cuts bass frequencies below 75 Hz. The low cut switch affects the line and mic inputs. EQUALIZATION Mono channels 1-4 have a 3-band EQ, with shelvinglow, peaking-mid, and shelving-high controls. The mid frequency is adjustable from 100 Hz to 8 kHz. Stereo channels 5-12 have a stereo 3-band EQ with shelving-low, peaking-mid, and shelving-high. These EQ options allow a lot of adjustment to your line-level sources and guitars. Apply EQ wisely and carefully, like makeup. (Too much and things can turn ugly.) TAPE IN and TAPE OUT Use these RCA unbalanced stereo inputs to connect the line-level outputs from sources such as tape decks, CD/DVD players and iPod® docks. Engage the tape switch to listen in your control room or phones. Engage "assign to main mix" to add the sounds to the main mix. For example, you can play intermission music, or listen to rare reference material of your band getting it right. The tape output is a copy of the main mix (post fader), suitable for analog recording, sending to the inputs of an external amplifier, or sound card etc. SETTING THE LINE INPUT GAIN The gain controls allow you to set your input signals to an optimum level: not so hot that the mixer is overloaded, and not so low that the signal is lost in noise. For a signal entering the TRS 1/4" line inputs, the adjustment range is -20 dB to +40 dB for channels 1-4, and -20 dB to +20 dB for channels 5-12. Use the following procedure for setting the gain just right: 1. Press the solo switch at the bottom of the channel your source is connected to. The rude solo light will flash to remind you that the source playing in the control room, headphones, and the right main meter is the soloed channel. 2. Play your source at typical loudness levels. 3. Adjust the channel gain control until the right main meter level is hovering around the 0 dB mark (labeled "level set"). 4. Now the gain is set correctly, disengage solo. 5. During a performance, if you notice that the OL (overload) LED next to the channel fader turns on, carefully decrease the gain until OL no longer comes on. Mono Line Inputs Hi-z Low Cut Gain EQ Solo Stereo Line Inputs Tape In/Out 1 ONYX MIC PRE 2 ONYX MIC PRE 3 ONYX MIC PRE 4 ONYX MIC PRE CTRL - RM OUT BAL/UNBAL MAIN OUT BAL/UNBAL ALT 3-4 OUT BAL/UNBAL L R L R L/3 R/4 LINE IN 5-6 LINE IN 7-8 LINE IN 9-10 LINE IN 11-12 TAPE L IN OUT R 1 LINE BAL/UNBAL LINE HI-Z 48V 2 LINE BAL/UNBAL LINE HI-Z 3 LINE BAL/UNBAL 75Hz 18dB/OCT 4 LINE BAL/UNBAL 75Hz 18dB/OCT 48V 48V 48V L (MONO) BAL/UNBAL R L (MONO) BAL/UNBAL R L (MONO) BAL/UNBAL R L (MONO) BAL/UNBAL R PREMIUM ANALOG MIXER w/ PERKINS EQ & FIREWIRE 30 U 20 40 GAIN U 60 -20dB +40dB 30 U 20 40 GAIN U 60 -20dB +40dB 30 U 20 40 GAIN U 60 -20dB +40dB 30 U 20 40 GAIN U 60 -20dB +40dB U GAIN -20dB +20dB U GAIN -20dB +20dB U GAIN -20dB +20dB U GAIN -20dB +20dB SEND PRE POST U EQ -15 +15 1k HIGH 12kHz SEND PRE POST U EQ -15 +15 1k HIGH 12kHz SEND PRE POST U EQ -15 +15 1k HIGH 12kHz SEND PRE POST U EQ -15 +15 1k HIGH 12kHz SEND PRE POST U EQ HIGH 12kHz -15 +15 SEND PRE POST U EQ HIGH 12kHz -15 +15 SEND PRE POST U EQ HIGH 12kHz -15 +15 SEND INPUT LINE U FW 1-2 HIGH 12kHz -15 +15 FREQ 100 8k U MID -15 +15 U LOW 80Hz -15 +15 AUX FREQ 100 8k U MID -15 +15 U LOW 80Hz -15 +15 AUX FREQ 100 8k U MID -15 +15 U LOW 80Hz -15 +15 AUX FREQ 100 8k U MID -15 +15 U LOW 80Hz -15 +15 AUX U MID 2.5kHz -15 +15 U LOW 80Hz -15 +15 AUX U MID 2.5kHz -15 +15 U LOW 80Hz -15 +15 AUX U MID 2.5kHz -15 +15 U LOW 80Hz -15 +15 AUX U MID 2.5kHz -15 +15 U LOW 80Hz -15 +15 AUX CTRL ROOM/PHONES SOURCE MAIN MIX TAPE FW 1-2 ALT 3-4 ASSIGN TO MAIN MIX OO MAX CONTROL ROOM OO MAX PHONES 0dB=0dBu LR 20 CLIP 15 10 6 3 0 2 LEVEL 4 SET 7 10 20 30 RUDE SOLO AUX MASTER SEND RETURN OO OO 1 MAX 2 MAX PAN OO OO 1 MAX 2 MAX PAN OO OO 1 MAX 2 MAX PAN OO OO 1 MAX 2 MAX PAN OO OO 1 MAX 2 MAX PAN OO OO 1 MAX 2 MAX PAN OO OO 1 MAX 2 MAX PAN OO OO 1 MAX PRE POST 2 MAX PAN PRE POST OO OO 1 +15 RTN TO AUX1 2 +15 OO OO 1 +10 2 +10 L R L R L R L R L R L R L R L R POWER Tape Level Set MUTE ALT 3/4 MUTE ALT 3/4 MUTE ALT 3/4 MUTE ALT 3/4 MUTE ALT 3/4 MUTE ALT 3/4 MUTE ALT 3/4 MUTE ALT 3/4 dB dB dB dB dB dB dB dB MIC dB 10 10 10 10 10 10 10 10 10 5 5 5 5 5 5 5 5 5 U U U U U U U U U OL OL OL OL OL OL OL OL 5 - 20 5 - 20 5 - 20 5 - 20 5 - 20 5 - 20 5 - 20 5 - 20 OO MAX LEVEL 5 10 10 10 10 10 10 10 10 10 DESTINATION 20 20 20 20 20 20 20 20 20 30 30 30 30 30 30 30 30 30 40 50 40 50 40 50 40 50 40 50 40 50 40 50 40 50 PHONES AUX 1-2 40 50 60 60 60 60 60 60 60 60 60 OO OO OO OO OO OO OO OO OO SOLO 1 SOLO 2 SOLO 3 SOLO 4 SOLO SOLO SOLO SOLO 5-6 7-8 9-10 11-12 TALKBACK TALKBACK MAIN MIX Quick Start Guide 9
-
 1
1 -
2
-
3
-
 4
4 -
 5
5 -
 6
6 -
 7
7 -
 8
8 -
 9
9 -
 10
10 -
 11
11 -
 12
12 -
 13
13 -
 14
14 -
15
-
16
-
17
-
18
-
19
-
20
-
21
-
22
-
23
-
24
 |
 |
