Magic Chef MCSFS12ST User Manual - Page 7
Operating Instructions
 |
View all Magic Chef MCSFS12ST manuals
Add to My Manuals
Save this manual to your list of manuals |
Page 7 highlights
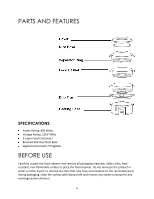
OPERATING INSTRUCTIONS 1. After thoroughly cleaning the unit, begin by filling up the heating base with room temperature water to desired level shown near the LCD panel. 2. Add the Drip Tray, followed by the Food Basket labeled # 1 on the bottom. (See diagram on page 6) 3. Add the Separator Ring afterwards, and sequentially follow the diagram on page 6 of this manual. 4. The Food Basket labeled "1" should be placed on the bottom, followed by "2" on top of "1", and the final Food Basket labeled "3" on top of "2." 5. Please note that not all trays need to be used. When all trays are used, the odor from different foods can transfer to different levels. 6. Wipe the unit dry then plug the cord in the outlet using dry hands on a flat, dry, and stable surface. 7. Depending on stacking level, you can change the amount of minutes needed to cook the food item. Operator must regularly check the status of steaming food item. 8. When finished, wipe each tray and part while disassembling them to wash. WARNING: DO NOT wash or immerse Heating Base in water, use a damp cloth to wipe the heating base only. Carefully store for next use. AUTOMATIC PROGRAMS (1 - 7) 1. Connect the plug to power supply. LCD will display "00:00". 2. Choose the appointed cooking programs by pressing different buttons: Program Number 1 2 3 4 5 6 7 0 Type of Food Rice Chicken Fish Eggs Prawns Vegetables Potato Turn Off Display Reference Time (in minutes) 45 35 23 21 15 25 50 N/A 3. After selecting the cooking program, press "START/OFF" to start cooking. The clock will count down with the indicator on. When the timer counts down to 00:00 on the LCD display, it will beep 4 times with rapidly flashing indicator light, which alerts the operating completion. 7
-
 1
1 -
 2
2 -
 3
3 -
 4
4 -
 5
5 -
 6
6 -
 7
7 -
 8
8 -
 9
9 -
 10
10 -
 11
11 -
 12
12 -
13
-
14
 |
 |
